|
|
Post by sall on Feb 16, 2012 19:54:42 GMT -6
Originally the OEM incandescent bulbs were replaced with blue LEDs. A handful of PnP LEDs and custom LED arrays for the over head lighting. At this time the desire was to have the entire cabin interior lighting match the blue LED Instrument Cluster and Climate Controls. The blue looked 'cool' but provided little to no usable light in the cabin. After looking in to a way to improve the interior lighting for usable light without returning to the yellowish incandescents I ended up with the below for White LED Interior Lighting. There is not a lot of space in the rear overhead lighting so I packed as many 5-Chip as I could which happened to be four. Each LED outputs ~30 Lumens. OEM 194 bulb outputs 25 Lumens. So, plenty more light output out of the four 5-chip LEDs and much better color temp. Nice crisp updated look with plenty of usable light and even than the luxer1 PnP(best you can buy). Small Custom Etched PCB: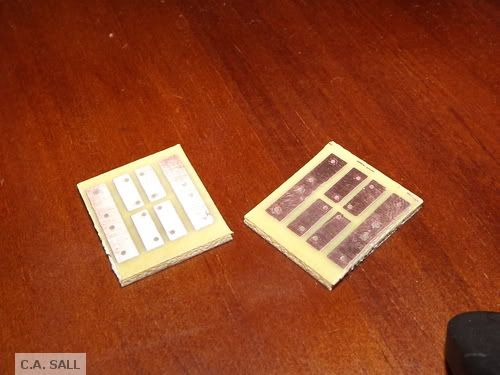 PCB Covered w/ Reflective Material(To Blend into OEM reflector) PCB Covered w/ Reflective Material(To Blend into OEM reflector)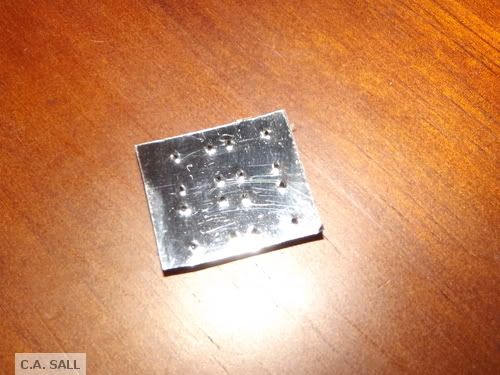 PCB Populated with LEDs: PCB Populated with LEDs: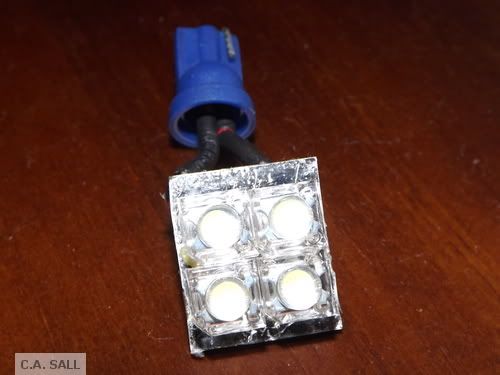 Front Overhead(Six LEDs here, any more equal overkill haha): Front Overhead(Six LEDs here, any more equal overkill haha):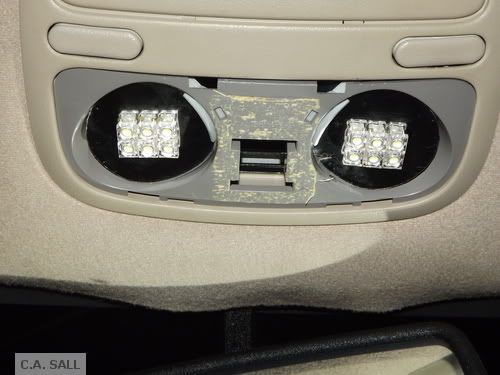 Output Shot: Output Shot: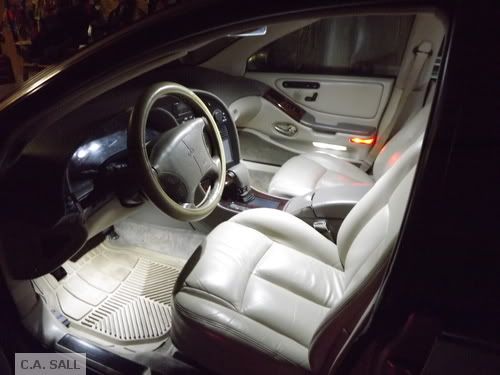 There is also PnP 74 LEDs in all the door lights to keep the color temp the same. Those are simple to replace though. I'm a fan of some PnPs but not for exterior safety devices. The PnP for overhead just were not up to snuff. You also will not get good output with PnP overhead because the bulb fires up into a reflector. You can alter this though and make them fire down just as a note. Next up is the installation of the most recent gauge cluster lighting and eventually white HVAC. No more blue... 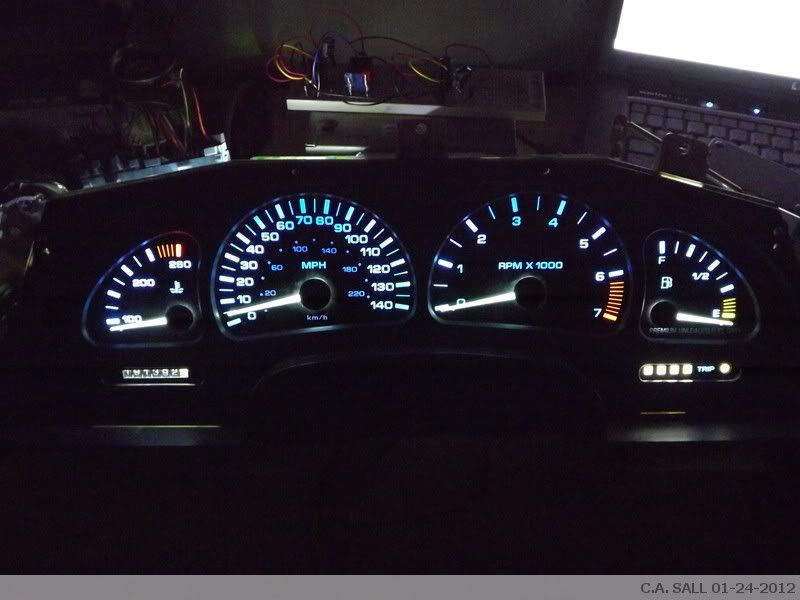 Just example not completed. Comments welcome! ;D |
|
|
|
Post by nelson480 on Feb 16, 2012 20:17:13 GMT -6
That cluster looks nummy.... Mmmm
|
|
|
|
Post by wireless on Feb 16, 2012 20:41:34 GMT -6
i love your aurora so much.
|
|
|
|
Post by nelson480 on Feb 16, 2012 20:49:49 GMT -6
way to go with the perfect seats too. How did you manage that?
|
|
Paulaurora
Super Moderator 
Posts: 3,828
Staff Member
|
Post by Paulaurora on Feb 16, 2012 20:57:15 GMT -6
man u good
|
|
|
|
Post by lkraft92 on Feb 16, 2012 22:25:50 GMT -6
those leds overheads look awesome. i have been wanting to convert my lights to led for a while, and i cant wait to see the gauges finished.
|
|
bobsblue95
Super Moderator
Scars of pleasure, scars of pain. Atmospheric changes make you sensitive again.
Posts: 3,125
Staff Member
|
Post by bobsblue95 on Feb 17, 2012 6:55:14 GMT -6
Good job. Are those overheads on a dimmer? Kinda bright for my taste.
I inverted my overhead bulbs when I installed the PNP white bulbs and I like it, but the PNP resistors are underrated and overheating so I'll have to redo it soon.
|
|
|
|
Post by sall on Feb 17, 2012 9:26:53 GMT -6
Thanks for the compliments fellas!
Haha I don't know Nelson. Previous owner helped me out a lot there. The seats aren't perfect but are in really good condition. Work hard to keep 'em that way haha.
Bob there is not a dimmer or PWM for the overhead lights. For me they are perfect. If you are making a custom array choose the resistor you think looks best with amount of LEDs you like. I test everything on a breadboard before making the board, etc.
Glad you figured out how to invert the bulbs up front. It certainly helps output tremendously. I just filled the cavity with wire and inverted the connector. I'm okay with some PnP LEDs but pick them very carefully. I would prefer to do it all custom but some times space is too limited. I would recommend the Luxer1 brand bulbs for PnP although pricey. Philips has some out now as well but haven't personally tested them.
|
|
|
|
Post by Mr. Javi on Feb 23, 2012 10:18:35 GMT -6
Looks good. Great job.
|
|
|
|
Post by nelson480 on Feb 23, 2012 11:02:32 GMT -6
How does the theatre dimming work with LeDs
|
|
XJSman89
Administrator 
Posts: 6,309
Staff Member
|
Post by XJSman89 on Feb 24, 2012 2:41:08 GMT -6
Where do you get your PCBs from?
|
|
|
|
Post by beastboy1976 on Feb 24, 2012 7:41:06 GMT -6
Wow Sall that looks truly beast. I love it. We have alot of incredible talent on this forum.
|
|
|
|
Post by sall on Feb 24, 2012 8:58:34 GMT -6
Where do you get your PCBs from? From my mind haha. They are custom PCBs just like the LED clear corners, tails and finish panel and license plate lamps among other various projects. From scratch they are pieces of copperclad board cut/trimmed for the circuit. The circuit is designed in software such as Eagle, PCBExpress, etc. You then print that circuit on a piece of Press-N-Peel(honestly, I use magazine paper) with laser printer(Cannot be inkjet) and transfer it the copperclad board via heat source(iron/laminator). Soak in water and peel paper off. All paper will peel except the circuit. It will be stuck to the copperclad. Then you etch the circuit in mixture of 1 part Muriatic Acid and 2 parts hydrogen peroxide. The etchant eats all bare copper except what is covered which is the circuit. Drill holes and solder components. Done. It's not that complicated really. Especially once you do it few times, learning curve for everything. Wow Sall that looks truly beast. I love it. We have alot of incredible talent on this forum. Thanks beast! |
|
XJSman89
Administrator
Posts: 6,309
Staff Member
|
Post by XJSman89 on Feb 24, 2012 11:54:24 GMT -6
Doesn't sound too hard. Would you mind posting where you get materials from? Acids, PCB material, etc?
What circuit design program do you use? Is it just a CAD program? I use SolidWorks 2012, I suspect that would work well enough as I have printed ply cutouts for carbon layup from it before but something specialized would be nice. I'd like to give it a try myself.
|
|
|
|
Post by sall on Feb 24, 2012 12:42:38 GMT -6
Doesn't sound too hard. Would you mind posting where you get materials from? Acids, PCB material, etc? What circuit design program do you use? Is it just a CAD program? I use SolidWorks 2012, I suspect that would work well enough as I have printed ply cutouts for carbon layup from it before but something specialized would be nice. I'd like to give it a try myself. The copperclad board can be purchased on eBay in various sizes. I have a lot of scrap pieces left over from LED Rear Deck project. Otherwise I would just use perf/vero board as mentioned previously. You can get Muriatic Acid at Lowes, Home Depot or your local pool and spa retailer. It's used to etch concrete or adjust pH in pools. I use it in my pool so it's always around. Hydrogen peroxide --- I'm sure you have this! Alternatively you can buy the etchant at RS for $10 for a small amount. You need to make sure you etch in a plastic or glass container and don't breathe in the fumes. Be careful how you dispose of the etchant it has the potential to eat your copper pipes if not diluted enough. The most important factor is you need to understand the circuit and how to translate it to the PCB software. These circuits for overhead lamps are simple though. Some people use CAD to do it but I prefer dedicated software(PCBExpress). There are tons of them out there. Overall is pretty straightforward but lots of margin for error. I'm saving up for a small CNC machine though. ;D |
|
XJSman89
Administrator
Posts: 6,309
Staff Member
|
Post by XJSman89 on Feb 24, 2012 15:03:31 GMT -6
Haha the CNC is great, we have a Mazak in the shop. You wouldn't believe the parts that come off of that thing.
|
|
XJSman89
Administrator
Posts: 6,309
Staff Member
|
Post by XJSman89 on Jun 13, 2012 7:52:20 GMT -6
|
|
XJSman89
Administrator
Posts: 6,309
Staff Member
|
Post by XJSman89 on Jun 13, 2012 7:56:11 GMT -6
Hey Sall I know you don't like sharing designs (lol) but would you mind throwing up a wiring diagram or even better, a PCB file? I'd like to try it but am not sure where to start on the design. How did you get it to plug into the overhead? Or is it just hardwired in?
You can put your name on the PCB, I won't change it. I'll even take a picture to prove it once I make them. ;D
|
|
|
|
Post by sall on Jun 13, 2012 13:34:11 GMT -6
Hey Sall I know you don't like sharing designs (lol) but would you mind throwing up a wiring diagram or even better, a PCB file? I'd like to try it but am not sure where to start on the design. How did you get it to plug into the overhead? Or is it just hardwired in? You can put your name on the PCB, I won't change it. I'll even take a picture to prove it once I make them. ;D It is is either 3 or 4 LEDs in a series with a current limiting resistor. The resistor used depends on the specs of the LEDs you use. 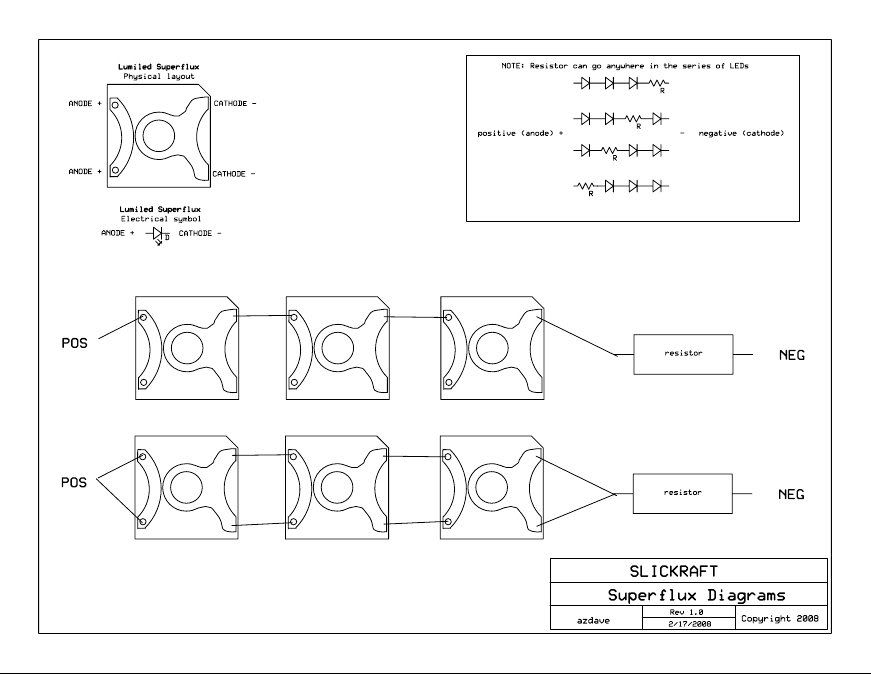 The design I used is pictured in the first post. You could replicate it easily with a Sharpie by hand on perfboard. They are custom PnP. Use a 194 bulb base and plugs right in. No sense in hacking up wiring. |
|
tim1993
Aurora Driver
 99 Oldsmobile Aurora 4.0L V8
|
Post by tim1993 on May 3, 2013 20:41:53 GMT -6
Nice man I like how the gauges on the dash looks
|
|
tim1993
Aurora Driver
99 Oldsmobile Aurora 4.0L V8
|
Post by tim1993 on Jun 24, 2013 15:52:40 GMT -6
I have two blue 12" flexi LED strips need a lil help on how to install
|
|
|
|
Post by renaldo0613 on Jul 5, 2013 21:45:29 GMT -6
I have two blue 12" flexi LED strips need a lil help on how to install Very easy. The come with a (-) and a (+) wire. Strip em, and wire them in where ever you want them. You should start another thread with your topic. |
|
|
|
Post by sall on Nov 1, 2013 14:58:57 GMT -6
Re-doing these soon. Got my hands on a batch of Nichia superflux  Chyea! They will be here tomorrow. |
|
 Forum")


 Chyea! They will be here tomorrow.