fatjock
Aurora Groupie
 Reality is an illusion caused by lack of alcohol
|
Post by fatjock on Mar 30, 2010 11:06:21 GMT -6
Thanks. Now that I know how to actually use pics on here, hopefully, my posts will improve! ;D |
|
fatjock
Aurora Groupie
Reality is an illusion caused by lack of alcohol
|
Post by fatjock on Apr 2, 2010 13:39:12 GMT -6
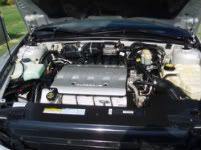
So, with Good Friday being a day off for me, but not my wife, I had the opportunity to spend some time on my Aurora, so I converted my air intake to a cold air intake. I apologize for not having comparable pictures from the same angle, but I forgot to take one before I started work, and so had to use an old pic for the "Before" shot. So. Old air Intake, E-bay special 3" pipe, K&N cone filter.  I moved the filter down into the wheel well,  and used the "old" 3" pipe to come through the lower hole then ninety degrees to the left. This still let me use the MAF sensor mounting in it.  Then to connect to intake manifold I used 4" flexible Dryer outlet hose, cut to size, and modified the union pieces at either end to suit the dimensions other than it was meant for, to produce the final thing.   The beauty of doing it this way, is that if it makes no difference, I can put it back to the way it was easily. I haven't driven it much yet, but will report any changes in performance or economy I notice when I have. |
|
XJSman89
Administrator 
Posts: 6,309
Staff Member
|
Post by XJSman89 on Apr 2, 2010 13:46:40 GMT -6
I did this to mine using an aluminum tube and filter in the fender and two doctored OEM tubes in the engine bay. With that kind of duct I would be worried about it getting too hot... It would defeat the point of making it a CAI to some degree wouldn't it? The rubber OEM tubes are better insulated.
|
|
fatjock
Aurora Groupie
Reality is an illusion caused by lack of alcohol
|
Post by fatjock on Apr 2, 2010 14:31:28 GMT -6
I did this to mine using an aluminum tube and filter in the fender and two doctored OEM tubes in the engine bay. With that kind of duct I would be worried about it getting too hot... It would defeat the point of making it a CAI to some degree wouldn't it? The rubber OEM tubes are better insulated. I agree. But by the time I wasn't happy with the design, I was too far into it not to finish and see what happens. So I'm looking at it as the "Mark I". For the Mark II, I was thinking of just trying a bigger filter (4" outlet), a similar dryer duct all the way, and building a heat shield, or a plastic 4" duct if I can find it. The only question then is the sensor mounting. By the time I get Mark IV, or V, I'll probably end up with OEM tubes, and a different filter, but whatever way it ends up, it's fun playing with it. |
|
fatjock
Aurora Groupie
Reality is an illusion caused by lack of alcohol
|
Post by fatjock on Apr 10, 2010 18:31:40 GMT -6
So this week, I'm really happy. I've improved the feel, the handling, and the appearance of my Aurora in one fell swoop. All it took was a three hours and a credit card. Before shot.  After shot.  Detail shot.  I've switched from standard aluminum 16" x 7"rims, with a mixture of 225/60/16 tires, to SC 18" x 7.5" chromed rims, with Michelin MXV 245/45/18 tires. To which I added an E-b ay special of 4 Aurora logo valve caps. The improvement to the appearance is self explanatory from the above, but the other changes are more subjective. To me, the wider, lower profile tires give the steering a slightly heavier feel, but really make the car feel more planted, more stable, and less disconnected. It also has a different feel over small road imperfection, and seems to better damped over these. Of course, all these are purely subjective, but what it all adds up to is...........I really, really like it! ;D ;D ;D ;D ;D ;D ;D |
|
fatjock
Aurora Groupie
Reality is an illusion caused by lack of alcohol
|
Post by fatjock on Apr 22, 2010 8:32:08 GMT -6
So things have been fairly quiet for the last couple of weeks.
The aurora is running well, and I really do like the effect the new wheels and tires have had on the feel, and the handling, as well as looking much better IMHO.
SO I think it's back to the Cold Air Intake this weekend, and I may look at replacing the metal duct for the OEM one, (for thermal conductivity reasons) and see how that goes.
While my paint doesn't look too bad from a distance, close up a lot of small defects are obvious. Due to the nature of the Pearl paint, touch-up is out, so I'm pretty much looking at having the whole car done.
One idea I'm playing with, is to experiment with colors. Maybe taking it to Maaco, to get a cheap-ass exterior flash-coat on it , to see how a particular color looks. Try it for a few months, and if I don't like it, go with something else. Then when I find the color I really want, have it done properly (Door Jambs, trunk surround, etc. included).
Having said that, I must admit the pearl white is growing on me, but it's just a little too "plain Jane". So if I get this re-done, I'm toying with ways to brighten it up a bit, without going ridiculous.
Maybe a graphic (I'll admit I like the idea of a large Aurora logo on the hood), or a shading on the side to emphisize the curves.
Anyway, I'm open to suggestions if anyone has ideas.
|
|
|
|
Post by aldrichd on Apr 24, 2010 21:34:33 GMT -6
If Pearl White is to plain for you there is a whole world of colors to choose from. Good luck with your choice.
|
|
fatjock
Aurora Groupie
Reality is an illusion caused by lack of alcohol
|
Post by fatjock on Apr 25, 2010 17:25:19 GMT -6
So today I took out the MAF screen (per the thread on the performance forum). aurorah.proboards.com/index.cgi?board=Zoom&action=display&thread=20166&page=2I had thought of using the original Air intake hose to go from throttle body to Aluminum tube I have passing through from the wheel well, but it wouldn'dt conform to the shape I needed, so I elected to leave things as they are for now. When I originally went from the stock air-box to the E-bay special, I definitely noticed a much more rapid throttle response, and perhaps it felt a bit tiny bit more lively, but not by any appreciable amount. When I switched set-up to be closer to a true cold air intake, by placing the cone filter in the wheel well, The throttle response worsened, and I missed the immediate response. So when I read the thread on the performance forum about removing the MAF screen, and read Lance reporting a faster throttle response, I figured I'd give it a try. Since I had the intake hose off anyway, it was a simple as running a knife around the edge of the screen, removing the main screen area, then carefully cleaning loose articles, debris, etc. from the throttle body intake. Total time of less than 10 minutes. Then I just put the hose back on, and went for a test drive. This mod may not be for everyone, but it works for me. The recent warm-up had showed that the drivers door air duct was cooling the inside of the door very well, but only a small percentage of the air-flow was making it through to the vent. So while I was in the car, I pulled the door panel, and found that this was just a case of the duct, and switch/vent unit becoming disconnected. It looked like the switch unit had been pulled, and not refitted correctly (it was a little loose before as well). SO it was a simple matter to click them back together. With the door panel back on, not only was the vent now fully operational, but the switch panel was no longer loose. So a quick fix, with good results. For anyone in the same position, there is an excellent write-up with pictures on the panel removal in the Electrical repairs "how-to's" for window motor replacement. |
|
fatjock
Aurora Groupie
Reality is an illusion caused by lack of alcohol
|
Post by fatjock on Apr 25, 2010 17:26:46 GMT -6
If Pearl White is to plain for you there is a whole world of colors to choose from. Good luck with your choice. Yaeh, as I said, I may try a few, before deciding finally.........if I do, I'll post pics of each.  |
|
|
|
Post by lanceslambos on Apr 25, 2010 18:06:43 GMT -6
so by putting the filter in the fender your performance got worse? then you cut out the screen and got it back? nice
|
|
fatjock
Aurora Groupie
Reality is an illusion caused by lack of alcohol
|
Post by fatjock on Apr 25, 2010 18:17:49 GMT -6
so by putting the filter in the fender your performance got worse? then you cut out the screen and got it back? nice When I had the Kit in, although I was pulling warm air, the journey from filter to Tb was short, and with a single bend. So throttle response was really good. When I put the filter in the wheel well, the air run is longer, with three bends, and I think this what cost the response time. Removing the screen improved things, but as of yet, I'm uncertain whether it has made up for all that was lost. The Intake, is an ongoing project, and I may yet go back to the kit as it was, and have a heat shield made. To hopefully have a short intake path, and cold air. I'll update next week once I've put more miles on it. |
|
|
|
Post by lanceslambos on Apr 28, 2010 11:31:59 GMT -6
|
|
fatjock
Aurora Groupie
Reality is an illusion caused by lack of alcohol
|
Post by fatjock on Apr 30, 2010 10:55:33 GMT -6
I'm still not happy with the intake.
Heat soak on the piping is definitely an issue, but I'm not really satisfied that having the filter where it is makes a significant difference.
I think so far, the best results I had were with the "Warm Air Intake", just with the kit as supplied. It's a possibility that the shorter run to the TB is of more benefit than the colder air (relative term, when you live in South Florida, and it's 90+ ambient, it's only ever going to be a warm air intake, regardless!).
I need to rethink, and may just go back to the WAI while I decide.........but it's not over with this. I may even go back to the standard box with K&N, while I think.
Anyway, on another tack, I have an SES indication as of yesterday afternoon. So I need to see about having the codes pulled this weekend, and find out what's going on.
|
|
fatjock
Aurora Groupie
Reality is an illusion caused by lack of alcohol
|
Post by fatjock on May 5, 2010 8:12:51 GMT -6
Found a good deal at Advance Auto Parts this weekend, who had a $187 OBDII scanner on sale for $94, so I had to have it. Scanned the codes in the parking lot, and sure enough, it came up as an IAT sensor Cct. High. Reset, but the same code came back within 10 minutes. So I put the intake back to as purchased from E-bay,  and reset the code again. Hasn't come back since. Now I'm back to sucking hot air, as opposed to previously where I was sucking lukewarm, and then heating it up on the way to the TB. I may investigate having a custom heat shield made, and piping, or blowing, cooler air to the filter. Jury is still out. The reward may not justify the effort, but what the hey, it is a project car after all, and that would make it fairly unique. But it may stay as it is for a while. Seen an ad last night, saying MAACO has a sale, so I may start experimenting with color........but there's other things I want to do as well, which may take priority. I guess we'll see what happens. |
|
Jimmy B
Aurora Newbie
BANNED MEMBER
|
Post by Jimmy B on May 5, 2010 8:50:40 GMT -6
K&N drop in and air box mod best thing you can do.
I hardly ever hear of a good ending come out of a Maaco paint job. The ones I have heard about that went well the owner did the prep work. Single stage paint... you get what you pay for...
|
|
fatjock
Aurora Groupie
Reality is an illusion caused by lack of alcohol
|
Post by fatjock on May 9, 2010 12:32:02 GMT -6
K&N drop in and air box mod best thing you can do. I hardly ever hear of a good ending come out of a Maaco paint job. The ones I have heard about that went well the owner did the prep work. Single stage paint... you get what you pay for... Didn't do the air-box mod, but had a K & N in, before fitting this. I may go back to that, and then to the Air box mods. Still debating it internally. As far as Maaco, I was intending to do all my own prep work, and just using it to try colors out, until I get one I really like, and then get a "real" paint job. Having said that, I did have a good experience with a Maaco in Georgia, when I had my daughters SUV done. That was a two stage, costing four figures, but Five years on, it still looks good. Though I too have heard many horror stories. I'm just loathed to spend the big bucks for a real good job, then a month down the line, decide I don't like the color. So if I can get something that looks good for a few months, such that I can decide if I can live with the color, I'm happy with that. Then it's just a case of finding the bucks to get it done right! |
|
fatjock
Aurora Groupie
Reality is an illusion caused by lack of alcohol
|
Post by fatjock on May 27, 2010 10:32:54 GMT -6
All has been well for a little while, until earlier this week when on the journey home I got a "low coolant level warning". Having only just set-off, I decided to pull over and investigate. I found a coolant leak from the top of the radiator. At the extreme drivers side, up under the cop cover somewhere. It wasn't a huge leak, but it was persistent. Nevertheless, I figured I could make it home, so I got back in, windows down, heater kicked up to 90 at full blast, and limped my way home, and stayed below about 230 degrees. So I was all depressed, thinking I'd have to change the Rad. So I took the Envoy in the next day to keep the Aurora cool, and started work when I got home. I took the top radiator cover off (using the "How to" for the Radiator change, thanks blue97olds.), and this is what I found:  In better perspective:  So a quick trip to Advance, $4 for a pack of replacement blanks, $15 for Dex-Cool, & $10 for Water Wetter, And I was ready to get her going again. Being a safety kind of a guy, I double fitted the condom:  Then in with the water wetter, and top up the coolant (brought it up to 200 with the cap off, heater blowing hot, topping up as necessary). Since then she's been good as gold. No loss of fluid, but she does seem to be running a little hotter than before, by about 5-10 degrees, but rarely (has to be 90+ ambient, and stuck in traffic) sees the wrong side of 220, and then visibly improves once the fans kick into high speed. She used to run at around 195-210, now it seems to be 200 - 220 most of the time. |
|
fatjock
Aurora Groupie
Reality is an illusion caused by lack of alcohol
|
Post by fatjock on May 27, 2010 10:49:27 GMT -6
BTW..........forgot to say before, I just got a spare trunk lid panel off E-bay for $100, so I'm going to be doing the rear LED Mod soon.
Always wanted to do it, just bothered about no back-up if things went awry. Now I have back-up, it's gonna get done.
Color me Happy! ;D
|
|
fatjock
Aurora Groupie
Reality is an illusion caused by lack of alcohol
|
Post by fatjock on Jun 14, 2010 5:43:05 GMT -6
This week I got round to completing the rear panel LED mod. For the most part, I followed the sticky instructions, with a couple of differences. First, I bought a spare panel, which not only allowed me to work on one, while the other was on the car, and secondly I used different sized LED strips, in a slightly different pattern. Having read some comments about having to be careful since the cut-outs to accomodate the LED strips weaken the structure of the panel I decided to initially try with smaller strips. I got my LED strips at Advance Auto parts, and while they may not have been the cheapest available, they could easily be cut, or extended, and thus gave me the flexibility I needed. Another advantage of these was that tey came with a battery pack and test button wired, so I could see how they looked as I worked. So I got 4 x 12" Red LED strips, at $25 for a 2-pack. My intention was that if 12" was enough, I'd use two top and two bottom, If I needed to extend, I'd use one pack on top, with the second as extension pieces, and then get a third (which I could again extend from the sewcond pack) for the bottom. Going from others experiences I planned to have the top two as regular rear lights, and the bottom two wired into the brakes. I figured that I'd try two 12" strips in the top, and if I didn't like it, I could extend them. So I marked and cut two 12" slots in the top (centered on each side), test fitted the strips, and waited for darkness. When I'd viewed them I was happy with the light pattern, and decided to put the other two on the bottom. Once these were done I wasn't too happy with the way I could get them to lie in the slots, and since they had Self-adhesive backing, I decided to attach them to a strip of duct-tape, which I could then adhere over the slots, to have them sit level. So I throroughly cleaned the panel, fitted the duct-tape along one side of the slot, attached the strips to the tape, and then closed the tape over the slot. When I was happy with the testing, I then siliconed over the entire area of the tape (Paying particular attention to the edges) to seal. After that it was simply a matter of swapping out the two panels running the wires, and connecting into the rear lights. Below is the result, by day, and night.  And darker.  Overall, I'm happy with the way things went, but once I'd seen it on the vehicle I realized that the inensity on the rear panel was less than on the regular lights. So maybe I should have went full length. But I'm pleased to have got it done, and very pleased with the improvement it gives. I'll try to get some shots with the brake lights, but for that I'll need an assistant from the audience, so it'll have to wait until my wife will help out. |
|
fatjock
Aurora Groupie
Reality is an illusion caused by lack of alcohol
|
Post by fatjock on Jun 28, 2010 19:13:38 GMT -6
So things have been tootling along nicely for a little while, then I begin to notice a mild grinding noise from the front Drivers side brake.
So far I have no loss of braking power, nor are the brakes pulling, but it doesn't sound good. A quick inspection (with the wheels still on) show a greaer build up of debris on this wheel compared to any other, and the disc looks well worn.
I had been debating whether to do anything with the brakes anyway, so I think I'll slap some new discs and pads all round. I have some vacation coming in July, and will probably get it done then...........so now to E-bay to see if I can find some suitable ones.
|
|
tka420
Aurora Passenger
 Bring it Back
|
Post by tka420 on Jul 11, 2010 16:51:11 GMT -6
Sounds like you have a frozen caliper. Its not retracting letting the pads rub, try pushing the piston back into the caliper might free it up for a bit, but it needs to be replaced
|
|
fatjock
Aurora Groupie
Reality is an illusion caused by lack of alcohol
|
Post by fatjock on Jul 12, 2010 17:40:43 GMT -6
I figured along the same lines. I got a full set of rotors and pads, which I intend to fit at least the fronts tomorrow, so I will be pulling the caliper and examining then. Hopefully by exercising, I can free it up enough, but if not, it'll have to be replaced. With a bit of luck, I can get a replacement for the weekend, when I plan on finishing off the rears. Thanks for your input, I appreciate it. Having barely driven the car for two weeks because of this, I'll be glad when it gets back to daily driver duties!  |
|
tka420
Aurora Passenger
Bring it Back
|
Post by tka420 on Jul 13, 2010 17:01:23 GMT -6
No problem, I've only had this problem once out of my three Aurora's so they seem to be well made.
I hear you on the driving duties, nothing compares to rollin in the rora
|
|
fatjock
Aurora Groupie
Reality is an illusion caused by lack of alcohol
|
Post by fatjock on Jul 13, 2010 17:45:30 GMT -6
Got things going today, but one seized bolt stopped me from getting everything apart on the troubled wheel. So I'm bringing some other tools home from work (including my electric Impact driver) to take care of that tomorrow.
That being said, I did get the pads out, and found where the problem lay!!
I'm thinking that when I bought the car earlier this year I should have paid maore attention to the brakes than "Well everything seems to be working there for now!"
The outermost pads were badly worn, innermost pads, non-existant.
I've only done 2000 miles on it since I bought it, but I have to take the responsibility for not checking these better before.
Oh well, new rotors and pads are going on all round, and I think I'll have the fuid changed as well. that should improve things.
On the good news front, the piston wound back in okay with no issues, so I don 't anticipate any issues with that, but I'll keep a wary eye on it for a while, just in case.
Also, with the wheel off, I noticed the hose clamp missing on the drive shaft CV joint boot at the gearbox end, so I'll re-pack that with grease, and fit a new clamp while I'm in there tomorrow.
Anyway, I anticipate getting at least the front axle done tomorrow, which should allow me to have her back in service, and then do the rear axle at the weekend.
I'll post pics, including the nasty pads and rotor when I do a full write up.
|
|
fatjock
Aurora Groupie
Reality is an illusion caused by lack of alcohol
|
Post by fatjock on Aug 3, 2010 5:05:18 GMT -6
I've been busy at work and out of things for a couple of weeks, so this is a quick update.
With the brakes, I got new pads in the front, but couldn't get the rotors off. Three out of four bolts on the caliper brackets don't want to give up (I guess they've been on there for eleven years now, and so are quite attached). Penetrating oil made no difference at all, so the next step is to try heat. But I haven't got round to this yet, as I said, busy at work.
Anyway, with the new pads in the brakes are working just fine, and nicely quiet. I still need to get round to doing those rotors (Since I've got them now anyway), and I think it's about time for a fluid change, but having seen how the retaining bolts were, I might leave attacking the bleed nipples to the pros!
The Drive shaft CV joint boot has been re-packed with grease and refitte, with all looking good there when inspected.
Other than this a recent fluid level check found my transmission fluid to be low, which I found surprising, but gave me the opportunity to add a bottle of Lucas Additive to the tranny.
Currently, she's purring like a kitten, and back to being the daily driver.
Having said that, there's still an oustanding list that has to be done before I can get back to the cosmetics.
|
|
nice95
Aurora Driver
my new, old, (old/new?), go to work car
|
Post by nice95 on Aug 10, 2010 14:23:37 GMT -6
sounds like a heck of a project, but should be well worth it once you get it done
|
|
fatjock
Aurora Groupie
Reality is an illusion caused by lack of alcohol
|
Post by fatjock on Oct 18, 2010 9:56:23 GMT -6
Okay, so I've been absent for a while.
I've been really busy at work, and a lack of cash has delayed any more work on my baby.
But suffice to say that she's still running well, no probklems for quite a while, and pretty much a daily driver.
So that's good news really.
|
|
|
|
Post by aldrichd on Oct 21, 2010 23:00:54 GMT -6
Thanks for the updates.
|
|
fatjock
Aurora Groupie
Reality is an illusion caused by lack of alcohol
|
Post by fatjock on Apr 12, 2011 13:26:38 GMT -6
So now that winter has come and gone, there's still no change really.
I still don't have enough spare cash to advance the project (and with premium gas at over $4/gallon, don't know when I will), my Aurora is still running great, and acting as an almost daily driver.
But I must make a confession, and say that I am considering abandoning the project, in favor of something with two less wheels, and much less gas consumption.
I'll keep you posted.
|
|
|
|
Post by kyngofpop on Apr 12, 2011 19:04:08 GMT -6
Gr8 thread and keep us updated man.
|
|
 Forum")