|
|
Post by sall on May 20, 2012 12:56:53 GMT -6
Very interesting. Glad you told me to search for your thread! Too bad the OEM mount/insert is no longer available via GM(at least any online dealers I have found) so this is about the only method for a new mount insert. So ~$40 and a bit of work can have a new torque-axis mount. This needs stickied!!!
Hopefuly genone can get an extra torque-axis mount for me and I'll get down to this along with the idler and belt tensioner replacement. I bet most of these torque-axis mounts are showing wear much like other motor and trans mounts.
|
|
|
|
Post by sall on Jun 4, 2012 18:37:16 GMT -6
A fellow member here Bobsblue was kind enough to sell me his spare TAM. So, I will be doing this project once the Bonneville mount arrives. I will be certain to supplement your write-up with some extra pictures of the process once finished. Although seems to be fairly straight forward.
|
|
|
|
Post by sall on Jun 8, 2012 15:50:23 GMT -6
Alright. I was able to start this project this afternoon and remove the insert out of the Bonneville TAM rather easily. Here are some pictures explaining the process. The insert is from the front right motor mount found on these vehicles: BUICK LESABRE (1992 - 1999) BUICK PARK AVENUE (1991 - 1996) OLDSMOBILE 88 (1992 - 1999) OLDSMOBILE 98 (1991 - 1996) OLDSMOBILE LSS (1996 - 1999) OLDSMOBILE REGENCY (1997 - 1998) PONTIAC BONNEVILLE (1992 - 1999) Just the insert is not available AFAIK. All Classics use the torque-axis mount. I wouldn't put a used one in. If the trans/motor mounts have not been changed they are all bad, I can pretty much guarantee that. So many riding around not getting power to the wheels and on sloshed out suspension. There are two tabs holding the insert into the Bonneville mount. I have highlighted these tabs with yellow paint pen. Front: 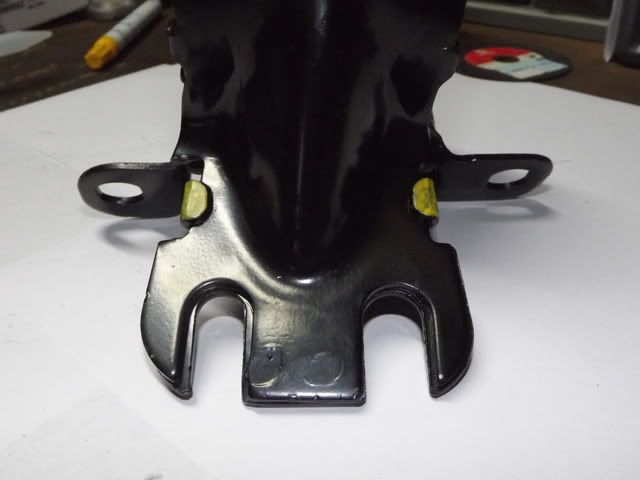 Back: Back: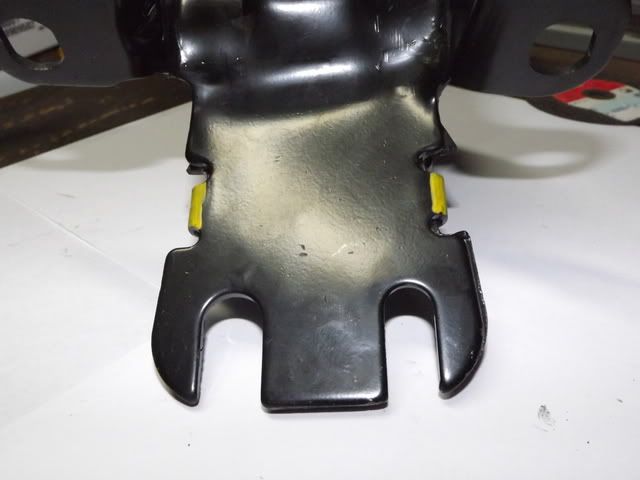 In addition to these two tabs holding the mounts together there are two small plug welds at the end of the mount. This will be more clear in the next picture. I removed the two tabs highlighted in yellow paint pen with 3" pneumatic cutoff wheel and also cut through one plate just above the tack weld mentioned above. 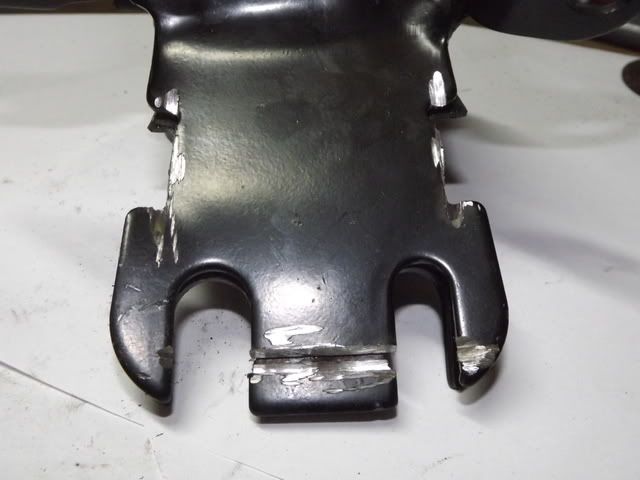 After the tabs and other cut is made it is very easy to pry the mount open with a bit of leverage. I used 18" flat head screw driver. Insert the screw driver or whatever you are using to pry the area around the removed tabs up and then stick the screwdriver in the other cut above the tack welds. Best to do this in vice as Golden mentioned. Mount Slightly Opened: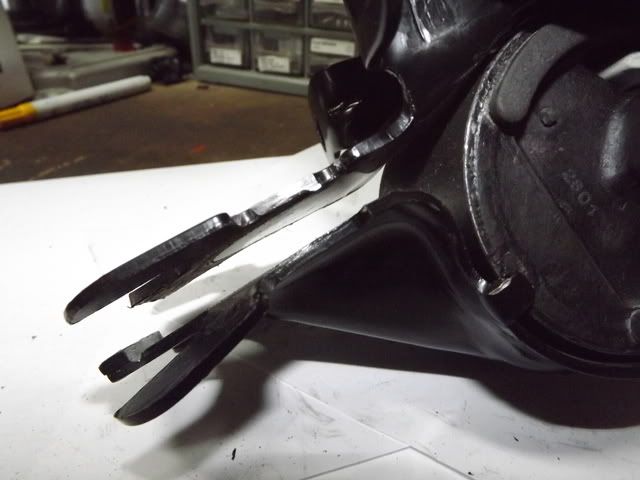 New Insert Removed From Bonneville Mount: New Insert Removed From Bonneville Mount: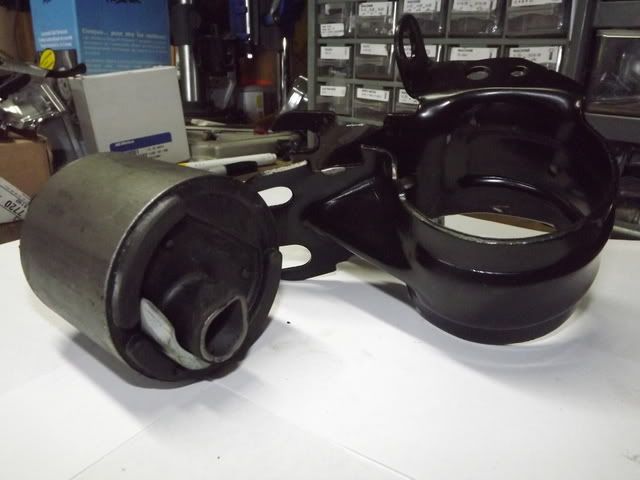 (I realize these last three picture oversized... the picture resize has not completed yet, but shouldn't take long.) Anyways, thats as far as I managed to get today. More pictures and details to come tomorrow! |
|
|
|
Post by sall on Jun 9, 2012 8:27:43 GMT -6
|
|
bobsblue95
Super Moderator      Scars of pleasure, scars of pain. Atmospheric changes make you sensitive again.
Posts: 3,125
Staff Member
|
Post by bobsblue95 on Jun 10, 2012 12:10:31 GMT -6
Great pics sall!
|
|
|
|
Post by sall on Jun 10, 2012 16:48:06 GMT -6
Thanks Bob! Unfortunately, I ended up felling a tree this weekend... after shoveling a ton of sand(literally) for the swimming pool. In the middle of all that my old Tanaka chainsaw decided to throw the starter spring and my crappy poulan primer bulb and fuel line were brittle and broke. After fixing that and cutting up the tree my day was pretty much shot. So, no welding as of yet. |
|
|
|
Post by sall on Jun 11, 2012 17:48:43 GMT -6
excellen pictures, Sall. way better than mine. someday i will remember to take pics while i'm working. and sorry i didnt get back to you about my old TAM. i didnt even realize i had a pm. yours is the second one i've ever gotten here. Thanks and no problem. I was able to find a spare, so that's all that matters! I can't wait to get it welded up and in the car though. |
|
|
|
Post by sall on Aug 4, 2012 15:07:18 GMT -6
Spent some time grinding/sanding the JB weld like epoxy off the strap and backing plate. Going to mix up some JB weld epoxy tomorrow and do it just as they had and it. Let it sit and cure for a couple days and then weld it up and install next weekend. About time haha.
|
|
|
|
Post by sall on Aug 6, 2012 19:31:04 GMT -6
I mixed up a whole pack of JB Weld and epoxied the insert to the backing plate and strap. Strap and insert are now back in and cured for over 24 hours. The mount looks great. Will weld it up tomorrow. Got a new auto darkening helmet today and picked up some good lincoln wire to cut down on the splatter. More pics to come! Will also have to hit the mount with a coat or two paint to cover where had to sand paint off for weld and paint weld bead as well. Can't wait to get it in finally.
|
|
|
|
Post by sall on Aug 7, 2012 14:14:44 GMT -6
Waiting to be welded... 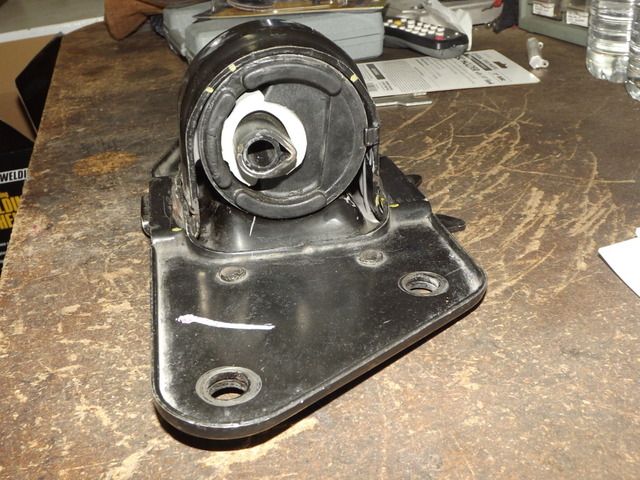 |
|
|
|
Post by sall on Aug 10, 2012 18:58:30 GMT -6
Thanks! I got it welded up a couple of days ago. Soda blasted with my redneck soda blaster and painted it all up after masking off the rubber. Took the windshield wiper reservoir off a few minutes ago. Start work on it in the morning and replacing tensioner,idler and alt while I am in there. Here's to a few hours under the hood  |
|
|
|
Post by sall on Aug 12, 2012 12:27:23 GMT -6
Yeahh! Again thank you Golden for this info! New mount is awesome. I can tell a world of difference. Glad I could kill two birds with one stone so to speak and get it all done at once. Now to manufacture some poly inserts for the left and right trans mounts  |
|
mjwalcott
Aurora Driver
  Half the fun of modding a car...is fixing the bull that needed to be fixed first
|
Post by mjwalcott on Mar 12, 2013 8:06:05 GMT -6
what's the procedure for uninstalling the tam. Did you have to hold the engine in place with something and how long did the whole procedure take. I have the means of do this, I might be able to ask the guys at work for help. We have a powder coat line and a weld area so it shouldn't. Be too hard, ill just have to drive the beater for a day or so.
|
|
|
|
Post by sall on Mar 12, 2013 8:45:07 GMT -6
what's the procedure for uninstalling the tam. Did you have to hold the engine in place with something and how long did the whole procedure take. I have the means of do this, I might be able to ask the guys at work for help. We have a powder coat line and a weld area so it shouldn't. Be too hard, ill just have to drive the beater for a day or so. To remove the mount follow the beginning of the belt tensioner/idler pulley replacement sticky. You will need some 2x6 or 8 to put under the pan with a jack to hold that side up. Better off to get a spare TAM, reload it and have it ready to install. They should be cheap. I think I have two here somewhere. The hardest part is getting it opened up cleanly to get a good weld later. The strap need compressed pretty good to to free it up from one side. It's all in the pictures/write-up. Mine is still doing great. I replaced all the other mounts as well at that time too  Huge improvement. You might as well go ahead and replace tensioner and idler pulley while you are in there, that's what I did too. Got all I could at once. |
|
|
|
Post by sall on May 8, 2015 7:41:34 GMT -6
Bump for those who haven't changed TAM or any of the trans mounts. They are bad change them  |
|
wmc
Aurora Newbie
Aurora lover since 95
|
Post by wmc on Aug 22, 2015 11:20:19 GMT -6
I'm in need of fixing my exhaust pipe after the flex pipe into the cat, reason I mention this is in doing so I found out somthing I was sure was wrong but now the whole world now knows as I'm driving a 160 decibal car around. My mounts suck! I've got a 99. I'm able to locate all but the tourqe axis mount. I was wondering what part off the bonniville contains that rubber insert, and is it possible to order just the insert? And 2 do all the first gen auroras use the same part or did they change them. I'm able to locate a 97 in a junkyard but don't wanna waste my time pulling out the thing if its not gonna work?
|
|
|
|
Post by sall on Aug 22, 2015 13:40:50 GMT -6
I'm in need of fixing my exhaust pipe after the flex pipe into the cat, reason I mention this is in doing so I found out somthing I was sure was wrong but now the whole world now knows as I'm driving a 160 decibal car around. My mounts suck! I've got a 99. I'm able to locate all but the tourqe axis mount. I was wondering what part off the bonniville contains that rubber insert, and is it possible to order just the insert? And 2 do all the first gen auroras use the same part or did they change them. I'm able to locate a 97 in a junkyard but don't wanna waste my time pulling out the thing if its not gonna work? The insert is from the front right motor mount found on these vehicles: BUICK LESABRE (1992 - 1999) BUICK PARK AVENUE (1991 - 1996) OLDSMOBILE 88 (1992 - 1999) OLDSMOBILE 98 (1991 - 1996) OLDSMOBILE LSS (1996 - 1999) OLDSMOBILE REGENCY (1997 - 1998) PONTIAC BONNEVILLE (1992 - 1999) Just the insert is not available AFAIK. All Classics use the torque-axis mount. I wouldn't put a used one in. If the trans/motor mounts have not been changed they are all bad, I can pretty much guarantee that. So many riding around not getting power to the wheels and on sloshed out suspension. |
|
wmc
Aurora Newbie
Aurora lover since 95
|
Post by wmc on Aug 22, 2015 18:22:40 GMT -6
No just wanted to pull the tam out to have another to put together. Thank you once again. Also I find that the list you provided meets my needs a lot. As far as the welding, what's the best to use? If replacing all the mounts what order do you think would be best? Does it matter?
|
|
|
|
Post by sall on Aug 22, 2015 19:45:36 GMT -6
ot a problem. I think I have two TAMs but probably more to ship than you can get one at junk yard for. If you can't find one just PM me. Since you have a '99 I would say front motor mount, rear trans mount, TAM. They are equally important though. When you have the TAM out it is a good time to swap out tensioner, idler pulley and serpentine belt.
|
|
RCA1186
Administrator      Rob
Go Pack Go!
Posts: 4,853 
Staff Member
|
Post by RCA1186 on Sept 4, 2015 7:53:01 GMT -6
stickied. Thanks Sall
|
|
murraytoiii
Aurora Newbie
Steering Rack is leaking fluid as fast as I pour it in
Posts: 22 
|
Post by murraytoiii on Sept 2, 2017 11:30:16 GMT -6
Sall you are the master of adapt improvise and overcome you pulled my bacon out of the fire with the front motor mount and insert that you customize unfortunately I was not able to see any of the photos that you posted would it be possible to send them to my email thank you
|
|
|
|
Post by sall on Sept 2, 2017 14:49:11 GMT -6
Sall you are the master of adapt improvise and overcome you pulled my bacon out of the fire with the front motor mount and insert that you customize unfortunately I was not able to see any of the photos that you posted would it be possible to send them to my email thank you Yeah photobucket screwed everyone. I will have to see if I can find them and rehost them. EDIT: Looks as if they are locked down and held for ransom or something. |
|
murraytoiii
Aurora Newbie
Steering Rack is leaking fluid as fast as I pour it in
Posts: 22 
|
Post by murraytoiii on Sept 2, 2017 22:30:35 GMT -6
Thank you again sir for your time and effort
|
|
|
|
Post by sall on Sept 3, 2017 9:19:58 GMT -6
Thank you again sir for your time and effort If I get some time I will look on my computer or SD cards and see if there is a chance they are still around. |
|
|
|
Post by ryans1995 on Sept 3, 2017 11:02:31 GMT -6
I'm about to have my motor mounts done and will need to hire a mechanic to do it.
I understand that the mounts no longer exist.
What is my best bet to order the right parts to get to my mechanic?
I'm about the have a ton of work done. The motor mounts need to be replaced, new struts, doing straight pipes, and my cooling fan isn't kicking on. I want to have this all done at once (or close to it), so I want to have everything ready for my mechanic when I drop off the car.
Any input would be appreciated. Thanks.
|
|
murraytoiii
Aurora Newbie
Steering Rack is leaking fluid as fast as I pour it in
Posts: 22 
|
Post by murraytoiii on Sept 3, 2017 11:08:23 GMT -6
Thank you again
|
|
murraytoiii
Aurora Newbie
Steering Rack is leaking fluid as fast as I pour it in
Posts: 22 
|
Post by murraytoiii on Sept 10, 2017 20:14:31 GMT -6
Any thoughts on where to find the torque access mounts
|
|
RCA1186
Administrator      Rob
Go Pack Go!
Posts: 4,853 
Staff Member
|
Post by RCA1186 on Sept 11, 2017 7:21:11 GMT -6
Any thoughts on where to find the torque access mounts You can get all the mounts except the torque axis mount. The other 3 are technically transmission mounts but the left mount is available as an insert on rock auto, the rear mount is hydraulic and also available on rock auto. The right side mount is re-loadable by using an insert I believe from a Pontiac Bonneville (not sure) but is also available from GMpartsdirect. Unfortunately I found the only way to replace the torque axis is to re-load it. |
|
murraytoiii
Aurora Newbie
Steering Rack is leaking fluid as fast as I pour it in
Posts: 22 
|
Post by murraytoiii on Sept 11, 2017 8:08:38 GMT -6
Thank you Sir
|
|
murraytoiii
Aurora Newbie
Steering Rack is leaking fluid as fast as I pour it in
Posts: 22 
|
Post by murraytoiii on Sept 11, 2017 8:17:23 GMT -6
Alright. I was able to start this project this afternoon and remove the insert out of the Bonneville TAM rather easily. Here are some pictures explaining the process. The insert is from the front right motor mount found on these vehicles: BUICK LESABRE (1992 - 1999) BUICK PARK AVENUE (1991 - 1996) OLDSMOBILE 88 (1992 - 1999) OLDSMOBILE 98 (1991 - 1996) OLDSMOBILE LSS (1996 - 1999) OLDSMOBILE REGENCY (1997 - 1998) PONTIAC BONNEVILLE (1992 - 1999) Just the insert is not available AFAIK. All Classics use the torque-axis mount. I wouldn't put a used one in. If the trans/motor mounts have not been changed they are all bad, I can pretty much guarantee that. So many riding around not getting power to the wheels and on sloshed out suspension. There are two tabs holding the insert into the Bonneville mount. I have highlighted these tabs with yellow paint pen. Front: Back:In addition to these two tabs holding the mounts together there are two small plug welds at the end of the mount. This will be more clear in the next picture. I removed the two tabs highlighted in yellow paint pen with 3" pneumatic cutoff wheel and also cut through one plate just above the tack weld mentioned above. After the tabs and other cut is made it is very easy to pry the mount open with a bit of leverage. I used 18" flat head screw driver. Insert the screw driver or whatever you are using to pry the area around the removed tabs up and then stick the screwdriver in the other cut above the tack welds. Best to do this in vice as Golden mentioned. Mount Slightly Opened:New Insert Removed From Bonneville Mount:(I realize these last three picture oversized... the picture resize has not completed yet, but shouldn't take long.) Anyways, thats as far as I managed to get today. More pictures and details to come tomorrow! Thanks Bob! Unfortunately, I ended up felling a tree this weekend... after shoveling a ton of sand(literally) for the swimming pool. In the middle of all that my old Tanaka chainsaw decided to throw the starter spring and my crappy poulan primer bulb and fuel line were brittle and broke. After fixing that and cutting up the tree my day was pretty much shot. So, no welding as of yet. |
|