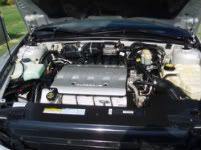
Post by TJM on Nov 11, 2005 15:34:01 GMT -6
k-tink, k-tink, k-tink, k-tink... for no apparent reason.
Release the brake - k-tink
k-tink - cruise shuts off
I have had enough!!! The Multi-Function switch is driving me nuts.
I could make it "k-tink" on demand by pushing the MF lever (using the "MF" term loosely here) forward. I had done the fix suggested in this forum with little improvement. I was inspired at the age of 12 by a man who insisted that EVERYTHING could be repaired rather than replaced so...
I removed the panels and steering column covers as described in the other thread.
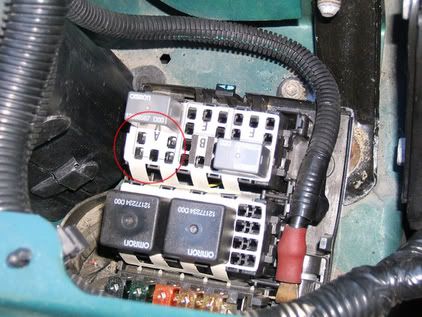
Unplug horn relay so I wouldn't unintentionally self-inflict any startling blasts while removing the MF switch; the horn pin is integrated with the MF switch.
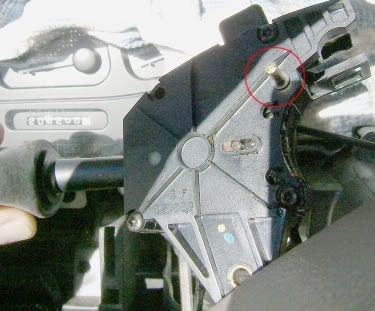
You must remove the wiper switch to remove the MF switch - I used a 3/16 6 point box ignition wrench to get to this screw that is somewhat hidden

Note the horn pin on the removed MF switch - also one cover screw removed
Be careful as you remove the cover not to loosa da horn spring and pin - that "Y" shaped piece with the 2 TINY springs is the dog for the directional auto release - Put the cover aside and DON"T PLAY WITH THE DOG or the springs will come off (yup you guessed it) doh!
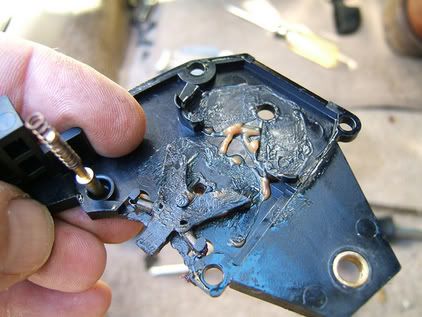
The inside of the MF switch reveals a multitude of grease but the unit remains together and nothing falls out <whew>
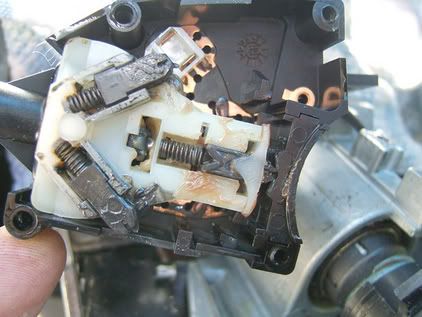
The end of the unit where the directional detents are can be removed to gain better access to the contacts - the contacts located on the stalk side are spring loaded but seem to have stops on them so they don't fall out
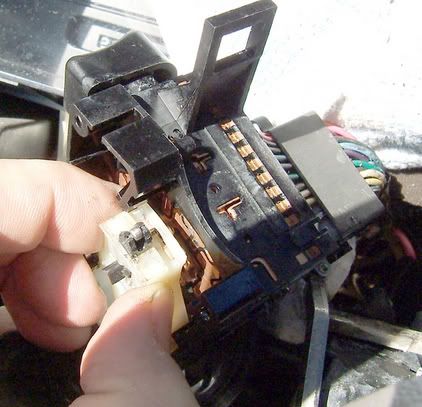
There are 3 of these little rollers -

The complexity of just this end of the MF switch leads me to believe that its cost is justified.
OK - now spray everything with CRC Electronics cleaner (mainly the contacts and Q-tip them just to help out the cleaner. There are more of the little holes described in the other thread all over this thing; I sprayed them too.
Apply a LITTLE dielectric grease to the contacts as well as the rollers, the dog, its cam on the steering column and the horn ring behind the steering wheel. reassemble the MF switch.
You have to hold the horn pin in to get the MF switch back into place and put the top screw in to make sure it doesn't pop out on ya.
The rest of the assembly is reverse of removal.
Total woking time 2½ hours
This dissection only addresses the directionals portion of the switch. However, the access gained into the rest of the switch by this disassembly far exceeds the "in-place" method of spraying.
The other section of the switch looks like it can be disassembled but I am afraid that side of it may have been designed by Inspector Gadget or Rube Goldberg and parts and springs will fly out as it gets opened.
This switch is a "MF" but time will tell if this fixed my issues - so far so good!
Release the brake - k-tink
k-tink - cruise shuts off
I have had enough!!! The Multi-Function switch is driving me nuts.
I could make it "k-tink" on demand by pushing the MF lever (using the "MF" term loosely here) forward. I had done the fix suggested in this forum with little improvement. I was inspired at the age of 12 by a man who insisted that EVERYTHING could be repaired rather than replaced so...
I removed the panels and steering column covers as described in the other thread.
Unplug horn relay so I wouldn't unintentionally self-inflict any startling blasts while removing the MF switch; the horn pin is integrated with the MF switch.

You must remove the wiper switch to remove the MF switch - I used a 3/16 6 point box ignition wrench to get to this screw that is somewhat hidden

Note the horn pin on the removed MF switch - also one cover screw removed

Be careful as you remove the cover not to loosa da horn spring and pin - that "Y" shaped piece with the 2 TINY springs is the dog for the directional auto release - Put the cover aside and DON"T PLAY WITH THE DOG or the springs will come off (yup you guessed it) doh!

The inside of the MF switch reveals a multitude of grease but the unit remains together and nothing falls out <whew>

The end of the unit where the directional detents are can be removed to gain better access to the contacts - the contacts located on the stalk side are spring loaded but seem to have stops on them so they don't fall out

There are 3 of these little rollers -

The complexity of just this end of the MF switch leads me to believe that its cost is justified.
OK - now spray everything with CRC Electronics cleaner (mainly the contacts and Q-tip them just to help out the cleaner. There are more of the little holes described in the other thread all over this thing; I sprayed them too.
Apply a LITTLE dielectric grease to the contacts as well as the rollers, the dog, its cam on the steering column and the horn ring behind the steering wheel. reassemble the MF switch.
You have to hold the horn pin in to get the MF switch back into place and put the top screw in to make sure it doesn't pop out on ya.
The rest of the assembly is reverse of removal.
Total woking time 2½ hours
This dissection only addresses the directionals portion of the switch. However, the access gained into the rest of the switch by this disassembly far exceeds the "in-place" method of spraying.
The other section of the switch looks like it can be disassembled but I am afraid that side of it may have been designed by Inspector Gadget or Rube Goldberg and parts and springs will fly out as it gets opened.
This switch is a "MF" but time will tell if this fixed my issues - so far so good!


 That's my 2 cents.


