Forum")


Post by skizo on Sept 10, 2014 15:25:56 GMT -6
Started getting the box o'marbles noises out of the pump. Just did the dirty on my '99 Classic and figured I post up a couple head scratchers and save a few bald spots here and there.
First off, you DO need a special GM tool to do the job. Rumor has it a lot automotive shops can rent you one, but I went ahead and got my own off Amazon.
The job itself isn't all that difficult and I'm sure has already been covered. Hard part can be just getting to the pump area. Lucky me, I stripped the air box and all that good stuff way back when so the job was already half done before I even started.
Couple recommendations ... go ahead and replace the drive belt for the pump. Mine was showing some checking in the ribs and was due. I'd also plan to replace the short piece of heater hose long as you're in there. My old one was showing some swelling. Standard size available at the local auto parts. I'd also highly recommend replacing all the spring clamps with some good worm drives - you can get some leakage if you don't line the old clamps up perfectly with the old dents in the hoses - not a problem with new clamps.
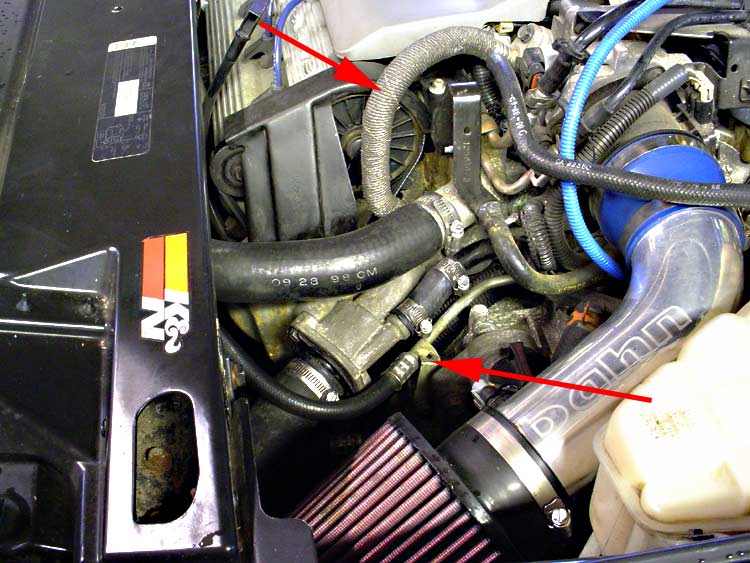
If you're wondering about the arrows - there's more room to work if you remove the preheater hose, and it's just two bolts and no gaskets to worry about. The flexible transmission line clamp is also one nut. The bracket just swivels up, allowing you to push the hose a couple inches to the side. Makes it a lot easier to get to the otherwise hidden pump cover bolt lurking behind it.
The tool itself is pretty self explanatory - it does take some significant effort to break the old pump off as it can get some corrosion in the mounting tabs AND it's installed at 74 foot pounds. Clockwise to remove the pump. Also, hold the tool tight and square to the pump as you really don't want it to slip off and chew anything up (including your fingers). You do want to make sure you do an eyeball inspection to get a feel for how the tool should work when you install the new pump. The tangs line up different than they do for removal.

** Now's the time to double check that the tabs on the pump are straight and lining up properly. I didn't, and come to find out, one of the tabs was bent - probably rough handling in shipping as the pump was bouncing around in a much bigger box. Had a couple aborted attempts installing the pump (along with a good bit of cursing) before I figured that out.
Not to forget, counter-clockwise to install. I tried putting the tool on the pump and then inserting that into the hole a couple times, but the pump slipped off. Turned the pump in by hand just a bit, enough to verify that it WOULD turn. I also used a narrow bladed screwdriver between the tab on the housing body and pump tang and was able to lock it in place enough to withstand a bit of banging about as I lined the tool up. Sorry, no pics, but you can see inside and it's easy enough to see what I'm talking about. Once that happened, it was easy - got it turning properly and set it to 74 foot pounds with a torque wrench. Probably a good idea to rent or borrow one as you really don't want to break the pump body. DO take a close look after installation - the pump turns about three quarters of an inch before it hits the stops, and that's easy enough to verify with a flashlight.
Oh. And RTFM! There's a couple alignment issues that can trip you up.

Check the arrows. There's a notched tab on the pump that MUST go to the 7 o'clock position for it to line up and lock in properly. You also need to install the thermostat with the little brass pin straight up so it vents properly. It will still work, but will probably not be as accurate. I also noticed that you need to push the thermostat into the housing just a bit when installing it - both the Stant replacement and the OEM unit were the same there.
Also, be sure to check the antifreeze levels a time or three after the job is finished. I topped it off to the line after the installation, and it was down a couple quarts after a short cruise. Topped that off, and same thing the next time I went out. Staying steady since, so it was just basically working out any voids and bubbles in the jacket.
Belt replacement. You need to remove the idler wheel to get that off. Remove the safety cover, two nuts on the side and one bolt on the top. There's a wire loom attached to that, so careful to make sure to unbuckle the cable clamp first. Once the cover's off, the two bolts that held the nuts on the sides can be removed - those hold the idler wheel assembly in place. DO use some blue threadlocker on these when reinstalling - just a drop on the "dirty" part of the thread should do ya. DO check the idler wheel for rumble or stick as that's supposed to be a problem over time. I considered replacing that also, but that's fairly easy to get to if it goes bad, and this one felt good. DO make sure the belt is properly installed on the pump motor - you can't see it, but you can reach down and feel it. Once again, a quick check on the old pump with the belt on the pulley should give you a good idea of what you should have when it's done right. Even then, keep an eye on the belt when you fire it up to check for side play or vibration. Mine was off a rib on the first go.
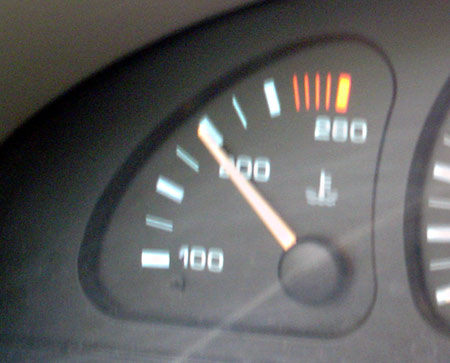
Good news is, the temp guage is right at 180F as it should be. Bad news is, the pump is quiet enough now that I can hear some whining from the power steering pump. Next project I expect!
PS ... that was a $700 dollar job that cost me around $100, including the specialty tool. When shopping about, DO remember to get a new gasket (Fel-Pro #35794 or similar) for the pump housing. Be aware that some thermostats don't have the rubber gasket in the package - the Stant #14228 does. There's a couple different pumps listed for the Aurora - I used the AC Delco 252-707. The belt itself can be a bit hard to track down ... the Gates #K030243 was a perfect fit.
First off, you DO need a special GM tool to do the job. Rumor has it a lot automotive shops can rent you one, but I went ahead and got my own off Amazon.
The job itself isn't all that difficult and I'm sure has already been covered. Hard part can be just getting to the pump area. Lucky me, I stripped the air box and all that good stuff way back when so the job was already half done before I even started.
Couple recommendations ... go ahead and replace the drive belt for the pump. Mine was showing some checking in the ribs and was due. I'd also plan to replace the short piece of heater hose long as you're in there. My old one was showing some swelling. Standard size available at the local auto parts. I'd also highly recommend replacing all the spring clamps with some good worm drives - you can get some leakage if you don't line the old clamps up perfectly with the old dents in the hoses - not a problem with new clamps.
If you're wondering about the arrows - there's more room to work if you remove the preheater hose, and it's just two bolts and no gaskets to worry about. The flexible transmission line clamp is also one nut. The bracket just swivels up, allowing you to push the hose a couple inches to the side. Makes it a lot easier to get to the otherwise hidden pump cover bolt lurking behind it.
The tool itself is pretty self explanatory - it does take some significant effort to break the old pump off as it can get some corrosion in the mounting tabs AND it's installed at 74 foot pounds. Clockwise to remove the pump. Also, hold the tool tight and square to the pump as you really don't want it to slip off and chew anything up (including your fingers). You do want to make sure you do an eyeball inspection to get a feel for how the tool should work when you install the new pump. The tangs line up different than they do for removal.
** Now's the time to double check that the tabs on the pump are straight and lining up properly. I didn't, and come to find out, one of the tabs was bent - probably rough handling in shipping as the pump was bouncing around in a much bigger box. Had a couple aborted attempts installing the pump (along with a good bit of cursing) before I figured that out.
Not to forget, counter-clockwise to install. I tried putting the tool on the pump and then inserting that into the hole a couple times, but the pump slipped off. Turned the pump in by hand just a bit, enough to verify that it WOULD turn. I also used a narrow bladed screwdriver between the tab on the housing body and pump tang and was able to lock it in place enough to withstand a bit of banging about as I lined the tool up. Sorry, no pics, but you can see inside and it's easy enough to see what I'm talking about. Once that happened, it was easy - got it turning properly and set it to 74 foot pounds with a torque wrench. Probably a good idea to rent or borrow one as you really don't want to break the pump body. DO take a close look after installation - the pump turns about three quarters of an inch before it hits the stops, and that's easy enough to verify with a flashlight.
Oh. And RTFM! There's a couple alignment issues that can trip you up.
Check the arrows. There's a notched tab on the pump that MUST go to the 7 o'clock position for it to line up and lock in properly. You also need to install the thermostat with the little brass pin straight up so it vents properly. It will still work, but will probably not be as accurate. I also noticed that you need to push the thermostat into the housing just a bit when installing it - both the Stant replacement and the OEM unit were the same there.
Also, be sure to check the antifreeze levels a time or three after the job is finished. I topped it off to the line after the installation, and it was down a couple quarts after a short cruise. Topped that off, and same thing the next time I went out. Staying steady since, so it was just basically working out any voids and bubbles in the jacket.
Belt replacement. You need to remove the idler wheel to get that off. Remove the safety cover, two nuts on the side and one bolt on the top. There's a wire loom attached to that, so careful to make sure to unbuckle the cable clamp first. Once the cover's off, the two bolts that held the nuts on the sides can be removed - those hold the idler wheel assembly in place. DO use some blue threadlocker on these when reinstalling - just a drop on the "dirty" part of the thread should do ya. DO check the idler wheel for rumble or stick as that's supposed to be a problem over time. I considered replacing that also, but that's fairly easy to get to if it goes bad, and this one felt good. DO make sure the belt is properly installed on the pump motor - you can't see it, but you can reach down and feel it. Once again, a quick check on the old pump with the belt on the pulley should give you a good idea of what you should have when it's done right. Even then, keep an eye on the belt when you fire it up to check for side play or vibration. Mine was off a rib on the first go.
Good news is, the temp guage is right at 180F as it should be. Bad news is, the pump is quiet enough now that I can hear some whining from the power steering pump. Next project I expect!
PS ... that was a $700 dollar job that cost me around $100, including the specialty tool. When shopping about, DO remember to get a new gasket (Fel-Pro #35794 or similar) for the pump housing. Be aware that some thermostats don't have the rubber gasket in the package - the Stant #14228 does. There's a couple different pumps listed for the Aurora - I used the AC Delco 252-707. The belt itself can be a bit hard to track down ... the Gates #K030243 was a perfect fit.