|
|
Post by awehlage on Aug 13, 2015 6:46:07 GMT -6
I will be moving into a new house at the end of the month, a clean slate to work with. One of my ambitions is to epoxy the garage floor with some sort of DIY kit. I've read the big box stores sell garbage kits that don't last long and to get "the good stuff" I need a contractors license.
So....who has experience using epoxy? What did you use? How has it held up? Tips, tricks, etc.... Thanks!!!!
|
|
XJSman89
Administrator 
Posts: 6,309
Staff Member
|
Post by XJSman89 on Aug 13, 2015 7:17:24 GMT -6
I went with gray Rustoleum epoxy with blue/white flake on my floor. I had to get the 2.5 garage kit and a single garage kit to finish my 3 car completely. It went down easy, though. I power washed it first, used the provided etching, let that sit for a day, and then had my father in law help me lay down the epoxy and didn't drive/park on it for a week. It went down really quick. So quick, in fact, that while he was rolling it out I spent the whole time spreading the flake, because it was going down so fast I couldn't spread the flake quick enough to get back to the second roller to help out. This was a day or two after we finished rolling, still hadn't driven on it yet at that point. 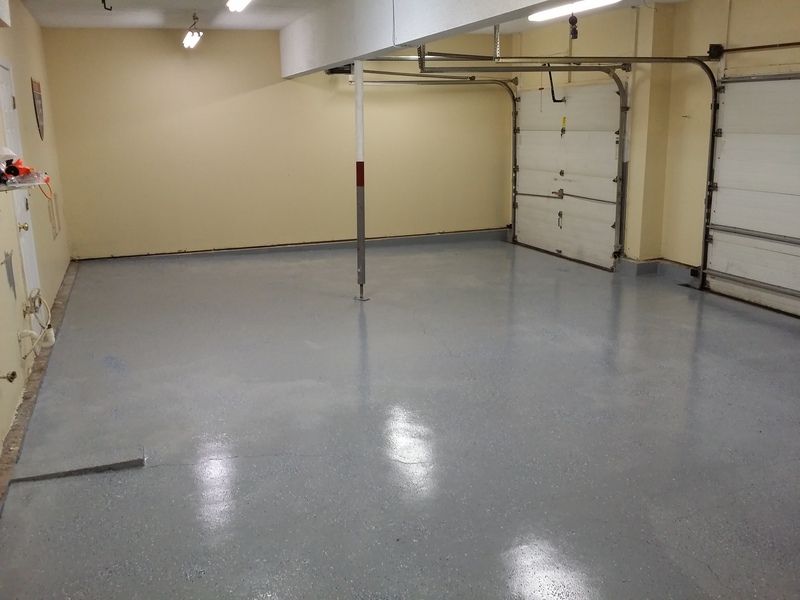 I've only had my floor down since we moved in (not quite a year) so I can't speak to the longevity, but I like it a lot. It didn't do a fantastic job filling in what pits there were (didn't have many) so if you want to do that I would fill in any pits/cracks ahead of time, but there's no peeling/coming up to speak of or anything like that. Oil and other fluids wipe right up and, from what I can tell anyway, they aren't penetrating the concrete or causing the epoxy to bubble. If you have any oil on your floor (I didn't, thankfully) I would get that up first as well, some muratic acid might be a possible way to get that up. I'm not sure what to use there, as I didn't have to. I do know that if you attempt to put the epoxy down over oil then they don't guarantee it will stick. With your new house, though, that shouldn't be a problem! The Rustoleum that I used was an off-the-shelf depot product of course, no "contractor grade" stuff. I like it so far, though. I hope that helps! |
|
|
|
Post by awehlage on Aug 13, 2015 7:31:35 GMT -6
Collins, thanks for all the insight!! I will be moving into a new construction house so no contaminants or physical damage on the concrete pad!! 3 car garage as well and I want to preserve the floor as long as possible.
Did you do any sort of clear topcoat or priming before laying down the epoxy? As far as following the included instructions did you follow them exactly and not deviate?
|
|
|
|
Post by ohiobuckeye on Aug 13, 2015 9:38:40 GMT -6
Nice to see and hear good results as I have the exact Rustoleum product ready for applicaton. Going to do the back third of the garage first which is the open work and storage area where cars don't park. Going from back to first expansion cut 24' x shade less than 10'. Pkg says 250' sq ft so should be just about right.
|
|
XJSman89
Administrator
Posts: 6,309
Staff Member
|
Post by XJSman89 on Aug 13, 2015 13:22:21 GMT -6
Collins, thanks for all the insight!! I will be moving into a new construction house so no contaminants or physical damage on the concrete pad!! 3 car garage as well and I want to preserve the floor as long as possible. Did you do any sort of clear topcoat or priming before laying down the epoxy? As far as following the included instructions did you follow them exactly and not deviate? Not a problem, Andrew! Happy to help. Hooray for fresh concrete! There's an acid for "etching" the concrete that you mix with water, spread with a broom, them mop up. I read some of the posts on the interwebs about it and some people claimed you need a stronger etching agent (from what I understand, it makes pores in the concrete for the epoxy to adhere to) and others claim that the acid that comes with it works just fine. I decided not to go with anything aftermarket and just follow the instructions as they were given. It worked just fine, when you spread the etching over the floor you can hear it reacting with the concrete. I did that part myself, it went pretty quickly as well. The instructions are pretty simple, and that's the only real explicit thing beyond the wait times. You can't walk on it for 24 hours, you can drive over it in 3 days, and you can't park on it for a week. We treated it like painting a wall. We cut in and rolled it on in nice, long strokes. The good thing about epoxy is that it kind of gels together; there aren't any "run marks" or anything of the sort on my garage floor. There was an additive that you can get with the rustoleum (and probably most any other product) that you're supposed to mix into the epoxy when you spread it that gives it a "nonskid" texture. I opted not to do this and it hasn't been an issue. The colored flakes themselves actually add a little bit of nonskid property to it. I'm not disappointed at all that I didn't add the nonskid packet of stuff. Obviously you can't mix the flake with the epoxy or they won't retain their color; you sprinkle those on after you've laid down the epoxy. Be sure you spread them with small handfulls, there are a couple clumped up areas that I created that I'm not too happy about.  Best of luck, man! Nice to see and hear good results as I have the exact Rustoleum product ready for applicaton. Yup! I like it. It's a great finish, I've gotten nothing but compliments about it. It's easy to keep it clean too. And since both the Olds and the Jag leak copious amounts of oil (The Olds more so than the Jag, believe it or not!) the quick cleanup is easily the best feature for me. Sometimes the drip pans just don't catch it all! |
|
|
|
Post by awehlage on Aug 13, 2015 14:22:56 GMT -6
Lots to consider! This may be a next spring/summer project as I have a busy three weeks ahead of me!
I was reading the old interweb and if concrete is new a good thorough power washing session should be enough but I would think the etching solution wouldn't then be included if not necessary.
I am leaning towards a double coat if I use a big box store product (rustoleum or quikcrete). I want to do it right the first time. If I do a double coat I won't do a clear top coat for added protection. Also, good to know about the flake adding some texture because I do want a non-skid surface so the kids and wife don't wipe out! We do have a drainage system in the garage floor but winter could be hazardous. The more texture the better.
Well I'm gonna continue to price out some products and see which is the best both in price and quality.
|
|
|
|
Post by white2002aurora on Aug 13, 2015 21:35:25 GMT -6
I was wondering how traction is on this? Would it be good for a durable front concrete porch coating?
|
|
RCA1186
Administrator
Rob
Go Pack Go!
Posts: 4,837 
Staff Member
|
Post by RCA1186 on Aug 14, 2015 6:07:12 GMT -6
That's funny because I should be moving to a new home in the next couple of months and was thinking of doing the exact same thing before I got fully moved in. Collins, what does that stuff cost for a 2.5 garage?
|
|
|
|
Post by awehlage on Aug 14, 2015 16:30:23 GMT -6
rca99aurora - where do you live in WI?
|
|
XJSman89
Administrator
Posts: 6,309
Staff Member
|
Post by XJSman89 on Aug 16, 2015 10:01:05 GMT -6
Andrew- I didn't go with a double coat, but I don't see that doing anything except being helpful. Theoretically two coats would last twice as long. It might be a little more slippery if you go over the colored coating/flake with a clearcoat, you might want to add non-skid or something of the like. Not sure if you can do that with clear. Also there was just enough flake in one kit to give a good spread without it being too congested. I would have wanted a little more flake myself, but it worked out alright. If you end up doing two coats of the colored epoxy, I would only put flake on the top coat and only use one bag, but that's just how I would do it! Be sure to not paint yourself into a corner, you have to alternate between rolling and spreading flake if you're doing it solo or else you'll paint to the edge and not be able to get back to the corner and spread it haha. I almost did that, had to reach a bit back to the first corner because we painted out too much.  white2002- It's a pretty industrial look, I don't know that I would want it on a proch myself. I bet it would hold up though. My garage door stays closed a lot of the time obviously, so I can't say how it would hold up to the elements long term. It seems to do okay though. Traction is pretty good but I would want a little more in a high traffic area like a porch. There is a cheap additive you can buy that puts something (not exactly sure what it is, but they're small and clear) in the coating to give it little bumps to provide extra traction. I didn't do these because I was afraid they would make it harder to clean, but I don't know for sure as I have no experience with them. Rob- The 2.5 garage kit is $100, and comes with everything you need (except for a roller and stuff, and buckets to mix epoxy in) to do the project. I just bought a couple cheap 5 gal homer buckets from the depot, one to mix etching and one for epoxy, then a tray to wipe the excess in from the roller. It covered almost exactly what was expected, 2 garages plus a little bit. I had to buy another single garage kit to finish my garage up. I got mine from home depot, Rustoleum EpoxyShield is what I bought and applied. |
|
RCA1186
Administrator
Rob
Go Pack Go!
Posts: 4,837
Staff Member
|
Post by RCA1186 on Aug 17, 2015 7:12:12 GMT -6
rca99aurora - where do you live in WI? I'm in Chicago |
|
|
|
Post by ohiobuckeye on Aug 17, 2015 8:12:57 GMT -6
I was wondering how traction is on this? Would it be good for a durable front concrete porch coating? I just watched the DVD that comes with product and it is not recommended for any application in direct sunlight. Covered and enclosed concrete only. Found out I may be screwed because I sealed the floor when garage was new 8 years ago. Still beads water especially in area where cars are not parked. Need to investigate a solution. |
|
randnon
Aurora Passenger

Posts: 246
|
Post by randnon on Aug 31, 2015 20:08:31 GMT -6
I am in the middle of doing this myself. Tomorrow I plan on renting a grinder to get the old finish off. With any coating it is always the prep that is most important. I plan on doing 2 coats and not using the chips so it can be re coated in a few years. My 20 year old floor was clear epoxy coated about 15 years ago and much of it has warn off. I presume you can re-coat over the same product in the future without stripping the old finish as long as it is sound.
|
|
XJSman89
Administrator
Posts: 6,309
Staff Member
|
Post by XJSman89 on Sept 1, 2015 7:49:12 GMT -6
I am in the middle of doing this myself. Tomorrow I plan on renting a grinder to get the old finish off. With any coating it is always the prep that is most important. I plan on doing 2 coats and not using the chips so it can be re coated in a few years. My 20 year old floor was clear epoxy coated about 15 years ago and much of it has warn off. I presume you can re-coat over the same product in the future without stripping the old finish as long as it is sound. A grinder is a great way to prep the floor. You're right, most of the time is spent in prep. I don't know why you couldn't go over the same coating again after a few uears as long as it's in one piece, but if you have years of dirt, oil, etc. spilling on the floor I would want to at least rough it up again and clean it to make sure the epoxy will stick. I believe that's what the etching is for as well, partly to prepare the surface and partly to clean it of contaminants. You could clean the whole floor with acetone or something similar I'm guessing as well, but I'm not an expert! I like the flake in mine but it would still look great without it in my opinion. Best of luck! |
|
randnon
Aurora Passenger
Posts: 246
|
Post by randnon on Sept 4, 2015 20:18:33 GMT -6
The grinding is done and the first coat is on. I rented a floor buffer with the coarse diamond wheel from home depot ( about $122 for the day ). It was well worth it. Removal took about 6hrs of grinding and removed about 1/16" from the floor getting rid of small pot marks and leaving a smoother floor. Tomorrow is the second coat and I am still not sure I will put in the flakes or not. I applied the first coat very thick and hope this next coat can be done with only one kit over the sealed floor. the manufacturer recommends re-coat from 12 to 48 hrs from first coat.
|
|
randnon
Aurora Passenger
Posts: 246
|
Post by randnon on Sept 6, 2015 23:49:57 GMT -6
The floor is done, 2 coats of color with color chips thrown on the second coat and a clear put on the top. If it is durable I will be very happy. Total cost with the grinder rental was about $1 per sq foot. The job is pretty straight forward but takes quite a few days with all the dry / cure time. Please see photos. Rich in Buffalo   |
|
RCA1186
Administrator
Rob
Go Pack Go!
Posts: 4,837
Staff Member
|
Post by RCA1186 on Sept 8, 2015 6:21:02 GMT -6
Looks great. Wanna come and do mine?
|
|
randnon
Aurora Passenger
Posts: 246
|
Post by randnon on Sept 8, 2015 7:42:11 GMT -6
The hardest part is making sure that all those flakes land color side up. My concern is that the floor will camouflage dropped parts when I am doing a project or find those parts in my tire at a later date. The flakes do a great job of hiding warn concrete. Rich
|
|
skizo
Aurora Passenger
WOT ... is there any other way?
Posts: 278
|
Post by skizo on Sept 12, 2015 17:32:58 GMT -6
Looks like a nice little project. Little late in the season here as we're already seeing some cooler weather.
My problem would be cleaning the old floor - 30 years of abuse. Surface is smooth, but some cracking and settling, so first step would be getting somebody in to "pump up" and level the parts that need it, then patching the cracks with expanding concrete. I'd also be building up an edge to frame the stuff for the traffic area, as I'm not about to pull out a whole bunch of built in workbenches.
For older floors, I expect most of the surface would be good with standard cleaning and etching. I assUme it wouldn't be all that difficult to patch any sections that peel after the coating goes down.
|
|
 Forum")


