Post by wfooshee on Apr 16, 2016 17:41:17 GMT -6
Like every GM car from the mid 90s to at least 2010 or so, my 'rora has the gas gauge that works fine when over half full, and bounces around all over the place below half full. The problem, of course, is worn wipers on the variable resistor in the tank. The float pivots the wiper arm and the car's brain reads the resistor to get the fuel level and put it on the dash gauge.
The part to fix classic Aurora, just the sender, is scarce. As in no longer exists. Can't be had. Anywhere. You have to get the whole pump assembly, which varies from at least 50 bucks to as much as 200! I'm not sure why such variance exists, but I don't like it when "the same" part can be had somewhere for a quarter of the price; i just don't trust that.
The sender for the second-gen is widely available. It doesn't fit, though, even though it superficially looks the same; it attaches differently, and the stuff that snaps it into place has no place to go on the classic pump assembly.
Thing is, the wiper arm DOES fit into the classic's sender. you just have to get it off the new part, get the wiper arm off the old part, and replace it with the new one. I could swear I found a thread where somebody did just that, but I can't find it now. Maybe it wan't actually this board, but a Bonneville or Cadillac board or someplace like that.
The sender unit for the second-gen Aurora is Dorman part 911-022, and it's about 35 or 40 bucks.
I already had all the trunk trim out because I've been working on a leak where the lid struts attach to the body work. Those plates are spot-welded from the factory, but in my car they'd apparently broken loose and the previous owner (my late father-in-law) drilled them and bolted them in, which was not even remotely weatherproof. Anyway, back to the gas gauge.....
I removed the back seat, which made it a trillion times easier to get to the fuel pump. It's easy to reach from the passenger compartment, without having to crawl into the trunk, climb out when you realize you need another tool, blah blah blah. The bottom cushion is easy, it just pops out so you can get to the battery and fuses. The back is easy, too, if you have an 18mm socket...... nobody's socket set has an 18, though; they're all 9,10,11,12,13,14,15,17,and 19. Same with wrenches. So I went to home depot and picked up a 6-point 18mm socket for 3 or 4 bucks. Once those 18mm bolts are out, the seat back lifts up and comes out. There's a sound panel that comes out, and you have access to the trunk.
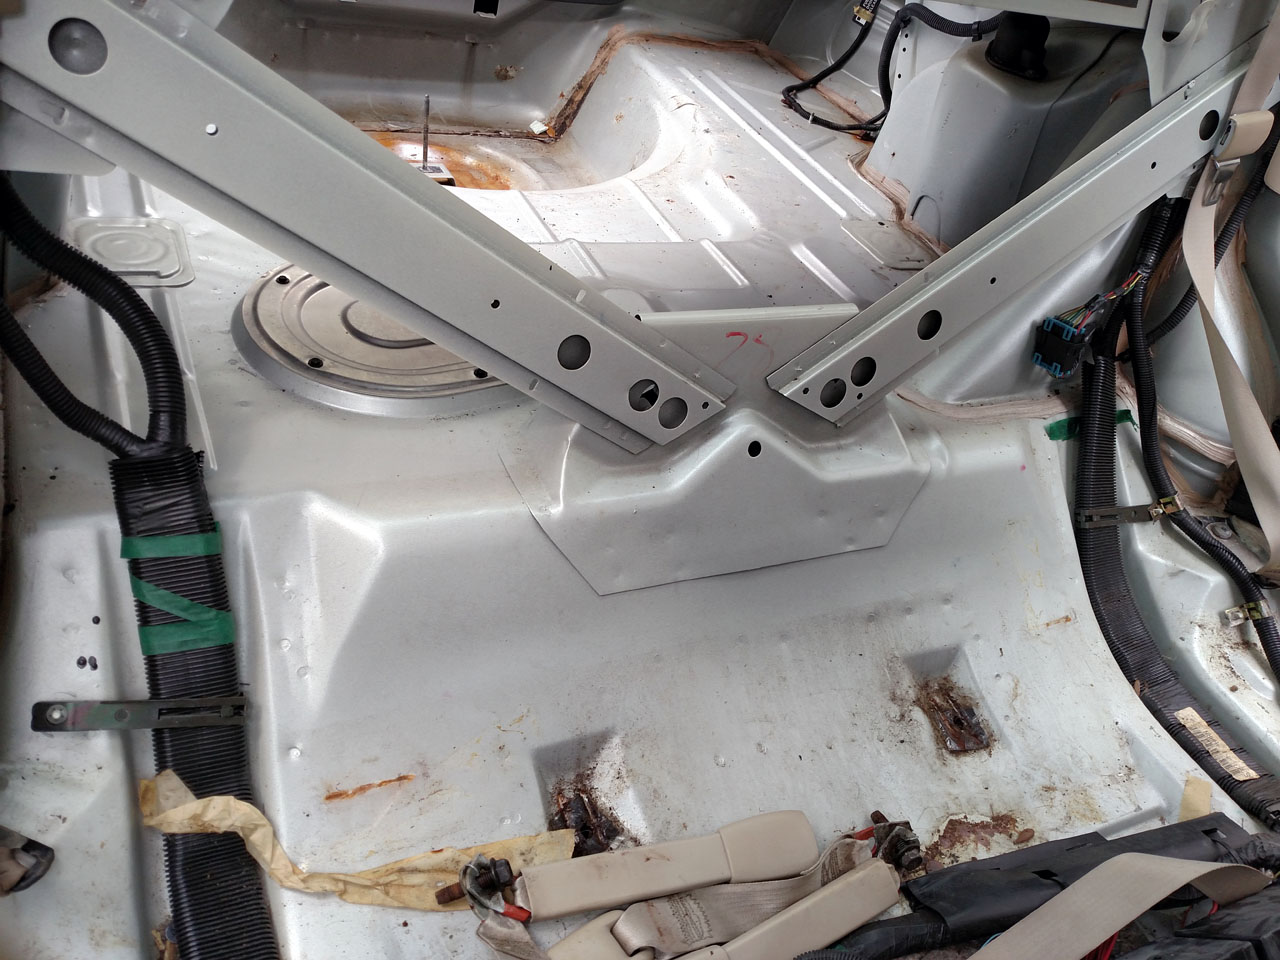
Remove that plate, and there are two electrical connections and two fuel connections under there. The fuel connections are snap-fit and easy to remove, although a small amount of fuel will dribble out.
Now the fun begins. First, clean that area as best you can. I didn't, and when I went to put stuff back together I had an enormous amount of crud that had gathered on the surface where the O-ring seals the pump assembly, which I had to remove with care so as to not dump it all into the open tank. Clean that gunk outa there before pulling the pump assembly, m'kay?
You have to remove that lock ring that's probably almost rusted solid. I found mine to have some rust, but what makes it hard to remove is actually the tabs that are bent down over it. If you look carefully, you'll see that they have an indent that matches a ridge on the ring, and that becomes a retainer lock. So my first order of business was to put a screwdriver under each of those tabs, pound it in a bit, and pry those up just a little bit. I couldn't get to the tab that was under the fuel lines, but all the others were accessible, and enough to make it loose. That made tapping the ring to remove it a piece of cake.
Lift the assembly, you'll have to twist it and tilt it to get it out because the level sensing float sticks way out to the side. Some gas will spill, but if you do it slowly, and let the assembly drain as you lift it, you'll minimize the spillage and also minimize the fuel left in the assembly when you get it out.
Now you have this, which in my case is out of focus...... (I'm not pulling it again for another picture!)
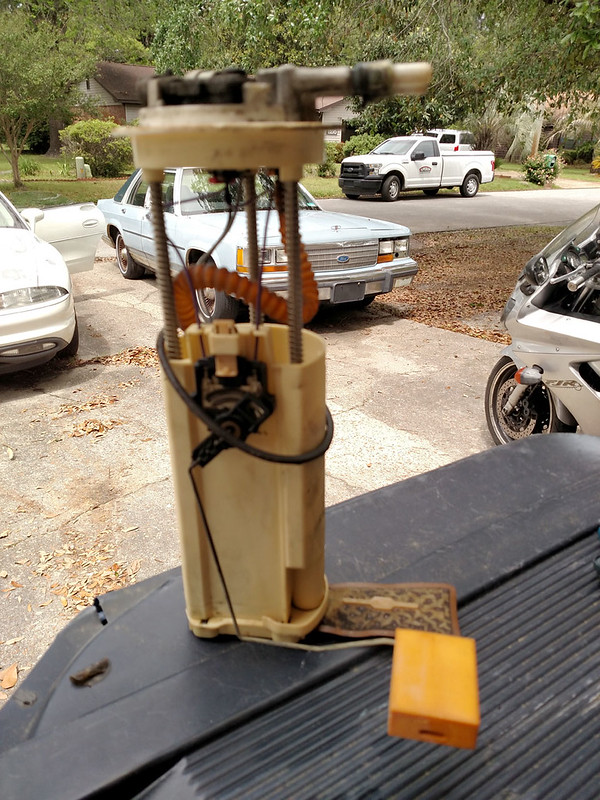
What we're after is this, the sending unit which is moved by the float as the fuel level changes.
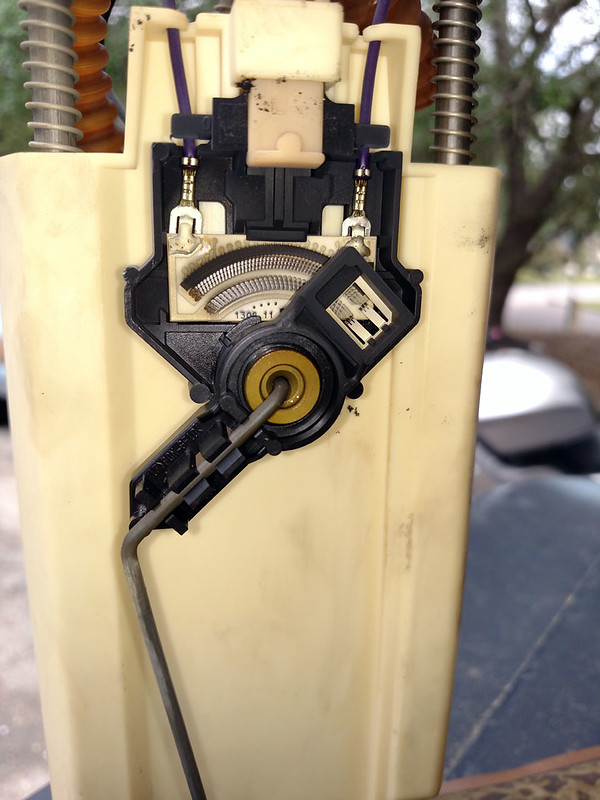
Pry the metal rod out of the snap fittings to remove the float. The new kit comes with a float, but its arm is shaped a tiny bit differently, so you want to keep your original float. That beige plastic piece at the top of the sender slides out, allowing you to pinch the snap tabs behind it and remove the sender. If you want it all the way loose for easier handling, you'll have to disconnect the two electrical plugs, but I think you can do what needs to be done without that. You do need to get the wires out of the guides there so it's at least that much free movement.
Here is the old (black) and new (white) side by side. Notice how different the tops of the assemblies are, which is why the part won't fit. But the wiper arms are identical!
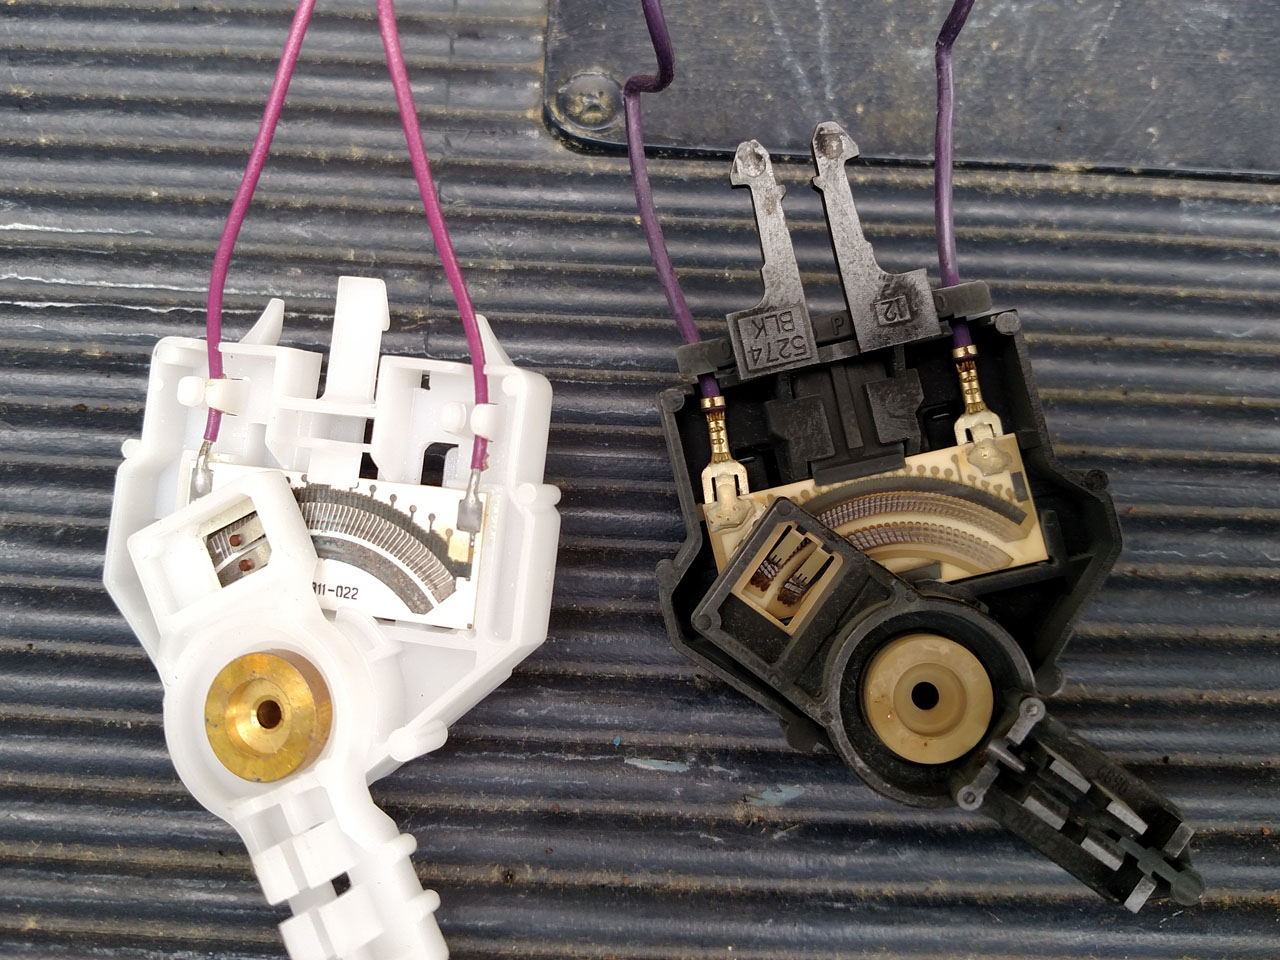
Now you need to rig something up that you can set the sender on, wiper side down, and find a rod that you can use to tap the brass center piece out. You're not going to need a lot of force, it's just a slip fit in the plastic, and there are no retainers or threads involved. Tap the rod with a screwdriver handle or something, as you're not going to need a sledge.....
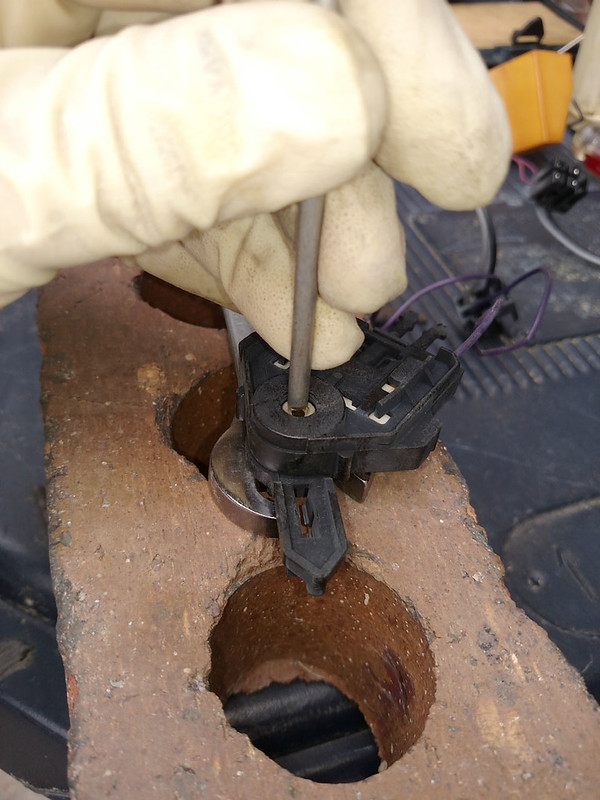
Now the same for the new part.
Here's the old wiper next to the new. You can see how much shorter the metal contacts are, which is why the gauge doesn't work.
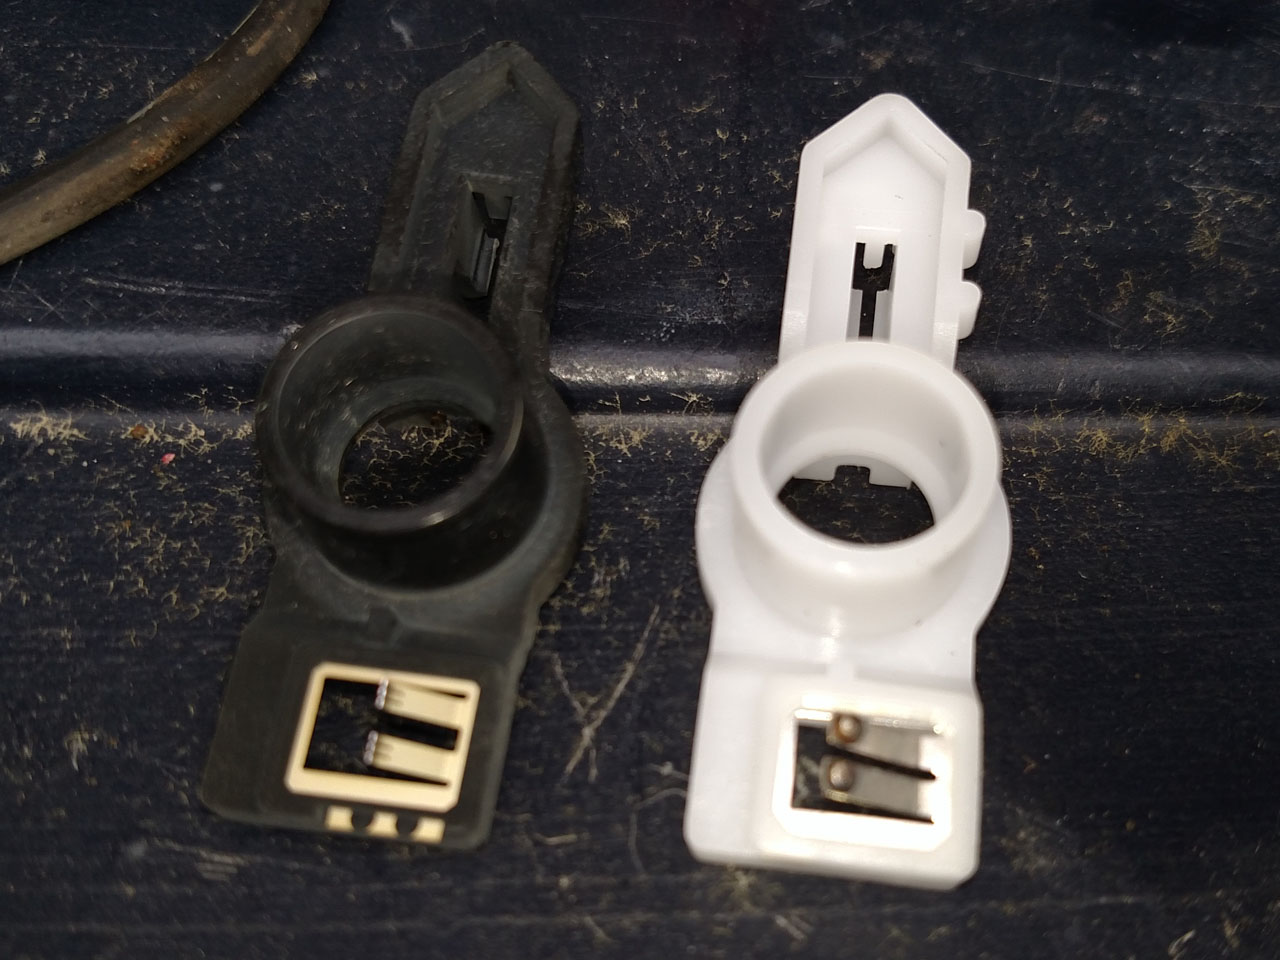
Place the new arm in the old sender, and tap the bushing back into place. I used the old bushing, not the new one, just in case they were actually a slightly different size in the press-fit space. i don't think they are, but i wasn't going to bother getting a micrometer out...... Anyway, as you tap the bushing in, you might get it too tight, so that the arm can't move, but it's no big deal. Just turn it over and tap the other direction very lightly until the arm moves free. you want it moving freely, but not flopping about; it shouldn't be able to tilt.
Now snap the sender unit back onto the pump assembly, reconnect the electricals if you disconnected them, and snap the float arm into the wiper arm. Voila:
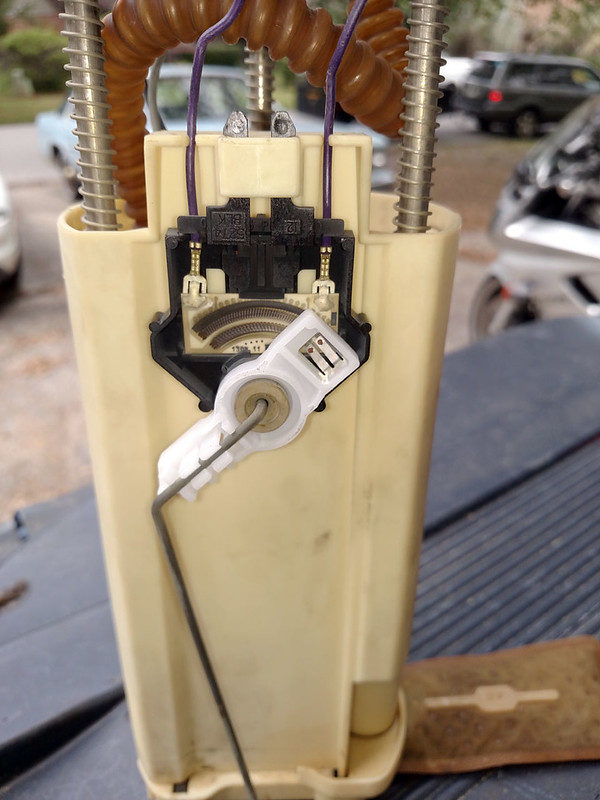
Toss it back into the tank (don't forget the new O-ring from the kit,) replace the locking ring, tap the tabs back down, reconnect the electrical and fuel lines, and replace the cover. If you did like me and removed the back seat, put all of that stuff back.
DONE! Gas gauge works. Drive around if you need proof.
The part to fix classic Aurora, just the sender, is scarce. As in no longer exists. Can't be had. Anywhere. You have to get the whole pump assembly, which varies from at least 50 bucks to as much as 200! I'm not sure why such variance exists, but I don't like it when "the same" part can be had somewhere for a quarter of the price; i just don't trust that.
The sender for the second-gen is widely available. It doesn't fit, though, even though it superficially looks the same; it attaches differently, and the stuff that snaps it into place has no place to go on the classic pump assembly.
Thing is, the wiper arm DOES fit into the classic's sender. you just have to get it off the new part, get the wiper arm off the old part, and replace it with the new one. I could swear I found a thread where somebody did just that, but I can't find it now. Maybe it wan't actually this board, but a Bonneville or Cadillac board or someplace like that.
The sender unit for the second-gen Aurora is Dorman part 911-022, and it's about 35 or 40 bucks.
I already had all the trunk trim out because I've been working on a leak where the lid struts attach to the body work. Those plates are spot-welded from the factory, but in my car they'd apparently broken loose and the previous owner (my late father-in-law) drilled them and bolted them in, which was not even remotely weatherproof. Anyway, back to the gas gauge.....
I removed the back seat, which made it a trillion times easier to get to the fuel pump. It's easy to reach from the passenger compartment, without having to crawl into the trunk, climb out when you realize you need another tool, blah blah blah. The bottom cushion is easy, it just pops out so you can get to the battery and fuses. The back is easy, too, if you have an 18mm socket...... nobody's socket set has an 18, though; they're all 9,10,11,12,13,14,15,17,and 19. Same with wrenches. So I went to home depot and picked up a 6-point 18mm socket for 3 or 4 bucks. Once those 18mm bolts are out, the seat back lifts up and comes out. There's a sound panel that comes out, and you have access to the trunk.

Remove that plate, and there are two electrical connections and two fuel connections under there. The fuel connections are snap-fit and easy to remove, although a small amount of fuel will dribble out.
Now the fun begins. First, clean that area as best you can. I didn't, and when I went to put stuff back together I had an enormous amount of crud that had gathered on the surface where the O-ring seals the pump assembly, which I had to remove with care so as to not dump it all into the open tank. Clean that gunk outa there before pulling the pump assembly, m'kay?
You have to remove that lock ring that's probably almost rusted solid. I found mine to have some rust, but what makes it hard to remove is actually the tabs that are bent down over it. If you look carefully, you'll see that they have an indent that matches a ridge on the ring, and that becomes a retainer lock. So my first order of business was to put a screwdriver under each of those tabs, pound it in a bit, and pry those up just a little bit. I couldn't get to the tab that was under the fuel lines, but all the others were accessible, and enough to make it loose. That made tapping the ring to remove it a piece of cake.
Lift the assembly, you'll have to twist it and tilt it to get it out because the level sensing float sticks way out to the side. Some gas will spill, but if you do it slowly, and let the assembly drain as you lift it, you'll minimize the spillage and also minimize the fuel left in the assembly when you get it out.
Now you have this, which in my case is out of focus...... (I'm not pulling it again for another picture!)

What we're after is this, the sending unit which is moved by the float as the fuel level changes.

Pry the metal rod out of the snap fittings to remove the float. The new kit comes with a float, but its arm is shaped a tiny bit differently, so you want to keep your original float. That beige plastic piece at the top of the sender slides out, allowing you to pinch the snap tabs behind it and remove the sender. If you want it all the way loose for easier handling, you'll have to disconnect the two electrical plugs, but I think you can do what needs to be done without that. You do need to get the wires out of the guides there so it's at least that much free movement.
Here is the old (black) and new (white) side by side. Notice how different the tops of the assemblies are, which is why the part won't fit. But the wiper arms are identical!

Now you need to rig something up that you can set the sender on, wiper side down, and find a rod that you can use to tap the brass center piece out. You're not going to need a lot of force, it's just a slip fit in the plastic, and there are no retainers or threads involved. Tap the rod with a screwdriver handle or something, as you're not going to need a sledge.....

Now the same for the new part.
Here's the old wiper next to the new. You can see how much shorter the metal contacts are, which is why the gauge doesn't work.

Place the new arm in the old sender, and tap the bushing back into place. I used the old bushing, not the new one, just in case they were actually a slightly different size in the press-fit space. i don't think they are, but i wasn't going to bother getting a micrometer out...... Anyway, as you tap the bushing in, you might get it too tight, so that the arm can't move, but it's no big deal. Just turn it over and tap the other direction very lightly until the arm moves free. you want it moving freely, but not flopping about; it shouldn't be able to tilt.
Now snap the sender unit back onto the pump assembly, reconnect the electricals if you disconnected them, and snap the float arm into the wiper arm. Voila:

Toss it back into the tank (don't forget the new O-ring from the kit,) replace the locking ring, tap the tabs back down, reconnect the electrical and fuel lines, and replace the cover. If you did like me and removed the back seat, put all of that stuff back.
DONE! Gas gauge works. Drive around if you need proof.


 ?? I need to take a few days off of work or somethin'

