Forum")


Post by XJSman89 on Apr 16, 2011 12:20:29 GMT -6
It's the writeup you've all been waiting for! Ladies and Gents, I'm very proud to present The first Aurora EVER to have Bi-Xenon Projectors!
Before I tell you how to do this mod, let's go over why you would do it in the first place, and some basic facts about projectors.
The first thing that you think of when you think "projectors" is the cutoff, right? That's why I got them in the first place.
Slapping in a set of eBay (or any other brand for that matter) HID bulbs into your halogen bowls will look good (I did it for three years, myself.) but it presents a problem. They put light on the road, sure, but not only is the light output pretty janky and inconsistent on the road but the glare is ridiculous to other drivers. People talk about getting "brighted" with plug and play HIDs. It may not seem like a big deal but now that I have projectors I notice everyone who has gotten plug and play HIDs and the glare that they put out when I'm passing them on the highway... simply put there is a reason why plug and play sets are illegal.
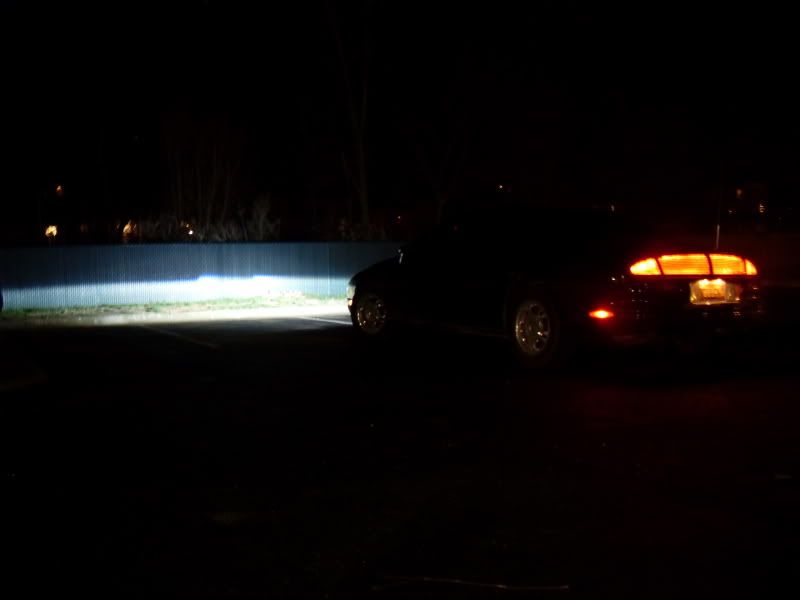
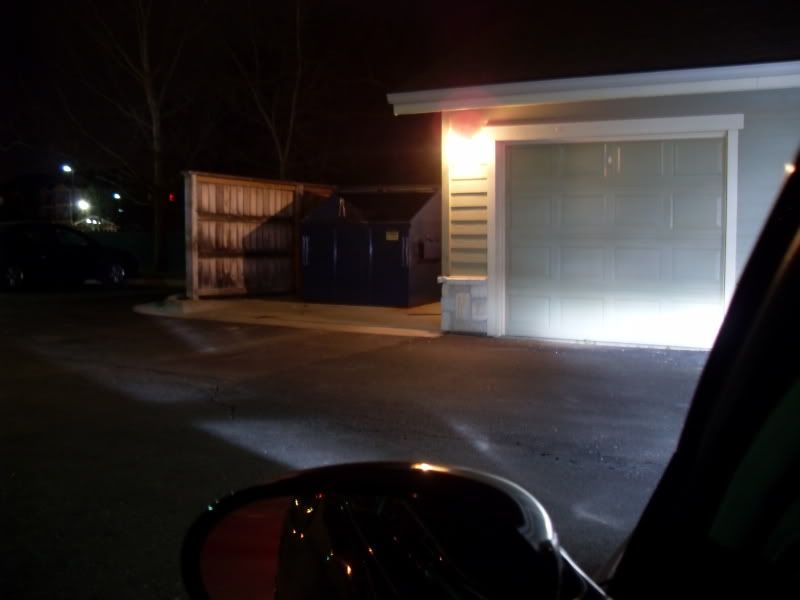
Plug and play HID output:
See the glare on the side in the next picture? That's nothing compared to the glare it throws into the eyes of oncoming traffic.
Plug and play bulbs output light in all directions. Halogen bulbs aren't as intense and project light in all directions as well, but not enough to cause glare. The temp of a standard halogen is around 4000K. The K stands for Kelvin, the scientific standard measure of temperature.
The temp of lights that I got is 6000K. That has a tiny hint of blue to it, and it is the standard temp for almost all factory HIDs that you would see in a brand new Lexus, Acura, Cadillac, etc. The company that I got the lights from doesn't offer them in a temp any higher than that. The reason for this is because you don't NEED anything higher. Any higher than 6000K and you both add glare and actually reduce the amount of light that you put on the road.
Thus the reason for a cutoff presents itself! It's not designed to look cool, that's just a (very awesome) byproduct! It is designed to limit the light that would otherwise shine directly into the eyes of someone driving the other way. Because it uses the shield inside the projector to "cut off" the light before it reaches their eyes, they don't see any glare at all!
Another benefit of this is that because you cut off virtually all glare from reaching their eyes, the light can be VERY bright! Even with plug and play HIDs, like with the HIDs that I have in my projectors, they were brighter than my high beams. The plug and play ones just didn't project as far because I aimed the headlights down. Now you see the problem with plug and play ones... while it may look cool, having highs on all the time would annoy other drivers!
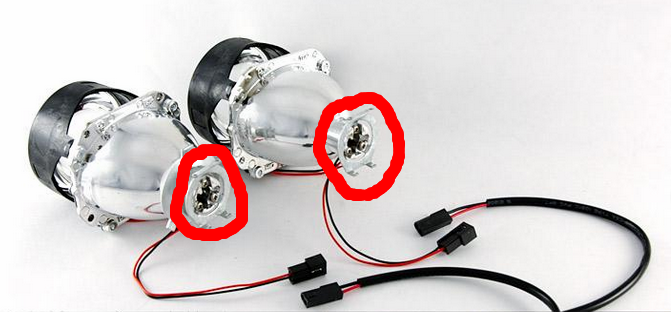
Now the Bi-Xenon part comes into play. At the bottom of each projector is a small solenoid with a plunger attached to it. This solenoid is then tapped into the high beam wires so that it will trigger when you turn on the high beams. This solenoid flips the cutoff shield out of the way and allows your lights to project uninterrupted to their full potential. In other words, you now have HID high beams also!
Pretty cool, right? The harness that I ordered with the lights handles everything, with the only modification being that you have to tap a couple of wires on the passenger side of the car with a diode inline to correctly trigger the highs and lows. I'll explain all of this later in the writeup. Basically since the Classic's lows turn off when you turn on the high beams (I'm not sure about the 2G) you have to modify them so that the lows stay on. The HID ballasts are powered by the low beams... if the low beams turn off then the cutoff solenoid would still trigger but the lights would go out!
So are you ready to start the project? Good! Here are a couple things to consider when you start it.
All that being said, Let's get started!
STEP 1: PURCHASING THE PROJECTORS. First, you'll need to order these babies!
I got mine from a website called The Retrofit Source. The tech support guys there are really chill. I called them once before I ordered everything to be sure I was getting the right stuff and a couple times after as I was installing everything to be sure that I was doing it all correctly.
If you get your lights from them use the discount code "TRSRCFS" for free shipping!
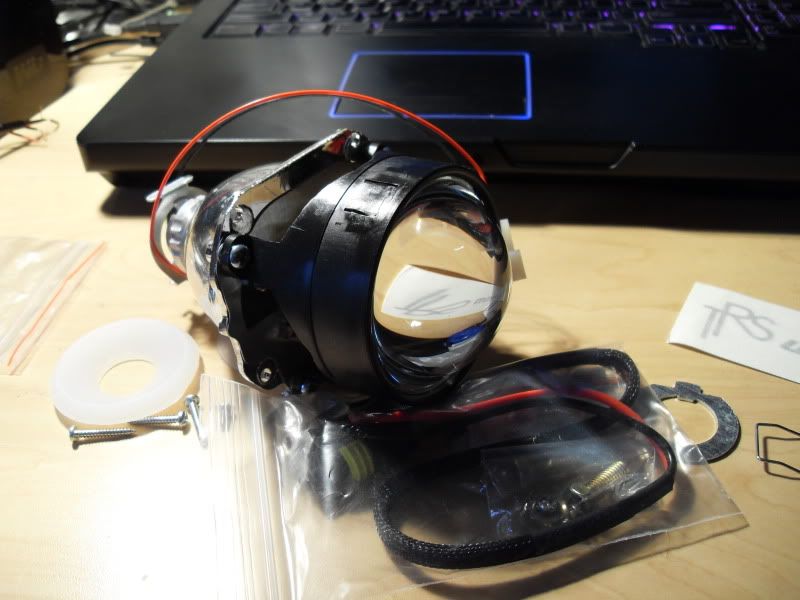
The lights in our classics are pretty shallow and the bowl is not too wide, so we need mini projectors to ensure that they will fit. I used their specially designed house brand of mini projectors called Morimotos. They are based off of the Acura TSX and Lexus LS460 projectors, but will fit in our lights a lot better without any crazy modifications! Here they are:
Bi-Xenon Morimoto Stage III Kit
That comes with everything you need. Be sure to select the following:
That should do it! The kit comes with everything you need to get it done. This isn't everything, but this is the naked (un-shrouded) projector!
STEP 2: PREINSTALL STEPS. There are a couple things to do once you get your lights. There are a few "preinstall" steps that both help you understand the projectors and ensure that they will work perfectly once installed. There are also a couple design flaws that shoot glare in weird places, this helps eliminate that.
All of that being said, you're probably fine skipping this step. I chose to do it, but you don't have to. They look great either way! The main issue that this fixes is that the solenoid can get stuck (like any solenoid has the potential to do) and lubing it up can help prevent that. They're going to be sealed and inside your headlights, the solenoid won't be easy to get to! Think of it as covering your butt so that you can be 100% sure they'll work alright!
Here's the writeup on how to complete the "pre-install" of your headlights! I'll say again it's not that difficult and you'll be glad you did it!
Morimoto Pre-Install
Here are my notes:
That's it for the preinstall!
Here's a bit of knowledge that is actually pretty important! Take a look at the back of the projector. You'll see on the metal that it marks what the "top" of the projector is. The solenoid should be on the bottom of the projector. This may confuse you, though. The cutoff shield is actually mounted on the bottom, and flips DOWN when the solenoid is activated! This seems to be counter-intuitive. The high beams project farther so the solenoid should flip UP, right?
Wrong! You may or may not know this, but the lens in the front of the projector actually inverts everything behind the lens. So the bottom becomes the top! That's why the cutoff shield is positioned like it is, and why when the shield flips down it actually lets the light project farther up when installed on the car. Don't get this confused when you're installing them, the markings on the projectors actually are correct!
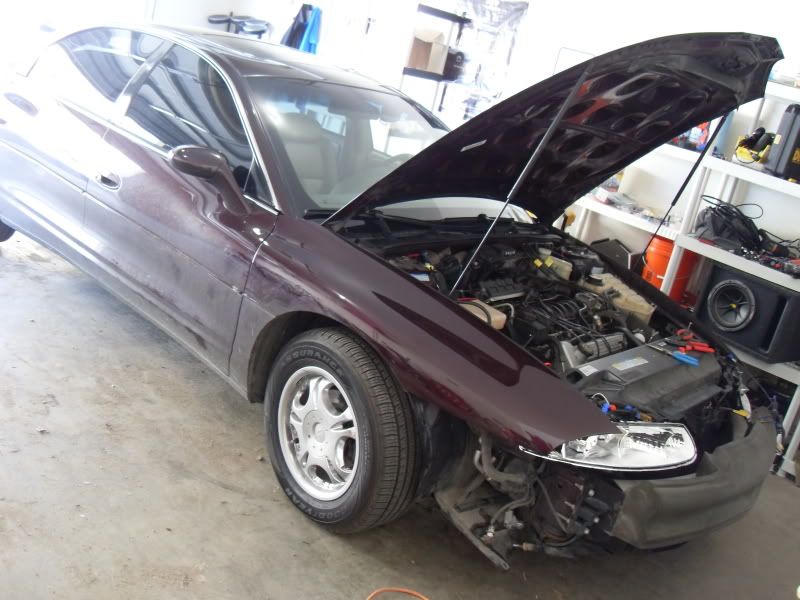
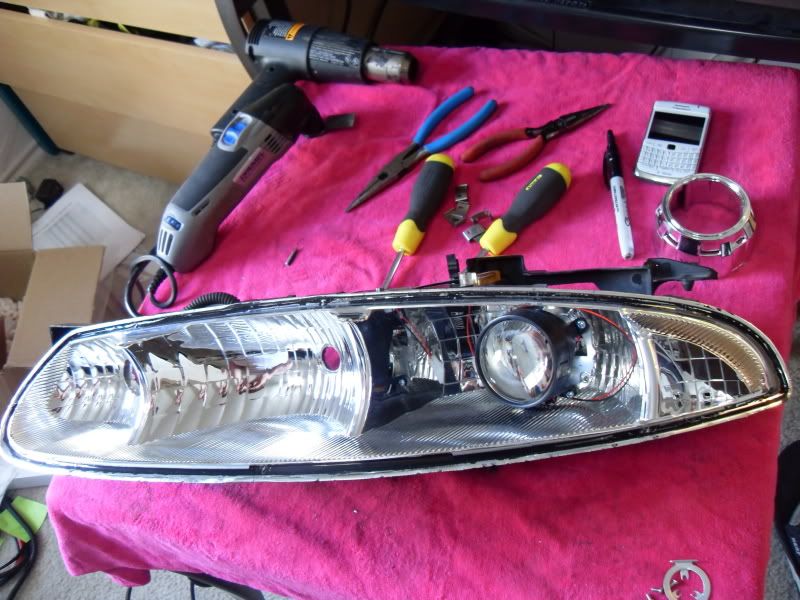
STEP 3: HEADLIGHT REMOVAL. I am assuming that you don't have a second set of lights, so now it's time to get that bumper off and pull the lights out! If you already have a second set then skip ahead and come back here when you're ready to pull the old lights out and install the new ones.
I followed bobsblue95's steps for removing the bumper and, ultimately, the headlights.
Here's what I recommend: Use his writeup as a guide, but look here for the full steps! After you have the sides of the bumper detatched as detailed in bob's writeup it takes VERY LITTLE effort to actually remove it completely. If you're just removing one light it makes sense to not do the whole thing, but I would do so for the projectors. I took the headlights in and out many times while fitting the projectors, testing and wring them, etc. It is a lot easier to take the lights in and out (and to make sure you don't scratch the bumper) when it is removed completely.
To completely remove it, here is an abridged version of what you do:
After you have the bumper completely off, you can remove the lights. Bob's writeup does a great job (and has some good pictures) of how to remove the lights. As he mentions there are four bolts. A 10mm socket will get all of them out.
Once your lights are unbolted be sure to disconnect all three bulbs and get that thing out of there! Be careful not to press the lens against the tip of the fender, it can crack it quite easily. It will take some elbow grease but it will come out!
**Now would be a good time to replace the halogen highs if you wish do do so. The headlights need to come out to replace them, and as you have found they aren't too easy to remove!**
STEP 4: SEPARATING THE LENSES. These were incredibly easy to do on my 96. Other years may have some problems if the headlights were sealed differently. When I called TRS they said they actually had a set of Aurora lights in the shop but were having some difficulty getting them apart. The side marker lenses on my 96 used a high-temp plastic "glue" to seal them, I expect this is what was used on those headlights. I use a dremel to get those apart, heating them up doesn't work. Just go slow to be sure they don't crack! Here's a how-to video on how to open "perma-seal" style GM headlights.
If you're lucky enough to have the other type of glue like I had on my 96, then this step is pretty easy!
Just remove the metal clips on the outside, there are eight or ten per light. I used a pair of pliers and a flathead screwdriver.
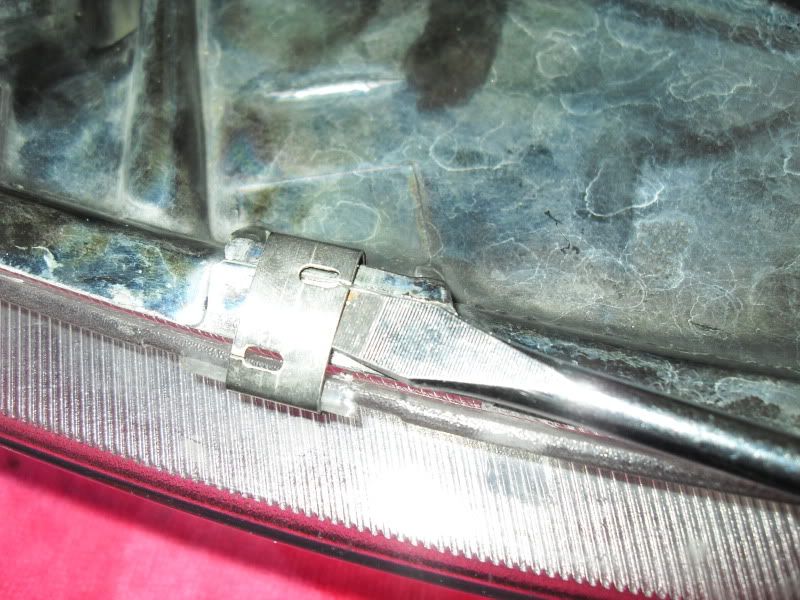
Here's the backside of the lens, and the "glue" used to seal them.
Again, my lights were really easy. You can either heat them up in the oven (265 degrees for NO MORE THAN 7 MINUTES should do it.) or you can use a heat gun. I heated them up a little bit with the gun but It didn't take much for mine. The oven would have been overkill. If you have the permaseal lights then heating them up won't get it undone, you HAVE to dremel them.
After you have heated them up (if you wish) then just take a flathead or two and very carefully pry the lights apart. The lens will want to crack on you if you use too much force so move slowly!
Once you have them apart, it's time for fitting!
STEP 5: FITTING THE PROJECTORS. You'll have to prepare the lights to mount the new projectors and modify the shroud to fit inside before you can mount them.
Getting the headlights ready for mounting is pretty easy. Obviously, you will first have to remove the halogen diffuser that hangs down from the top. There are two bolts per diffuser, use a nutdriver, socket, or wrench to get them off. Very simple.
Note: I used one of these holes to run the solenoid wires through so that I didn't have to drill another one. I'll mention this again later.
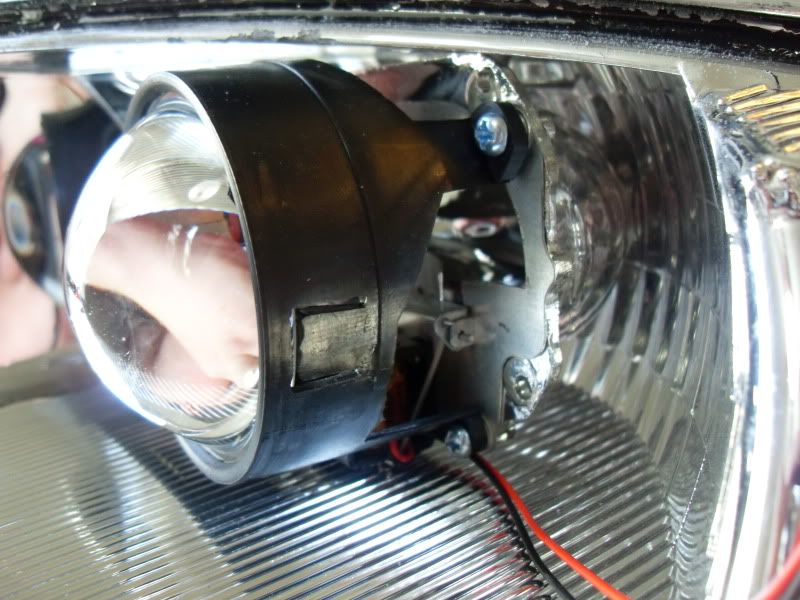
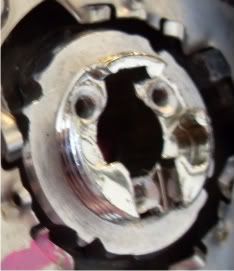
Next, you'll have to take off the triangular brackets that were used to mount the halogen bulbs. There are three bolts per bracket. They screw into the plastic of the headlights and can strip out easily, so be careful! They actually take a torx bit, go figure. You'll need a T-15 driver to get them undone. The reason why you're removing these is so that you can tighten the projector's retaining nut (seen here in the middle) with a pair of vice grips.
Next, you'll see three screws on the back of the projector that hold on a odd looking bracket. You'll need to remove this to fit the projector and install the lights. Be careful to not strip out the screws. You can see where the screws go in the above picture, the actual bracket isn't in that picture.
This picture is from The Retrofit Source. I forgot to take a picture of the bracket. You can see it mounted and circled in red. See the two holes at the top? That's where the bulb retaining wire mounts into. The wire is held in using two hooks at the bottom.
Now you're ready for the test fit! Here is a before and after of what my shrouds ended up looking like once they were modified:
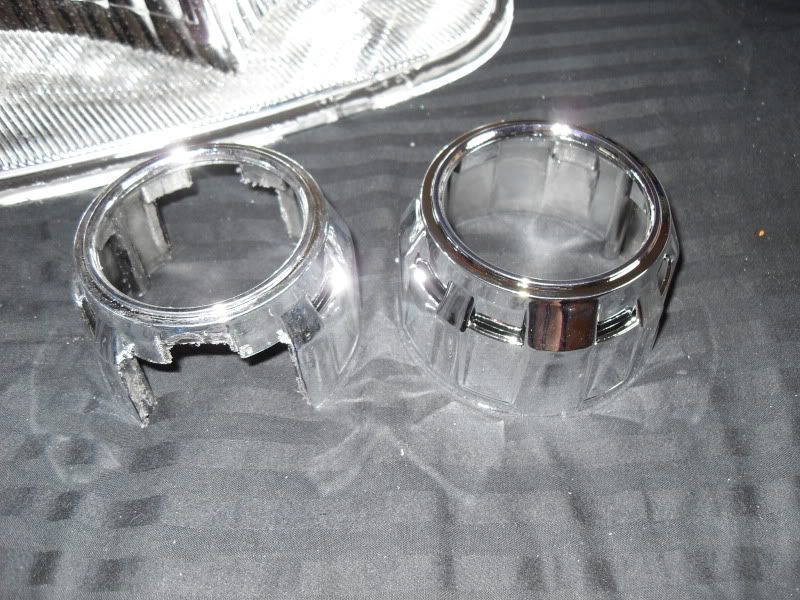
You can fit the projectors in no problem. The threaded part of the back of the projector fits through where the old halogen bulb did. The part you are modifying is the shroud itself.
When you initially try to fit the shroud in, you will find that it won't fit. The solution is simple, cut it! Use a dremel to cut a little bit at a time so that you don't go too far. I cut a little bit more off of the top than the bottom. There's no easy way to describe what to cut, but I'll do my best.
Note: There IS a top and bottom to the shrouds. The screw holes at the top are closer together than the holes at the bottom. Be sure to note this when you're cutting!
I only cut the center parts of the top and bottom. There's not too much that you need to shave off the top and bottom to get them to fit. Some of the black of the plastic ends up showing when you cut it but you won't see this part much at all once its mounted, so a simple silver sharpie should fix this.
Once you have them cut so they fit properly, test fit them! The shrouds connect to the projectors using four screws each. Next use the thin silicone ring included with each projector and put it on the back to ensure that it fits snugly. Then slide the projectors in (with the solenoid at the bottom of course) and bolt them up. There is a custom-made bolt for each of the two projectors. You can't miss it; it has notches around the outside that I used to tighten it. You can see what it looks like once installed in one of the pictures I included above:
Just hand-tighten it at first, you won't completely tighten it until you're ready to throw the lenses on for good.
You should be good to go! By this time you'll probably want to check them out. Good idea! You'll need to get the wiring done before you can, but you can see what they look like at least! The stock headlight lenses can be deceiving; when they're not glued on correctly it makes the output of the projectors look a lot worse than it will be when completed. Just test it without the lenses for now.
I'm sure you want to see what they look like, so let's wire them up!
STEP 6: WIRING. This isn't too hard to do, it just takes some patience. Read through everything first so you don't connect something wrong by accident!
First, let's get the bulbs in there. There is a thin u-shaped wire that is used to hold the bulbs in. The problem is that it's built for a different shaped bulb retainer.
The bracket that this little u-shaped retaining wire fits into is the odd looking bracket that you removed earlier. reattach it with all three screws and slide the bulb into the projector. Now take one side of the bracket, bend one side so that it's straight with the top, move a little bit out, and then bend it back down. If you try to fit it in there like it is you'll see the problem; the top part of the bracket isn't wide enough to fit properly. All you're doing is widening the top out so that it will fit and hold the bulb in correctly.
The little upturned parts at the end of the retaining wire hook into the bottom of the bracket and press onto the back of the bulb to hold it in tight. Ensure both sides of the wire press onto the black back part of each bulb!
*I'll take a picture of the bulb and retainer mounted in the car and insert it in the next couple days*
The harness wiring is VERY similar to the steps found in this PDF. It will explain how to complete most of the wring needed to get your projectors running, with a couple modifications.
Note: Here is what you do differently from the above wring writeup.
*I'll take another picture of the proper connection in the next couple days as well*
There's one final step. As mentioned earlier, most cars leave the low beams on when the high beams are turned on. The classic doesn't. There's a very simple way to fix this!
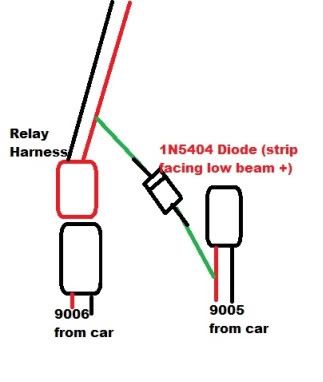
You'll need to get a 1N5404 diode from radio shack (they're like $1.58) and wire this in. The diode is very important, it prevents your stock wiring from getting fried by the harness. All you need to do is connect the positive STOCK high beam wire to the positive RELAY INPUT wire that connects to the car's 9006 low beam output, but be sure to connect it on the relay side. You also need to be sure that the strip on the diode is on the low beam side.
You only need to do this on the side where you plugged the low beam output from the car into the relay harness on, which would be the passenger side. This picture (sent to me by one of the TRS tech support guys) should help clarify everything!
Finally, the solenoid needs to be wired up! The connectors needed to wire the solenoids is included as well. You can see that the solenoid in the projector has a white two-pin connector on it. There is a black connector included in the kit, this is the one that you will attach to the car. Simply connect the red wire to the positive stock high beam wire, and the black wire to the negative stock high beam wire. You'll do this for both sides.
I'm sure you can see that you can see the connector's wires will need to be connected outside the headlight once you get the lens on. The solution is simple! As mentioned before, use one of the holes left when you took out the halogen diffuser to run the wires through. You'll need to cut off the connector, run the wires through, and reattach the connector. I used wire nuts for all of my connections since it gives a good, clean connection. You can connect wires in whatever way you wish. Soldering would be the best as far as a clean, professional installation goes.
ALTERNATIVELY, since I created this post an updated harness has been released that should do all of this already. I am leaving the above steps as a reference in case you want to do the harness yourself and/or if you get an older or incorrect version of the harness and need to modify it. The following is a post from wireless further along in the thread that describes this new harness and how to install it:

With the classic's, the low beam turns off when you turn on the high beam. This can cause issues with the bi-xenon functionality with the factory headlight harness: when you flip on your high beams, the halogen highs come on but the low beam (hid bulb) turns off. The shield still flips, but you have no light to emit.
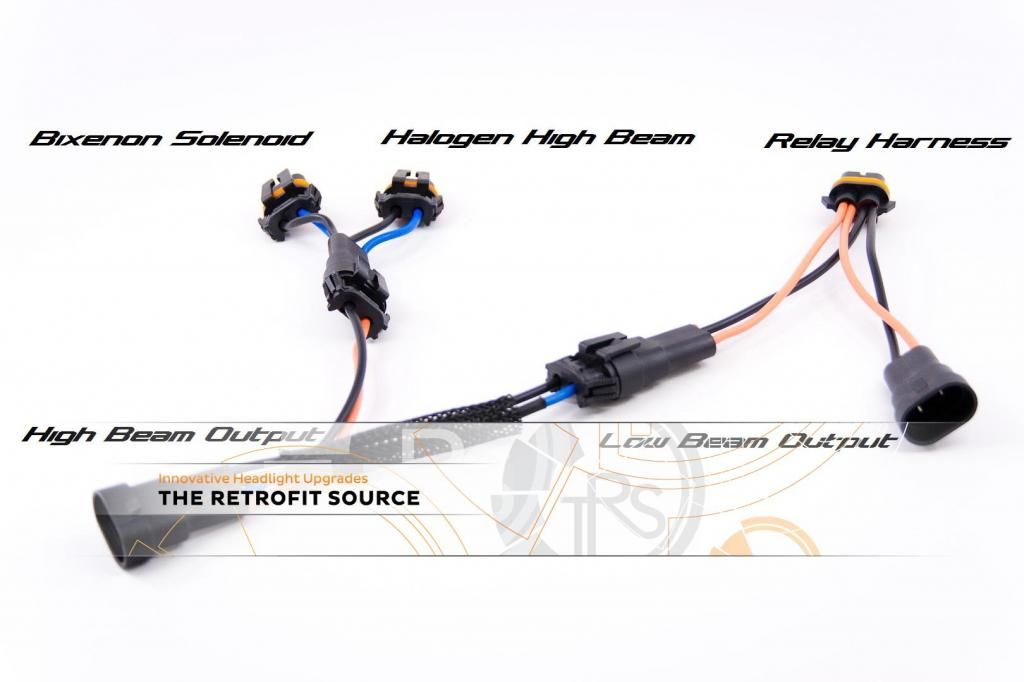
This fixes it - This harness has a diode built in. A diode allows current to flow one way only - not two, in a nutshell. (The diode, in this image, has the black mesh wrap on it)
This harness has a diode that keeps your relay, in this case a TRS wire harness activated so your low beams continuously receive power, even when your highs are turned on.
How it works is:
Factory high beam (9005) plugs into the High Beam Output (labelled on image)
The splitter on the left, with the two male plugs, plugs into both your solenoid and halogen bulb on that side.
The low beam (9006) plugs into the "Low Beam Output."
This is the receiving connector that will signal the relay to stay on when the high beam is flipped.. The male plug on that side plugs into your harness.
It should also be noted that the harness I took and modified as well as the updated harness that wireless explains above aren't completely compatible with the functions of our Auroras. The Aurora's "flash to pass" feature, when used in the daytime, (pulling on the high beam stalk without "clicking" it into place) flashes the highs to let someone know that you would like to pass them on the highway. It's also how you let someone know there is a cop hiding somewhere waiting to spring them. ;D With either of these new harnesses installed the low beams will also be activated when you "flash" someone. HID bulbs need time to "warm up" or the life of the bulb can be shortened. Flashing them on and off is detrimental to the life of the bulb. Exactly how much is hard to say. Your bulb won't go bad in a couple weeks if you flash someone once but it doesn't help it; It isn't a huge issue and to correct it I just don't flash people much. Simple. ;D Sall came up with an alternative that is discussed on pages 6 and 13-14 further on in the thread.
Now it's time to test them! Before you do, though, make sure that NONE of the wires can get caught in the moving parts of your engine! There are a lot of wires, be sure to secure all of them. I used zip ties.
STEP 7: TESTING. Now that everything is wired properly, fire them up! They draw a lot of power, so I would turn the car on while doing this.
It's the moment of truth! Just turn your lows on at first. If they don't work, don't fret! Just check your connections. The relay positive, negative, and low beam output from the car are the most obvious culprits. Remember that the 9006 low beam connector from the car to the relay harness must be connected OPPOSITE from how it looks like it should be connected! All of the other ones connect like they seem that they should. If you look in the paint diagram from TRS above you can see that the positive and negative are, in fact reversed.
If they work, fantastic! Now just bask in the brilliance that is a perfect cutoff line. ;D If not then post here, send me a PM, and I'll help you figure it out. I'm happy to give anyone a call and walk you through it if needed. It can be a complicated process.
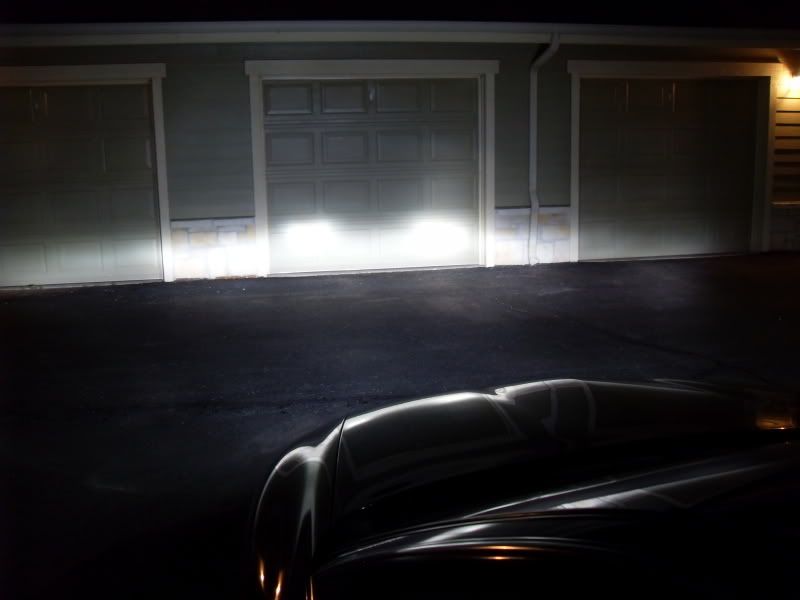
No doubt you'll need to adjust them. You'll need to find a level surface and a blank wall. Park 25 feet or so from the wall and check the output. If you're like two feet from the wall the output WILL look weird. Example:
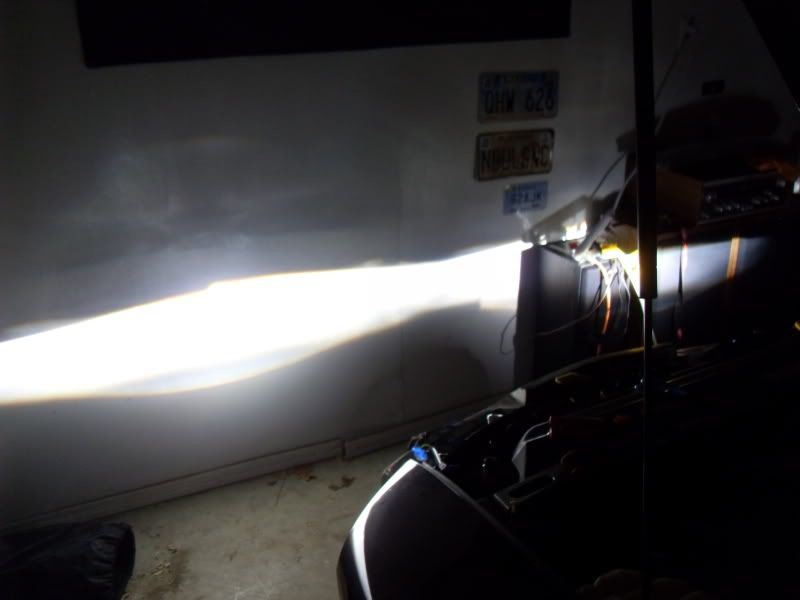
And the highs:
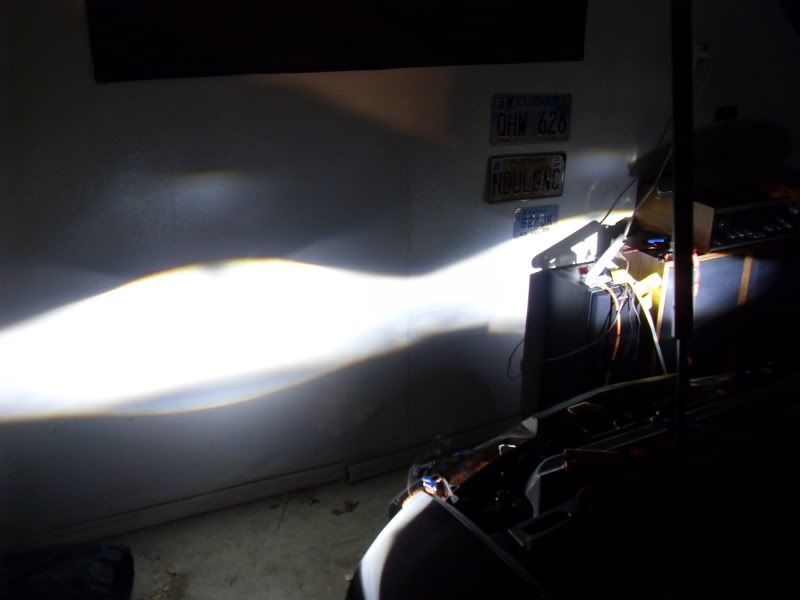
See how it looks bad? That's because it's parked so close.
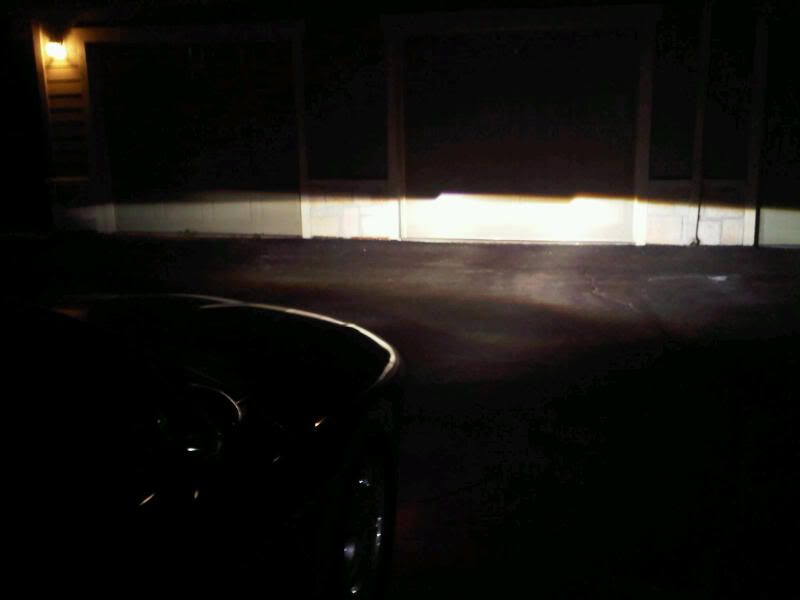
Once you're parked properly in front of the wall, you're ready to do test them out!
First, be sure the lights are level. there is a level on the top outside part of each light. I chose to aim the lights up a little bit once it was all said and done, you can determine this for yourself once you're complete.
Next, check the rotation of the projectors themselves. This is why you didn't tighten the bolt on the back of the projector completely; so that you can rotate them to the correct positions here. Chances are they'll be a little bit skewed.
Once you know how it is supposed to be rotated, remove the light and completely tighten the notched bolt on the back of the projector. I used a vice grip to get it tighter by putting the end of the flathead into a notch and using that to rotate it, Then use a set of vice grips to tighten it up REALLY tight. It will dig into the plastic of the light a bit, this is why it's a more permanent installation haha. You'll need it really tight in order to ensure that it doesn't rattle around once the housing is glued together.
In the picture above you can see what it looks like when it isn't tight. The projector on the left has been completely tightened down, but the one on the right wasn't tightened yet. See how the right one is a little fuzzy? You can also tell that I was testing the rotation also. The passenger projector needs to be rotated to the left still.
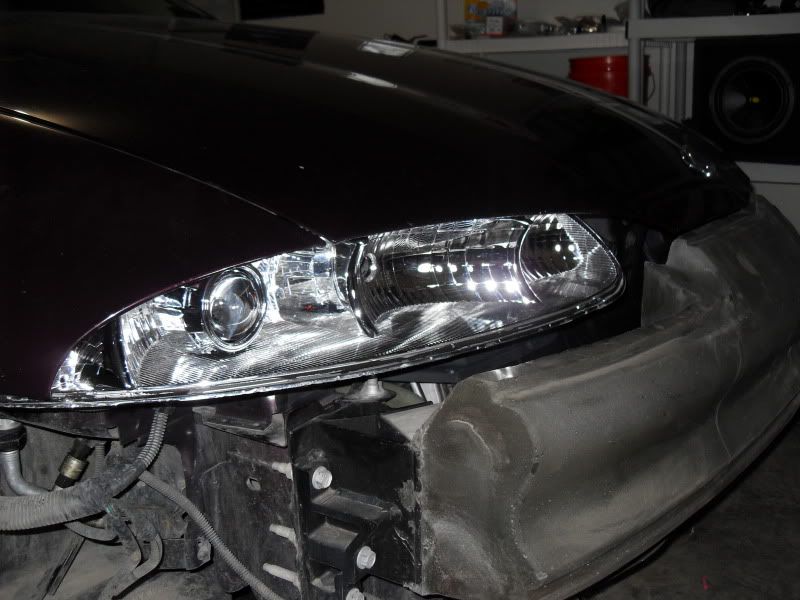
Once they're tightened put them back in there and check it one more time! It looks good, doesn't it?
STEP 8: REATTACHING THE LENS. This is the point of no return! Once you put the lens on it will be impossible to modify the projector's fitment without opening the headlight again.
Before you put the lens on, ensure:
If all that is done, you are ready to reattach the lens!
This part is easy! I used two quick-grip clamps like the ones in the link PER LIGHT. More clamps is always better if you can get them to clamp securely, just be sure that they doesn't scratch the surface of the lens.
Once the lens is clamped tightly to the housing (you may need to move/remove a clamp temporarily in order to silicone underneath it) you can start sealing!
I used GE Silicone II Premium Waterproof Silicone to seal my lights. It is tack free in 3 hours and ready to roll in 24. Leave the clamps on for the full 24 hours. DON'T USE quick-dry silicone. You need something that will stand up to the continued vibrations of the car for years. A quick-dry silicone won't do this as well. GE Silicone II is crack proof, shrink proof, and flexible.
Get a caulk gun, load your silicone tube, and seal the light up! I pressed the end along the seam between the light and the lens and basically "injected" the silicone in. You don't need to glob it on, just enough to seal it. One tube sealed both of my lights with silicone to spare.
Once the silicone is completely dry remove the clamps and trim/sand off the excess to clean it up. Remember, if you take more time putting it on then there's less to clean up later!
Be sure to reinstall the metal retaining clips that hold the lens and housing together. You removed these when you first separated the lens.
Once they're dry, you're ready for final installation!
STEP 9: FINAL INSTALLATION. The moment of truth is here! This is the easiest step of them all.
Just reverse the tear-down to install everything!
Install the headlights. Be careful of the bottom headlight bolts and don't let the corner of the fender crack your lens when you're putting them in. Don't forget the turn signal and high beam bulbs! Just tape off the low beam socket that isn't used.
Test the lights out. Do they work as they should? Do they seem to be aimed and rotated correctly? what about he high beams?
Make sure one more time that the lights are tight and reinstall the bumper.
*I don't yet have any good pictures of the final install. I'll take a few of that as well!*
You're good to go! Congrats on the install, I'm sure it feels fantastic! One last step: Be sure to upload pictures onto this thread so everyone can see how glorious it is!
Please post any questions, comments, findings, etc to help improve this thread. I will update it accordingly.
Also don't be afraid to ask for help! Please post here but you can also PM or email me (xjsman89@auroraclubna.com) the same question and I will help solve the problem!
Before I tell you how to do this mod, let's go over why you would do it in the first place, and some basic facts about projectors.
The first thing that you think of when you think "projectors" is the cutoff, right? That's why I got them in the first place.
Slapping in a set of eBay (or any other brand for that matter) HID bulbs into your halogen bowls will look good (I did it for three years, myself.) but it presents a problem. They put light on the road, sure, but not only is the light output pretty janky and inconsistent on the road but the glare is ridiculous to other drivers. People talk about getting "brighted" with plug and play HIDs. It may not seem like a big deal but now that I have projectors I notice everyone who has gotten plug and play HIDs and the glare that they put out when I'm passing them on the highway... simply put there is a reason why plug and play sets are illegal.
Plug and play HID output:
See the glare on the side in the next picture? That's nothing compared to the glare it throws into the eyes of oncoming traffic.
Plug and play bulbs output light in all directions. Halogen bulbs aren't as intense and project light in all directions as well, but not enough to cause glare. The temp of a standard halogen is around 4000K. The K stands for Kelvin, the scientific standard measure of temperature.
The temp of lights that I got is 6000K. That has a tiny hint of blue to it, and it is the standard temp for almost all factory HIDs that you would see in a brand new Lexus, Acura, Cadillac, etc. The company that I got the lights from doesn't offer them in a temp any higher than that. The reason for this is because you don't NEED anything higher. Any higher than 6000K and you both add glare and actually reduce the amount of light that you put on the road.
Thus the reason for a cutoff presents itself! It's not designed to look cool, that's just a (very awesome) byproduct! It is designed to limit the light that would otherwise shine directly into the eyes of someone driving the other way. Because it uses the shield inside the projector to "cut off" the light before it reaches their eyes, they don't see any glare at all!
Another benefit of this is that because you cut off virtually all glare from reaching their eyes, the light can be VERY bright! Even with plug and play HIDs, like with the HIDs that I have in my projectors, they were brighter than my high beams. The plug and play ones just didn't project as far because I aimed the headlights down. Now you see the problem with plug and play ones... while it may look cool, having highs on all the time would annoy other drivers!
Now the Bi-Xenon part comes into play. At the bottom of each projector is a small solenoid with a plunger attached to it. This solenoid is then tapped into the high beam wires so that it will trigger when you turn on the high beams. This solenoid flips the cutoff shield out of the way and allows your lights to project uninterrupted to their full potential. In other words, you now have HID high beams also!
Pretty cool, right? The harness that I ordered with the lights handles everything, with the only modification being that you have to tap a couple of wires on the passenger side of the car with a diode inline to correctly trigger the highs and lows. I'll explain all of this later in the writeup. Basically since the Classic's lows turn off when you turn on the high beams (I'm not sure about the 2G) you have to modify them so that the lows stay on. The HID ballasts are powered by the low beams... if the low beams turn off then the cutoff solenoid would still trigger but the lights would go out!
So are you ready to start the project? Good! Here are a couple things to consider when you start it.
- The project took me right at a week to complete. I'm a full time student and I have a part time job so my time is pretty limited. A lot of this time is down-time. I had homework, had to work late, etc. If you started it Friday night and worked a pretty full weekend I bet you could get it done by Monday. Not all of these steps require the lights to be out of the car either, so you can start early. After you read the writeup I'm sure you will be able to calculate the time you'll need! I have the scooter to ride so it wasn't a big deal for me to have the car down for a whole week. Plus I saved gas money! ;D
- The amount of time that your car is "down" would be greatly reduced if you had a second set of headlights. This would also be helpful in case you cracked the lens on one of them. I didn't have the extra cash so I used the set on my car and didn't have any problems doing so. The choice is up to you!
- Finally, this is a rather permanent modification. It's not irreversible per say, but it takes a lot of time and effort to get these babies in there and looking perfect. Please be sure that it's what you want (and that you'll have the car for enough time to make it worth it) before you do this! You can't just unplug them and swap in some halogens like you can with plug and play bulbs.
- DON'T CLEAN THE PROJECTOR BOWL WITH ANY KIND OF ALCOHOL! It will RUIN the chrome coating and, in effect, ruin the projector.
All that being said, Let's get started!
STEP 1: PURCHASING THE PROJECTORS. First, you'll need to order these babies!
I got mine from a website called The Retrofit Source. The tech support guys there are really chill. I called them once before I ordered everything to be sure I was getting the right stuff and a couple times after as I was installing everything to be sure that I was doing it all correctly.
If you get your lights from them use the discount code "TRSRCFS" for free shipping!
The lights in our classics are pretty shallow and the bowl is not too wide, so we need mini projectors to ensure that they will fit. I used their specially designed house brand of mini projectors called Morimotos. They are based off of the Acura TSX and Lexus LS460 projectors, but will fit in our lights a lot better without any crazy modifications! Here they are:
Bi-Xenon Morimoto Stage III Kit
That comes with everything you need. Be sure to select the following:
- Ballasts: Morimoto 3five (35w)
- Bulbs: H1: Morimoto 3five (I used 6000k, they have a tint of blue. 4000K looks like a halogen.)
- CCFL Angel Eyes: I didn't get these. There isn't a lot of space, they may not fit in our lights. You can try them if you wish, but I wouldn't bother.
- Projectors: LHD (North American Standard)
- Shrouds: Mini Gatling Gun (Again, our lights are small. You need a mini shroud. These look great, you'll love them!)
- Wire Harness: Relay: 9006 (since they're going in the low beam slot)
That should do it! The kit comes with everything you need to get it done. This isn't everything, but this is the naked (un-shrouded) projector!
STEP 2: PREINSTALL STEPS. There are a couple things to do once you get your lights. There are a few "preinstall" steps that both help you understand the projectors and ensure that they will work perfectly once installed. There are also a couple design flaws that shoot glare in weird places, this helps eliminate that.
All of that being said, you're probably fine skipping this step. I chose to do it, but you don't have to. They look great either way! The main issue that this fixes is that the solenoid can get stuck (like any solenoid has the potential to do) and lubing it up can help prevent that. They're going to be sealed and inside your headlights, the solenoid won't be easy to get to! Think of it as covering your butt so that you can be 100% sure they'll work alright!
Here's the writeup on how to complete the "pre-install" of your headlights! I'll say again it's not that difficult and you'll be glad you did it!
Morimoto Pre-Install
Here are my notes:
- I sanded the plungers as directed, it wasn't difficult at all. I used 150 followed by 600 grit sandpaper.
- I used a standard high-temp graphite lube from home depot to lube them, it is working fine.
- Don't stretch the return spring too much, a little bit will do. Too much and you'll ruin the spring!
- I couldn't find a thin aluminum sheet so I used an air vent ducting plug and cut the metal from that. It worked fine. When you drill the holes in the flashing be sure to sand the other side down so it fits flat, the screws used to hold the solenoid don't have a whole lot of extra thread on them.
- LOOK ON PAGE 2 AT THE BOTTOM. You will see another step to sharpie the VERY OUTSIDE of the lens to eliminate glare. Do it just like it says, it helps a lot too. Be careful and take your time, though!
That's it for the preinstall!
Here's a bit of knowledge that is actually pretty important! Take a look at the back of the projector. You'll see on the metal that it marks what the "top" of the projector is. The solenoid should be on the bottom of the projector. This may confuse you, though. The cutoff shield is actually mounted on the bottom, and flips DOWN when the solenoid is activated! This seems to be counter-intuitive. The high beams project farther so the solenoid should flip UP, right?
Wrong! You may or may not know this, but the lens in the front of the projector actually inverts everything behind the lens. So the bottom becomes the top! That's why the cutoff shield is positioned like it is, and why when the shield flips down it actually lets the light project farther up when installed on the car. Don't get this confused when you're installing them, the markings on the projectors actually are correct!
STEP 3: HEADLIGHT REMOVAL. I am assuming that you don't have a second set of lights, so now it's time to get that bumper off and pull the lights out! If you already have a second set then skip ahead and come back here when you're ready to pull the old lights out and install the new ones.
I followed bobsblue95's steps for removing the bumper and, ultimately, the headlights.
Here's what I recommend: Use his writeup as a guide, but look here for the full steps! After you have the sides of the bumper detatched as detailed in bob's writeup it takes VERY LITTLE effort to actually remove it completely. If you're just removing one light it makes sense to not do the whole thing, but I would do so for the projectors. I took the headlights in and out many times while fitting the projectors, testing and wring them, etc. It is a lot easier to take the lights in and out (and to make sure you don't scratch the bumper) when it is removed completely.
To completely remove it, here is an abridged version of what you do:
- Behind the black plastic liner in the front of each wheel well there are two nuts (with washers attached) where the fender meets the bumper. A 10mm socket will get these off.
- Detatch the black plastic (the same plastic sheet) underneath the car as well, by the side markers. You will see a brace that goes diagonally downward to attach to the bumper. Undo this brace from the bumper.
- The bumper should tilt down at this point. Once you've done this to both sides, go underneath the bumper at the front and center of the car. You will see three (3) cutouts where a plastic brace goes from the bumper and attaches to the frame. It uses ribbed plastic bolts to do this. Get a pair of pliers and pry those babies out of there and set them aside. Your bumper can now be completely removed.
- Tilt the bumper down, and alternating between pulling it forward and up at a 45 degree angle, you will be able to remove it!
After you have the bumper completely off, you can remove the lights. Bob's writeup does a great job (and has some good pictures) of how to remove the lights. As he mentions there are four bolts. A 10mm socket will get all of them out.
- There are two (2) bolts toward the inside of the car facing front. They are clearly visible.
- You will find one more facing forward, but it is underneath the light and a little more complicated to get to. (This is the one that Bob uses the flexible extension to get to in his writeup.) It is below the light toward the outside. BE CAREFUL WITH THIS ONE. There is a bolt that is WELDED TO THE FRAME on the back side of this bracket. One of my welds broke on the bolt when I was trying to get it out. It took an hour to get it out (and an hour when putting it back in) to get it done completely for just this one bolt. The nut is incredibly difficult to reach if the weld comes undone. I had to use a really long wrench and an impact drill to get it. Basically go slow and be careful not to break the weld!
- Finally, there is one last bolt on the fender itself. It faces downward. You will see two right next to each other toward the front of the fender; the one you want is the more forward of the two.
Once your lights are unbolted be sure to disconnect all three bulbs and get that thing out of there! Be careful not to press the lens against the tip of the fender, it can crack it quite easily. It will take some elbow grease but it will come out!
**Now would be a good time to replace the halogen highs if you wish do do so. The headlights need to come out to replace them, and as you have found they aren't too easy to remove!**
STEP 4: SEPARATING THE LENSES. These were incredibly easy to do on my 96. Other years may have some problems if the headlights were sealed differently. When I called TRS they said they actually had a set of Aurora lights in the shop but were having some difficulty getting them apart. The side marker lenses on my 96 used a high-temp plastic "glue" to seal them, I expect this is what was used on those headlights. I use a dremel to get those apart, heating them up doesn't work. Just go slow to be sure they don't crack! Here's a how-to video on how to open "perma-seal" style GM headlights.
If you're lucky enough to have the other type of glue like I had on my 96, then this step is pretty easy!
Just remove the metal clips on the outside, there are eight or ten per light. I used a pair of pliers and a flathead screwdriver.
Here's the backside of the lens, and the "glue" used to seal them.
Again, my lights were really easy. You can either heat them up in the oven (265 degrees for NO MORE THAN 7 MINUTES should do it.) or you can use a heat gun. I heated them up a little bit with the gun but It didn't take much for mine. The oven would have been overkill. If you have the permaseal lights then heating them up won't get it undone, you HAVE to dremel them.
After you have heated them up (if you wish) then just take a flathead or two and very carefully pry the lights apart. The lens will want to crack on you if you use too much force so move slowly!
Once you have them apart, it's time for fitting!
STEP 5: FITTING THE PROJECTORS. You'll have to prepare the lights to mount the new projectors and modify the shroud to fit inside before you can mount them.
Getting the headlights ready for mounting is pretty easy. Obviously, you will first have to remove the halogen diffuser that hangs down from the top. There are two bolts per diffuser, use a nutdriver, socket, or wrench to get them off. Very simple.
Note: I used one of these holes to run the solenoid wires through so that I didn't have to drill another one. I'll mention this again later.
Next, you'll have to take off the triangular brackets that were used to mount the halogen bulbs. There are three bolts per bracket. They screw into the plastic of the headlights and can strip out easily, so be careful! They actually take a torx bit, go figure. You'll need a T-15 driver to get them undone. The reason why you're removing these is so that you can tighten the projector's retaining nut (seen here in the middle) with a pair of vice grips.
Next, you'll see three screws on the back of the projector that hold on a odd looking bracket. You'll need to remove this to fit the projector and install the lights. Be careful to not strip out the screws. You can see where the screws go in the above picture, the actual bracket isn't in that picture.
This picture is from The Retrofit Source. I forgot to take a picture of the bracket. You can see it mounted and circled in red. See the two holes at the top? That's where the bulb retaining wire mounts into. The wire is held in using two hooks at the bottom.
Now you're ready for the test fit! Here is a before and after of what my shrouds ended up looking like once they were modified:
You can fit the projectors in no problem. The threaded part of the back of the projector fits through where the old halogen bulb did. The part you are modifying is the shroud itself.
When you initially try to fit the shroud in, you will find that it won't fit. The solution is simple, cut it! Use a dremel to cut a little bit at a time so that you don't go too far. I cut a little bit more off of the top than the bottom. There's no easy way to describe what to cut, but I'll do my best.
Note: There IS a top and bottom to the shrouds. The screw holes at the top are closer together than the holes at the bottom. Be sure to note this when you're cutting!
I only cut the center parts of the top and bottom. There's not too much that you need to shave off the top and bottom to get them to fit. Some of the black of the plastic ends up showing when you cut it but you won't see this part much at all once its mounted, so a simple silver sharpie should fix this.
Once you have them cut so they fit properly, test fit them! The shrouds connect to the projectors using four screws each. Next use the thin silicone ring included with each projector and put it on the back to ensure that it fits snugly. Then slide the projectors in (with the solenoid at the bottom of course) and bolt them up. There is a custom-made bolt for each of the two projectors. You can't miss it; it has notches around the outside that I used to tighten it. You can see what it looks like once installed in one of the pictures I included above:
Just hand-tighten it at first, you won't completely tighten it until you're ready to throw the lenses on for good.
You should be good to go! By this time you'll probably want to check them out. Good idea! You'll need to get the wiring done before you can, but you can see what they look like at least! The stock headlight lenses can be deceiving; when they're not glued on correctly it makes the output of the projectors look a lot worse than it will be when completed. Just test it without the lenses for now.
I'm sure you want to see what they look like, so let's wire them up!
STEP 6: WIRING. This isn't too hard to do, it just takes some patience. Read through everything first so you don't connect something wrong by accident!
First, let's get the bulbs in there. There is a thin u-shaped wire that is used to hold the bulbs in. The problem is that it's built for a different shaped bulb retainer.
The bracket that this little u-shaped retaining wire fits into is the odd looking bracket that you removed earlier. reattach it with all three screws and slide the bulb into the projector. Now take one side of the bracket, bend one side so that it's straight with the top, move a little bit out, and then bend it back down. If you try to fit it in there like it is you'll see the problem; the top part of the bracket isn't wide enough to fit properly. All you're doing is widening the top out so that it will fit and hold the bulb in correctly.
The little upturned parts at the end of the retaining wire hook into the bottom of the bracket and press onto the back of the bulb to hold it in tight. Ensure both sides of the wire press onto the black back part of each bulb!
*I'll take a picture of the bulb and retainer mounted in the car and insert it in the next couple days*
The harness wiring is VERY similar to the steps found in this PDF. It will explain how to complete most of the wring needed to get your projectors running, with a couple modifications.
Note: Here is what you do differently from the above wring writeup.
- The harness attached to each bulb will be clean; there is no "relay wire harness input" on either of them. You don't need to worry about that step.
- On the third picture the "harness input" won't look like the one pictured. It will be a 9006 plug. You guessed it; this plugs into the passenger side low beam output from the car.
- ANOTHER NOTE: The polarity of the wiring on our cars is reversed from the harness. it looks like the plug should attach so that it locks in place. FOR THIS CONNECTION ONLY, just flip the harness output of the TRS harness around so that it DOESN'T click when it's fully attached. All of the other connectors attach like they're supposed to.
- The power wires don't need to attach to the battery. I cut the ends of those connectors off and used bigger ones in order to attach them to the proper places. Connect the positive wire coming from the relay (the one with the fuse attached) to the positive jump terminal next to the serpentine belt. Connect the negative wire of the relay to a grounding point. I used one of the bolts on the top of the strut tower.
*I'll take another picture of the proper connection in the next couple days as well*
There's one final step. As mentioned earlier, most cars leave the low beams on when the high beams are turned on. The classic doesn't. There's a very simple way to fix this!
You'll need to get a 1N5404 diode from radio shack (they're like $1.58) and wire this in. The diode is very important, it prevents your stock wiring from getting fried by the harness. All you need to do is connect the positive STOCK high beam wire to the positive RELAY INPUT wire that connects to the car's 9006 low beam output, but be sure to connect it on the relay side. You also need to be sure that the strip on the diode is on the low beam side.
You only need to do this on the side where you plugged the low beam output from the car into the relay harness on, which would be the passenger side. This picture (sent to me by one of the TRS tech support guys) should help clarify everything!
Finally, the solenoid needs to be wired up! The connectors needed to wire the solenoids is included as well. You can see that the solenoid in the projector has a white two-pin connector on it. There is a black connector included in the kit, this is the one that you will attach to the car. Simply connect the red wire to the positive stock high beam wire, and the black wire to the negative stock high beam wire. You'll do this for both sides.
I'm sure you can see that you can see the connector's wires will need to be connected outside the headlight once you get the lens on. The solution is simple! As mentioned before, use one of the holes left when you took out the halogen diffuser to run the wires through. You'll need to cut off the connector, run the wires through, and reattach the connector. I used wire nuts for all of my connections since it gives a good, clean connection. You can connect wires in whatever way you wish. Soldering would be the best as far as a clean, professional installation goes.
ALTERNATIVELY, since I created this post an updated harness has been released that should do all of this already. I am leaving the above steps as a reference in case you want to do the harness yourself and/or if you get an older or incorrect version of the harness and need to modify it. The following is a post from wireless further along in the thread that describes this new harness and how to install it:
With the classic's, the low beam turns off when you turn on the high beam. This can cause issues with the bi-xenon functionality with the factory headlight harness: when you flip on your high beams, the halogen highs come on but the low beam (hid bulb) turns off. The shield still flips, but you have no light to emit.
This fixes it - This harness has a diode built in. A diode allows current to flow one way only - not two, in a nutshell. (The diode, in this image, has the black mesh wrap on it)
This harness has a diode that keeps your relay, in this case a TRS wire harness activated so your low beams continuously receive power, even when your highs are turned on.
How it works is:
Factory high beam (9005) plugs into the High Beam Output (labelled on image)
The splitter on the left, with the two male plugs, plugs into both your solenoid and halogen bulb on that side.
The low beam (9006) plugs into the "Low Beam Output."
This is the receiving connector that will signal the relay to stay on when the high beam is flipped.. The male plug on that side plugs into your harness.
It should also be noted that the harness I took and modified as well as the updated harness that wireless explains above aren't completely compatible with the functions of our Auroras. The Aurora's "flash to pass" feature, when used in the daytime, (pulling on the high beam stalk without "clicking" it into place) flashes the highs to let someone know that you would like to pass them on the highway. It's also how you let someone know there is a cop hiding somewhere waiting to spring them. ;D With either of these new harnesses installed the low beams will also be activated when you "flash" someone. HID bulbs need time to "warm up" or the life of the bulb can be shortened. Flashing them on and off is detrimental to the life of the bulb. Exactly how much is hard to say. Your bulb won't go bad in a couple weeks if you flash someone once but it doesn't help it; It isn't a huge issue and to correct it I just don't flash people much. Simple. ;D Sall came up with an alternative that is discussed on pages 6 and 13-14 further on in the thread.
Now it's time to test them! Before you do, though, make sure that NONE of the wires can get caught in the moving parts of your engine! There are a lot of wires, be sure to secure all of them. I used zip ties.
STEP 7: TESTING. Now that everything is wired properly, fire them up! They draw a lot of power, so I would turn the car on while doing this.
It's the moment of truth! Just turn your lows on at first. If they don't work, don't fret! Just check your connections. The relay positive, negative, and low beam output from the car are the most obvious culprits. Remember that the 9006 low beam connector from the car to the relay harness must be connected OPPOSITE from how it looks like it should be connected! All of the other ones connect like they seem that they should. If you look in the paint diagram from TRS above you can see that the positive and negative are, in fact reversed.
If they work, fantastic! Now just bask in the brilliance that is a perfect cutoff line. ;D If not then post here, send me a PM, and I'll help you figure it out. I'm happy to give anyone a call and walk you through it if needed. It can be a complicated process.
No doubt you'll need to adjust them. You'll need to find a level surface and a blank wall. Park 25 feet or so from the wall and check the output. If you're like two feet from the wall the output WILL look weird. Example:
And the highs:
See how it looks bad? That's because it's parked so close.
Once you're parked properly in front of the wall, you're ready to do test them out!
First, be sure the lights are level. there is a level on the top outside part of each light. I chose to aim the lights up a little bit once it was all said and done, you can determine this for yourself once you're complete.
Next, check the rotation of the projectors themselves. This is why you didn't tighten the bolt on the back of the projector completely; so that you can rotate them to the correct positions here. Chances are they'll be a little bit skewed.
Once you know how it is supposed to be rotated, remove the light and completely tighten the notched bolt on the back of the projector. I used a vice grip to get it tighter by putting the end of the flathead into a notch and using that to rotate it, Then use a set of vice grips to tighten it up REALLY tight. It will dig into the plastic of the light a bit, this is why it's a more permanent installation haha. You'll need it really tight in order to ensure that it doesn't rattle around once the housing is glued together.
In the picture above you can see what it looks like when it isn't tight. The projector on the left has been completely tightened down, but the one on the right wasn't tightened yet. See how the right one is a little fuzzy? You can also tell that I was testing the rotation also. The passenger projector needs to be rotated to the left still.
Once they're tightened put them back in there and check it one more time! It looks good, doesn't it?
STEP 8: REATTACHING THE LENS. This is the point of no return! Once you put the lens on it will be impossible to modify the projector's fitment without opening the headlight again.
Before you put the lens on, ensure:
- The shroud is tight on the projector itself
- The projector is installed correctly into the light, including the silicone "washer" on the back of the projector inside the headlight
- The bulb is tight in the projector and you have cleaned the bulb with the included alcohol swab prior to installation
- The projector doesn't rotate at all in the headlight
- The solenoid wires have been run through the holes left in the top of the light AND the connector has been reattached to ensure the wires don't slip back inside the light
If all that is done, you are ready to reattach the lens!
This part is easy! I used two quick-grip clamps like the ones in the link PER LIGHT. More clamps is always better if you can get them to clamp securely, just be sure that they doesn't scratch the surface of the lens.
Once the lens is clamped tightly to the housing (you may need to move/remove a clamp temporarily in order to silicone underneath it) you can start sealing!
I used GE Silicone II Premium Waterproof Silicone to seal my lights. It is tack free in 3 hours and ready to roll in 24. Leave the clamps on for the full 24 hours. DON'T USE quick-dry silicone. You need something that will stand up to the continued vibrations of the car for years. A quick-dry silicone won't do this as well. GE Silicone II is crack proof, shrink proof, and flexible.
Get a caulk gun, load your silicone tube, and seal the light up! I pressed the end along the seam between the light and the lens and basically "injected" the silicone in. You don't need to glob it on, just enough to seal it. One tube sealed both of my lights with silicone to spare.
Once the silicone is completely dry remove the clamps and trim/sand off the excess to clean it up. Remember, if you take more time putting it on then there's less to clean up later!
Be sure to reinstall the metal retaining clips that hold the lens and housing together. You removed these when you first separated the lens.
Once they're dry, you're ready for final installation!
STEP 9: FINAL INSTALLATION. The moment of truth is here! This is the easiest step of them all.
Just reverse the tear-down to install everything!
Install the headlights. Be careful of the bottom headlight bolts and don't let the corner of the fender crack your lens when you're putting them in. Don't forget the turn signal and high beam bulbs! Just tape off the low beam socket that isn't used.
Test the lights out. Do they work as they should? Do they seem to be aimed and rotated correctly? what about he high beams?
Make sure one more time that the lights are tight and reinstall the bumper.
*I don't yet have any good pictures of the final install. I'll take a few of that as well!*
You're good to go! Congrats on the install, I'm sure it feels fantastic! One last step: Be sure to upload pictures onto this thread so everyone can see how glorious it is!
Please post any questions, comments, findings, etc to help improve this thread. I will update it accordingly.
Also don't be afraid to ask for help! Please post here but you can also PM or email me (xjsman89@auroraclubna.com) the same question and I will help solve the problem!


 lol. Good job bud! Rob are you sulking in the corner cuz Collins finally beat you at something