Forum")


Post by bobsblue95 on Aug 21, 2011 20:38:35 GMT -6
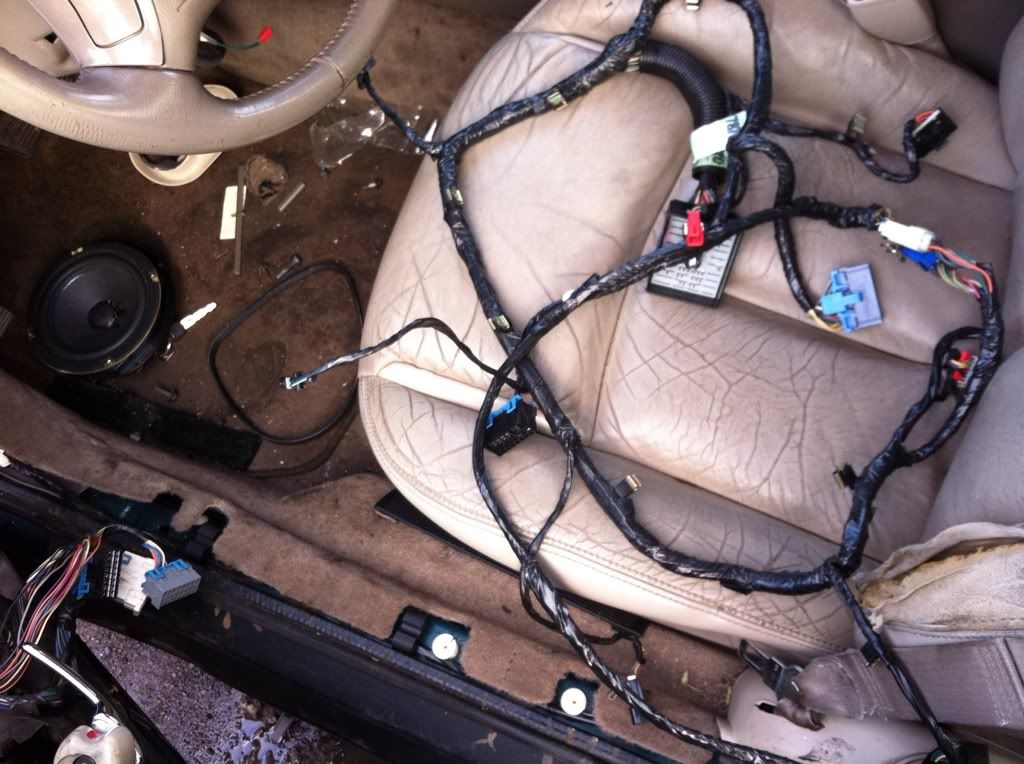
I surgically extracted the Bose radio wiring harness from the parts car. No trivial task! I only cut one ground wire and the front door speaker wires removing all of this... (oh I cut a few random wires inside the car as they were intertwined with my connectors)

Most people won't have the patience for this, so here's how to do it without too much effort. Oh, before anyone asks why I didn't just get some new drivers and amp, two words... Free Upgrade. Everything I needed is already in my hands.
You'll need:
-Bose speakers, all seven for best results!
-a Bose head unit (look for Tape/CD button if you want changer option, not just Tape button.)
-a Bose amplifier and the two connectors for it with enough wire to splice onto.
-optionally, the rear deck, which includes the subwoofer enclosure and amplifier mounting point. You may use your own sub box. I believe it uses 2 ohm drivers but not sure at this time.
-100 feet of 18ga speaker wire, which includes the following:
-Two pieces of 18ga speaker wire, ~18ft long, wrapped with foil then tape. Head unit end needs a wire connection to ground the shield. You might try monster cable here as an expensive alternative. Color code the four individual wires at both ends.
-An inline fuse holder, 20A fuse, Power and Ground wires, ~5 ft.
-Wire splicing equipment. I recommend solder and heat-shrink tubing, but you can use crimp splices or whatever floats your boat.
I discovered that a small (1mm?) allen wrench makes a great pin removal tool. Wiggle the wrench side to side while wiggling the wire in and out. Don't just pull on the wire, *push then pull* until it comes out easily.
Here I'm removing speaker wires from the connector. The pinouts are mostly the same.

To convert non-Bose to Bose wiring:
Disconnect the wires from the rear 6x9 speakers in the trunk.
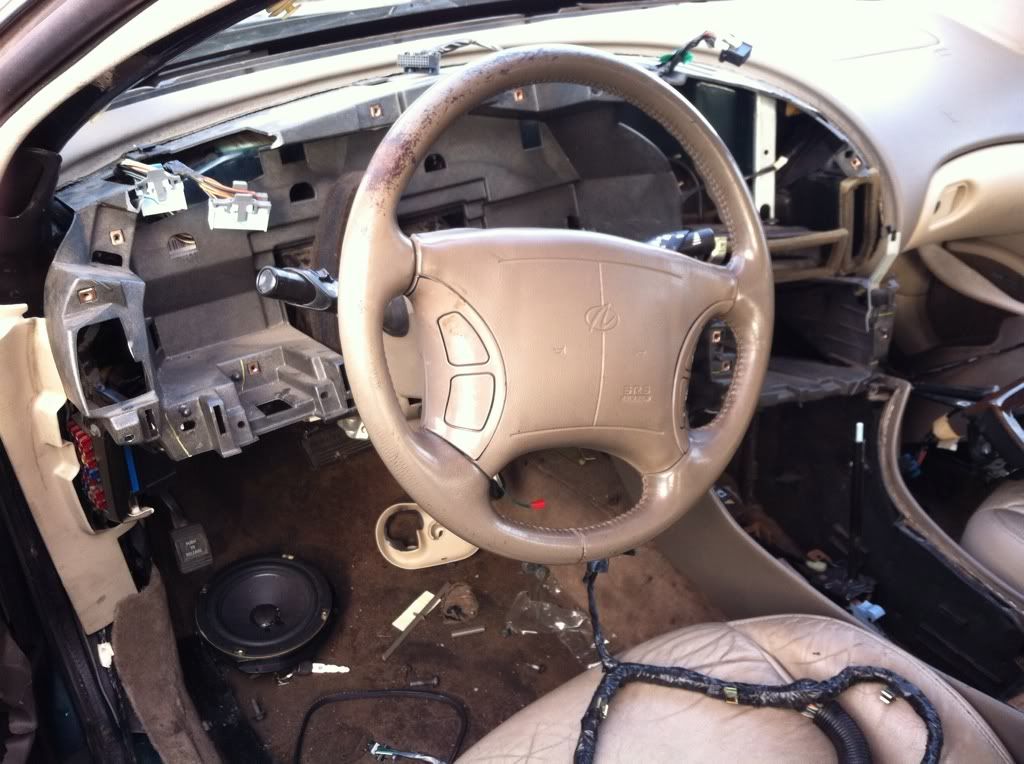
Remove the Yellow wire from radio connector E13 and plug it into E3 (pink wire in the photo.) Make sure the tang engages the connector body.
The other end of the Yellow wire, originally connected to the left rear speaker, gets connected to aplifier connector pin 12 (pink).
Cut the following wires near the h/u connector long enough to splice new wires: (at least 4 inches for your own sanity)
E12(brn), E14(dk grn), E15(lt grn), F12(tan), F13(gray), F15(dk blue)
*DO NOT cut the Light Blue wire in F14 or any other wires not listed.
Splice the SPEAKER SIDE of the Dark Blue wire (Not the H/U side) to the Light Blue wire (scotchlock is good here.) Splice them together in the trunk as well, and then to amp connector, pin 17. This makes the two wires act as one bigger wire, which becomes our common signal return wire.
Four shielded wires* need to be spliced to E12, E15, F12 and F15, and routed along the driver's side under the door sills back behind the back seat, into the trunk. You also need to run the speaker wires to the doors under there.
Connect the following from Bose head unit to Amp, using the four shielded wires:
E12 (brn) -> 15 (brn) - Left Rear +
E15 (lt. grn) -> 14 (dk.blu) - Right Rear +
F12 (tan) -> 13 (tan) - Left Front +
F15 (dk.blu) -> 16 (lt.grn) - Right Front +
Using existing dark and light blue speaker wires spliced together, connect:
F14 (lt.blu) - 17 (wht) - Common - Use BOTH right rear speaker wires for this! Spliced together at both ends as noted above.
F13 (gry) - Common shield from the four shielded wire loom.
*Bose uses 18 ga. wire from h/u to amp and for speaker wires.
Four regular wires wrapped together in foil and tape.
Foil connects to F13 at h/u, no connection at amp.
You may choose to remove and replace the rear deck with the Bose deck. The subwoofer, amplifier and remote receiver are mounted under here.

Just two nuts to remove the seatback, plastic push-in fasteners hold the upper carpet and chmsl assembly, then four screws hold the plastic deck in place. Lots of wire clips to drive you crazy of course.
Speaker Connections:
Front speakers have 2-pin connectors behind the a-pillar interior panels. Cut and splice into the speaker wires. With the head unit connector unplugged, check continuity to determine which side of the connector is speaker side. Cut whichever side you want, I chose to omit the connectors. Amplifier speaker pinout:
1 (lt. blu -), 2 (dk. blu +) - Right Rear door speaker (~12 ft, routed into door)
3 (gray -), 4 (tan +) - Left front woofer and tweeter (~12 ft, splice near parking brake)
5 (brn +), 8 (yel -) - Left rear door speaker (~8 ft, routed into door)
6 (lt grn +), 7 (dk grn -) - Right front woofer and tweeter (~15 ft, splice near ABS module)
Small 4-pin connector goes to sub-woofer dual voice coil driver.
Wire lengths are approximate, from amplifier to speaker or splice point.
Finally you need power and ground. There are good ground points under the back seat, just bolt it down somewhere. The easy way to get power is with an inline fuse holder. Put a spade connector on one end and plug it into the fuse block where the Bose fuse (20A) would normally go.
Cheers!
Bob
Most people won't have the patience for this, so here's how to do it without too much effort. Oh, before anyone asks why I didn't just get some new drivers and amp, two words... Free Upgrade. Everything I needed is already in my hands.
You'll need:
-Bose speakers, all seven for best results!
-a Bose head unit (look for Tape/CD button if you want changer option, not just Tape button.)
-a Bose amplifier and the two connectors for it with enough wire to splice onto.
-optionally, the rear deck, which includes the subwoofer enclosure and amplifier mounting point. You may use your own sub box. I believe it uses 2 ohm drivers but not sure at this time.
-100 feet of 18ga speaker wire, which includes the following:
-Two pieces of 18ga speaker wire, ~18ft long, wrapped with foil then tape. Head unit end needs a wire connection to ground the shield. You might try monster cable here as an expensive alternative. Color code the four individual wires at both ends.
-An inline fuse holder, 20A fuse, Power and Ground wires, ~5 ft.
-Wire splicing equipment. I recommend solder and heat-shrink tubing, but you can use crimp splices or whatever floats your boat.
I discovered that a small (1mm?) allen wrench makes a great pin removal tool. Wiggle the wrench side to side while wiggling the wire in and out. Don't just pull on the wire, *push then pull* until it comes out easily.
Here I'm removing speaker wires from the connector. The pinouts are mostly the same.
To convert non-Bose to Bose wiring:
Disconnect the wires from the rear 6x9 speakers in the trunk.
Remove the Yellow wire from radio connector E13 and plug it into E3 (pink wire in the photo.) Make sure the tang engages the connector body.
The other end of the Yellow wire, originally connected to the left rear speaker, gets connected to aplifier connector pin 12 (pink).
Cut the following wires near the h/u connector long enough to splice new wires: (at least 4 inches for your own sanity)
E12(brn), E14(dk grn), E15(lt grn), F12(tan), F13(gray), F15(dk blue)
*DO NOT cut the Light Blue wire in F14 or any other wires not listed.
Splice the SPEAKER SIDE of the Dark Blue wire (Not the H/U side) to the Light Blue wire (scotchlock is good here.) Splice them together in the trunk as well, and then to amp connector, pin 17. This makes the two wires act as one bigger wire, which becomes our common signal return wire.
Four shielded wires* need to be spliced to E12, E15, F12 and F15, and routed along the driver's side under the door sills back behind the back seat, into the trunk. You also need to run the speaker wires to the doors under there.
Connect the following from Bose head unit to Amp, using the four shielded wires:
E12 (brn) -> 15 (brn) - Left Rear +
E15 (lt. grn) -> 14 (dk.blu) - Right Rear +
F12 (tan) -> 13 (tan) - Left Front +
F15 (dk.blu) -> 16 (lt.grn) - Right Front +
Using existing dark and light blue speaker wires spliced together, connect:
F14 (lt.blu) - 17 (wht) - Common - Use BOTH right rear speaker wires for this! Spliced together at both ends as noted above.
F13 (gry) - Common shield from the four shielded wire loom.
*Bose uses 18 ga. wire from h/u to amp and for speaker wires.
Four regular wires wrapped together in foil and tape.
Foil connects to F13 at h/u, no connection at amp.
You may choose to remove and replace the rear deck with the Bose deck. The subwoofer, amplifier and remote receiver are mounted under here.
Just two nuts to remove the seatback, plastic push-in fasteners hold the upper carpet and chmsl assembly, then four screws hold the plastic deck in place. Lots of wire clips to drive you crazy of course.
Speaker Connections:
Front speakers have 2-pin connectors behind the a-pillar interior panels. Cut and splice into the speaker wires. With the head unit connector unplugged, check continuity to determine which side of the connector is speaker side. Cut whichever side you want, I chose to omit the connectors. Amplifier speaker pinout:
1 (lt. blu -), 2 (dk. blu +) - Right Rear door speaker (~12 ft, routed into door)
3 (gray -), 4 (tan +) - Left front woofer and tweeter (~12 ft, splice near parking brake)
5 (brn +), 8 (yel -) - Left rear door speaker (~8 ft, routed into door)
6 (lt grn +), 7 (dk grn -) - Right front woofer and tweeter (~15 ft, splice near ABS module)
Small 4-pin connector goes to sub-woofer dual voice coil driver.
Wire lengths are approximate, from amplifier to speaker or splice point.
Finally you need power and ground. There are good ground points under the back seat, just bolt it down somewhere. The easy way to get power is with an inline fuse holder. Put a spade connector on one end and plug it into the fuse block where the Bose fuse (20A) would normally go.
Cheers!
Bob


 ;D
;D