|
|
Post by chasebishop88 on Jul 21, 2019 13:13:15 GMT -6
Hey guys I need some help keep in mind I dont know very much about suspension So I was changing the oil in my car and saw what I think Is a ball joint and it was all scratched up to the point of showing metal I would like yalls opinion on what to do / what this part is 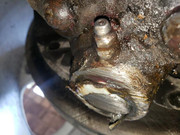 |
|
RCA1186
Administrator  Rob
Go Pack Go!
Rob
Go Pack Go!
Posts: 4,837 
Staff Member
|
Post by RCA1186 on Jul 22, 2019 6:11:34 GMT -6
Hard to tell but from the picture and angle, but it sure does look like the ball joint. What year Aurora?
The ball joint is supposed to be "non-serviceable" which would mean you can't just replace the ball joint, you have to replace the whole control arm. However, it actually IS possible to replace it, you just have to drill out the three rivets that hold it in. They sell replacements by themselves on rockauto.com, those come with nuts and bolts so you are able to fasten them onto the arm. You can get one for about 20-30 bucks. Control arms can be had from $60-175. From how corroded everything looks, you might be better off replacing the control arm. Of course that depends on the year of the car as the 1995-1997 ones are not available unfortunately. If that's the case, you're stuck with drilling the rivets out.
|
|
|
|
Post by Marc on Jul 22, 2019 9:47:50 GMT -6
That is a ball joint. I can see its lube fitting.
|
|
|
|
Post by chasebishop88 on Jul 22, 2019 10:45:41 GMT -6
Yeah it's a 95
|
|
RCA1186
Administrator
Rob
Go Pack Go!
Posts: 4,837
Staff Member
|
Post by RCA1186 on Jul 22, 2019 12:04:56 GMT -6
I kind of thought so with the corrosion. The updated control arms are aluminum. You will have to drill out the rivets to replace the ball joint. Here is an excerpt from the thread we have concerning this procedure. Changing the Ball joints This is where the fun really starts. The ball joints are held to the control arm with three rivets. The first ball joint that I changed took me forever to figure out how to get the rivets out. After I figured out the process, the second one only took about a half hour. Here’s the process. You’ll need a drill press. I suppose that you could try to do this with a hand drill, but you’re on your own if you try, but I wouldn’t recommend it. First, center punch the rivets on both sides. Do this well and accurately or you will be sorry later. Drill half way through the rivet with a 3/16” drill, then turn the control arm over and drill the rivet from the other side until the holes meet up. It’s very important to keep the drill centered on the rivet as best you can. That’s why you should drill it from both sides. Next repeat the process with a 5/16” drill, and finally with a 7/16” bit. Now, take a cold chisel and a hand sledge, and with the control arm clamped in a vise, pound the rivet heads off. What’s left of the rivets should now come out pretty easily. Once the rivets are out, you can pound the ball joint out. The secret, once again, is being accurate in drilling the pilot holes in the center of the rivet. If you get off center, you will have problems, and will also end up drilling into the control arm. Honestly, if I were in your position, and it didn't have play or make noise I'd leave it be until I HAD to do it. |
|
tigger
Administrator
Posts: 2,844
Staff Member
|
Post by tigger on Jul 22, 2019 16:55:10 GMT -6
Does it pull to that side? That looks like a pretty good scuff...
But I'm with Rob, If you're not having issues, leave it alone, haha!
|
|
|
|
Post by chasebishop88 on Jul 23, 2019 8:11:47 GMT -6
No it dosent pull I'll probably just continue to grease it about every two weeks to keep the sqeaks down
|
|
 Forum")


