fatjock
Aurora Groupie
 Reality is an illusion caused by lack of alcohol
|
Post by fatjock on Jan 9, 2010 19:48:22 GMT -6
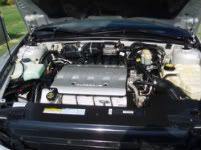
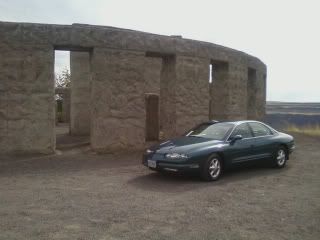
I've just purchased a 1999 classic with 126K miles as a project car. This will be part restoration, part customization, to get me the car I want. What gets done, and when it gets done, will depend on available budget, but as a first installment, like me give a quick summary of the condition of the vehicle upon purchase, and what I intend to do with it. Initial condition:Mechanically and electrically, I see few issues. Engine and gearbox are running smoothly, no smoke, noise, or vibrations that there shouldn't be. However, when I test drove the lights were inoperative. The dealer agreed to repair this, but the part they ordered, didn’t repair the problem (or as they put it, “they sent us the wrong part”), but they did render it drivable by putting the lights through the ignition accessories. So if the car is on, the lights are on. When they tell me they have the right part in (probably sometime next week), I’ll take it back and get that sorted. But that’s why I bought the car Sunday, and didn’t actually get it until Thursday. Inside, all the bells and whistles operate. Handling and ride are fine, but this is one area where I suspect I'll have some work to do. 1) The compressor for the suspension seems to run a lot (by which I mean much more so, and a lot noisier, than that of my Envoy), so I'm not sure if I have slight leak in the system, or if the compressor is on its way out, and takes a while to build up the necessary pressure. 2) There seems to be a slight "dead" area feedback wise in the steering, at about 1/3 - 1/2 turn from center in either direction. Is this normal, or is it something I need to be concerned about? 3) While the brakes are powerful enough, there is some slight juddering. So when I have the cash, there will be new pads & rotors all round, and I'll do a fluid change at the same time, perhaps uprating the calipers. When I picked up the car Thursday, it came with a single set of keys, and no remote. So that is first thing to be taken care of. The interior of the car needs a lot of work. While all switches are in place and functional, the main drivers door switch cluster is slightly loose. The seats are extremely dirty, creased, and cracked, as is the leather wrapping of the steering wheel, which has a nasty, tasteless, cover on it. Carpets and door cards are in good condition, but the ashtray/lighter cover of the console is broken. Intended plan of attack:Since the car came with no service history, I intend to immediately replace all the fluids, so that I know what is in there, and for how long. While I’m at it, I’ll throw in a K&N air filter. Next I can’t survive with just a single set of keys, and no remote. So that needs to be sorted out. Next, I’ll clean and Lexol the seats to see how they come up. If they’re not too bad, I may leave them that way, since it is an old car, and the signs of the age adds character. But if they don’t improve a lot, I’ll look at having them recovered. So, onto things to get done when money allows. The Steering wheel needs recovered or replaced. Then I need to get the driver’s door switch cluster secured /replaced, and probably replace the lower center console section, and the floor mats. Then for the hi-fi, which I hope to eventually replace with a unit with Navigation & Bluetooth, and at least an MP3 input, but hopefully with an internal hard-drive of at least 10Gb. Depending on the output of this, speakers will have to be replaced too. Externally, tires will be switched for Michelins, because I like, and trust them. Bodywork is generally in very good condition, but the few small areas which need attention will get it, and the entire car will be resprayed, probably changing color, but to what I don’t know yet. Rims will be changed, and I’m toying with a body-kit, but undecided. A performance exhaust is a distinct possibility, and I’ll have to research what the options are. Work Done So far:E-Bay is a wonderful thing. I realized the condition on the test drive some of the things that needed doing, so while waiting to pick the car up, I got looking for parts. I found remote keys (with programming instructions) ($36), a replacement steering wheel of the correct color at a good price($45), and VATS key set blanks (two of, at $15 each). (Please note if ordering these that you need to measure the resistance of the resistor pack, and order the correct code #.) As an aside, I also elected to order some 10000K headlight (high and low) bulbs ($12). Yeah, they claim they are HID, but that’s bull.I have put these on my daughters ’96 Grand Cherokee, and they made a good difference. However if they don’t do enough, I will put in a full HID kit. So work really commenced today (Saturday), and fortunately the remotes arrived on Friday. So first, on the way to the parts store for cleaning stuff, I filled up, and ran it through a car wash (No leaks, Yay!!!!!!) . Before leaving the parts store, I added Z-Max fuel treatment to the tank, then returned home. Then upon return I programmed the remotes, so I now have one full set of keys. Next, I started on the seats, cleaning with Mr Clean Magic Erasers, and liberally treating with Lexol conditioner. This saw a vast improvement, but is just the first step in an ongoing activity. I next changed the oil (since I had tried this with my Daughters SUV with 193K, and was impressed with the difference it made, I used Castrol GTX for High Milage vehicles) , and treated with Z-Max additive. Next was transmission fluid (No treatment added), and I replaced the air filter with a K&N. While under the hood, I cleaned up a bit, particularly the top cover, and front bank rocker cover, but also the inner wings and firewall. While I know I have a replacement steering wheel on order, I couldn’t deal with the nasty cover on there, so I got a tan neoprene cover at the parts store, and put that on. I didn’t like the way it sat (with the ends open), so I sewed it in place, which was a big improvement. So that’s it for now. I’ve posted pictures of her today (external only, foul weather meant I wasn’t leaving the doors open for any length of time. I will post Internal pictures when I can. Though I didn’t do full “before” pictures, I did take some of the drivers seat before cleaning, and I’ll try to get the dealers photos. I tried to put more images....but had no success, I need a masterclass on posting links to pics here! Attachments:
|
|
|
|
Post by dynamic1964 on Jan 10, 2010 13:40:33 GMT -6
Thanks for your great story and welcome to ACNA. Your Aurora has a great owner nowadays and she looks fine! I think also E-bay is a great buying place for our Auroras. I have an 2002 and bought via tip here from ACNA a new HID kit (and other things) via E-bay. That was a big different i must say.  /Arne |
|
|
|
Post by aldrichd on Jan 10, 2010 17:40:46 GMT -6
Looks like you have a handle on everything. Please keep us posted on your progress.
|
|
fatjock
Aurora Groupie
Reality is an illusion caused by lack of alcohol
|
Post by fatjock on Jan 10, 2010 19:35:52 GMT -6
Since I'm too dumb to be able to post a link to the pics on the thread, I've put a link to "my website" as "Project Photos" on my profile.
This will take you to all current pics.
I'll be posting more throughout the week to show interior & engine bay, then as work gets done I'll post more with each update.
|
|
|
|
Post by oldsmobile99 on Jan 10, 2010 22:25:40 GMT -6
sounds like your going to do a great job. good luck
|
|
|
|
Post by aj on Jan 10, 2010 22:43:13 GMT -6
Well good luck with your Aurora and seems it is in good hands now. Looks very nice in the pics you have. They are great cars if kept up on maintenance properly and will last. I still have mine after 15 years of ownership with my '95 Aurora and just normal wear and tear with regular maintenance still have the original engine and tranny.
|
|
fatjock
Aurora Groupie
Reality is an illusion caused by lack of alcohol
|
Post by fatjock on Jan 24, 2010 13:46:15 GMT -6
Time for an update:
The past couple of weeks have seen me working a lot, and had my time off coincide nicely with crappy weather, so There's not a lot of progress.
I received all the parts I ordered, and I had previously mentioned I had programmed the remotes (which was a simple task), so only having a few keys cut stood between me, and two full sets of keys, plus a spare set with no remote.
This proved not to be so easy. After I had tried one hardware store and three local locksmiths with no joy, work put a pause in my plans, so I asked my wife if she could do better.
She went to the Cadillac dealers around the corner, who cut all four keys free of charge. So the moral of this story is, just go straight to a GM dealers, and save a lot of hassle.
Next, I cleaned and Lexol'd the used steering wheel I purchased, but when I looked at fitting it, I began think of airbags going off in my face, and decided to have it fitted by a pro. So that'll wait until cash is available.
Lastly was the bulbs, and fitting these was not a lot of fun.
The high beams were relatively easy. I removed the two bolts retaining the inboard end of the light unit bracket, which allowed me ample access to swap these out.
The low beams were another story. As discussed in another thread, to adequately access the drivers side I had to remove the airbox, or at least the top half of it, but after that it was straightforward. The passenger side bulb appeared as though it had been fitted by a gorilla, with a strange idea of wire routing.
This meant I first had to wrestle it into a position where I could fully disconnect it, and I do mean wrestle, to get the wiring back where it ought to be. Then I could remove the olb bulb. Fortunately with the wire routing corrected, fitting the new item was simple.
With knowledge gained on other threads, and more experience driving the car, I now think that the suspension just needs a new compressor. This one is tired and noisy, but it does still work, so it can wait for now.
I'll try to get more photo's posted, especially to show my interior, for I'm now certain I'll have to have my seats re-covered.
|
|
|
|
Post by roara on Jan 31, 2010 1:29:36 GMT -6
Welcome! Sounds like you have it under control.
Photobucket works well for "storing" pics and then you can upload to ACNA using the "IMG" address.
|
|
|
|
Post by aldrichd on Feb 4, 2010 22:19:14 GMT -6
Smart move on having a "Pro" do the steering wheel. There's too much that can go wrong if you do not know what you are doing.
|
|
fatjock
Aurora Groupie
Reality is an illusion caused by lack of alcohol
|
Post by fatjock on Feb 6, 2010 20:29:42 GMT -6
Well, this week has seen a couple of things. Firstly, the recent uncharacteristically poor Florida weather has shown that my washers and wipers were somewhat less than adequate, and then on Thursday my baby developed a misfire.
I drove into work Thursday morning as normal, but when I went to leave Thursday afternoon, and began reversing out of my parking slot, I felt a regular movement around every second or so. Being at walking speed and full lock, it felt like a flat to me. A quick visual inspection belied that.
When I got back in, I noticed the tachometer was dipping in time to the movement.
Since I had filled up from near empty on the way in Thursday morning, I began to wonder if I had got some contaminated gas, or while at low level, I had sucked some debris from the bottom of the tank into the line, and partially clogged one of the injectors, causing a single cylinder to starve. But as soon as I got moving, and past idle, things smoothed out, so it couldn’t be that either. More investigation was necessary, but only electrical (ignition system) was left.
I checked out the maintenance threads here Thursday night, and learned from others experiences.
On Friday morning, things were getting worse. Now the misfire was more regular at idle, and occasionally missing as I accelerated from a stop. By the trip home Friday evening, it was misfiring as far up the rev range as 3000rpm.
From the symptoms observed, and what I’d learned here, I reckoned I’d go for plugs and leads first as the most likely cause.
Saturday morning saw me in Autozone, where I got a set of replacement leads (Autolite, not what I wanted, but what was available, and coincidentally, identical to those removed), and plugs (Autolite IR, again what was available, and replacing AC Delco items). While there I also picked up a pair of Rain-X Latitude wiper blades.
In order to isolate the cause (if found) I replaced each item one at a time (plug, then lead), testing after each. I was fortunate enough to find the culprit on the second cylinder I worked on (it was the #4 lead), then after that I just went on to change out the rest, and a test-drive to put it through its paces. Back to silky smooth.
Next in line was a five minute wiper blade swap, and another few minutes judicious application of a pin to the washer nozzle, and I was able to clean my windshield, and remove any water on it.
I still haven’t had the steering wheel fitted yet. The money I had slated for that got spent on Plugs/leads & wiper blades, so it’ll have to wait (probably until next month).
The only other thing I’ve done recently was to remove the broken cover from the Ashtray area, and it looks better (at least in my opinion). Since I keep my GPS plugged in, I would rarely been closing it anyway.
Having recently invested in a cassette adaptor so I could use my MP3, I learned that my cassette deck was inoperative. That was a lesson learned. I should have dug up a cassette from somewhere (though I don’t know where, since we went all digital a few years ago) to test it before shelling out for the adaptor. Still the GPS has a built in FM transmitter, MP3 capability, and an SD card slot so I’m using that.
It’ll do until I can replace the head unit. I did toy with fitting another stock unit, but I want Bluetooth and Nav, so I’ll upgrade. It may mean some customization of the surround, but so be it.
|
|
|
|
Post by aldrichd on Feb 14, 2010 0:53:49 GMT -6
good job on fixin' the miss.
|
|
fatjock
Aurora Groupie
Reality is an illusion caused by lack of alcohol
|
Post by fatjock on Feb 14, 2010 12:15:10 GMT -6
;D
Okay, so perhaps I spoke too soon last week.
On Tuesday, the misfire returned. It wasn’t as bad as previously, but still there. Once again it was only present at idle, and only once every few seconds.
I had some time Wednesday, so I installed my own variation on the bonding modification discussed in other threads here. Using two 4 gauge 40” battery cables, on each side I went from a suspension strut top bolt, to a coil-pack side mounting bolt, effectively improving earth bonding between the engine, and body, hoping this would help. No change.
Thursday saw everything running smoothly again, until around halfway home on Thursday evening, when the misfire reappeared at idle. It was the same again Friday morning, but smooth again Friday Afternoon.
Now I had an intermittent fault. So using the information I already had (where changing the #4 lead put things back to normal, the fault was definitely ignition based, and it only occurs intermittently), I suspected the coil pack for cylinders 1 & 4.
Since I couldn’t be sure this was the case, since removing the coil pack plate is not fun to remove, and since the only coils immediately available were cheapies, I opted to replace all four.
So Saturday saw me back at the parts store, this time just for the four coils.
The coils are very simple to replace, once you have the coil plate out, with just two bolts retaining each. The two side bolts on the coil pack plate are easily accessible enough, but the rear ones are a pain, and the only thing that makes this task even slightly difficult.
However with the whole unit pulled forward, replacing the coils is easy. I’d advise doing them one at a time, so that you only need have two leads disconnected at any time, such that you can position one to the left, and one to the right, and never get them confused.
First coil (6 & 7) swap out was uneventful, and moving on the second, I learned how stupid I’d been. This was the suspect coil (1 & 4), and it was loose. I swapped this out, and then the next two (3 & 8, and finally (2 & 5).
By now I knew what had happened. A loose coil was causing an intermittent connection, and subsequent failure to spark. By pushing down on the coil to fit the new lead last week, I had repositioned it to work, but it had worked loose again by Tuesday, but never quite as badly as before. So, I have now replaced 4 coils, 8 leads, and 8 plugs, and probably didn’t have to replace any of them, just secure the loose coil.
On the other hand, having just bought this car, I don’t know how long these components had been in the car, and the components could have been damaged by the intermittent connection. So at least now I know that all is good, and when they were fitted. So on balance for me, no regrets.
On the test drive, the vehicle drove smoother than it I think it ever has, but I could just be deluding myself there.
Having found a cause which would have given all the symptoms, and repaired it, I’m now confident it’s taken care of, but time will tell for sure. I’ll post next week to let you know if it’s still running well.
As a side note, I observed through this that by monitoring battery voltage on the DIC, when all was running okay, I was reading 14.0-14.2 V, when the misfire was occurring it dropped to 13.8V or below, with the poorer the running, the lower the voltage, and at worst point it got down to 13.3V.
When I had finished today, and on the test run, it read 14.2 -14.6V. I’ve never seen it that high before. Now how much of that is down to the loose coil, and how much to the bonding modification? Who knows. I can only say that it seems to be running better than ever, and the voltage on the DIC is up where it ought to be.
|
|
fatjock
Aurora Groupie
Reality is an illusion caused by lack of alcohol
|
Post by fatjock on Feb 14, 2010 12:16:07 GMT -6
BTW
If anyone is interested, let me know, and I'll post pics of the bonding mod I made.
|
|
|
|
Post by Deleted on Feb 15, 2010 22:22:28 GMT -6
the bonding mod you are referring too is a common mod that is down with classic owners. We call it the grounding mod. I had it on my own aurora and it produced favorable results, resulted in almost all of the lost voltage to be returned to the ALT. But it only bought me a few months until the alt crapped out.
|
|
fatjock
Aurora Groupie
Reality is an illusion caused by lack of alcohol
|
Post by fatjock on Feb 22, 2010 21:54:48 GMT -6
Yeah, what I did was little different from what I've already seen posted on here. I referred to it as bonding since I'm not actually making a ground connection, just bonding the engine and body to the same potential. Kind of a to-may-to, to-ma-to thing. The end result is the same.  |
|
fatjock
Aurora Groupie
Reality is an illusion caused by lack of alcohol
|
Post by fatjock on Feb 22, 2010 21:57:38 GMT -6
So this week has seen no recurrence of the misfire. Everything is still running extremely smoothly, so I’m real happy with that. On the other hand on Wednesday I had problems starting the car. Turn the key, and everything lights up, but nothing when I go to start. VATS issue. After several attempts, she fired up. On another couple of occasions, it took a couple of attempts too. I decided on to install the VATS bypass modification I had seen on here. The only variation I decided on was to use a 2-pole connector (male on the loom side, female on both the keyswitch side, and the bypass connector [resistor pack]), so that I could go back through the keyswitch easily by removing the bypass connector, and reconnecting the loom as was. So when the weekend came around, I had a day to work on her. First of all, I had to replace the steering wheel. I followed the directions in the “Steering Wheel controls” thread. This proved to be far easier than I expected it to be, but necessitated a couple of trips to the parts store to get the correct size socket for the wheel nut, and a second to get a steering wheel puller, which I had completely overlooked! Anyway, with the wheel modification in, and a quick test drive, I was free to start on the VATS bypass. A Radio Shack run got me all I needed (resistors, connectors, heat shrink, etc.) and it was down to business. First I made the bypass, in which the most difficult part was reading the resistor values. With a VATS #15 key, I opted for a 10K, and 1.5K, and a 300ohm in series to closely resemble the 11.8K of my keys. I elected to twist together (wire-lock) the ends of the resistors, and fill with solder, then nip off. This allows the resistors to sit side-by-side, while still connecting them in series. I then folded back the two end wires on themselves (to increase width for the crimp terminals of my connector), then crimp on the pins, heat shrink over the resistors and down onto the pins, and shrink on with a hair dryer. All that’s then left is to push the pins into the connector. So with this done, it was out to the car with a printout of the Vats bypass step by step. This is where I hit a problem. On my 99, there wasn’t two grey cables in the footwell only one, and that one was the five conductor cable which goes to the airbag unit. So next I figured I’d try to trace back from the keyswitch, which meant removing the cover surrounding the top end of the column. Which was not a fun experience, and proved completely fruitless, since I never found the grey cable I sought. There is a single connector on the rear of the keyswtch, with a bunch of loose wires going getting tape wrapped into the loom , and as I type, I’m still unaware which two are for the VATS . Anyway, since reassembly, She’s started first turn of the key, so I must have done something right! One thing I’ve learned from this ? I need to buy a camera to keep in the glovebox, because I keep forgetting to take one with me when I go to work on the car, and especially this week, I could have got some shots that could be useful to others. That needs to be corrected. I’ve ordered an intake kit (for which I’ll have to make a suitable heat shield to make a cold-air intake), so if that arrives this week, It’s on the schedule for next weekend, and while I’m in that area, I’m going to convert to an air horn. So hopefully I’ll remember to get pictures of those, and who knows I may strip things from this week back down to get the shots I should have done this week!  |
|
|
|
Post by sall on Feb 23, 2010 13:58:06 GMT -6
Don't say I didn't warn you about the puller!
|
|
fatjock
Aurora Groupie
Reality is an illusion caused by lack of alcohol
|
Post by fatjock on Feb 24, 2010 18:46:43 GMT -6
Sometimes, you've just got to learn things the hard way!
|
|
fatjock
Aurora Groupie
Reality is an illusion caused by lack of alcohol
|
Post by fatjock on Mar 7, 2010 15:24:30 GMT -6
After an uneventful week last week, when I was working the weekend and didn’t have the time to do any work on the car, this week has been slightly different.
Tuesday saw the arrival of the “cold air intake” I had ordered from E-bay, so Tuesday afternoon I pulled the airbox, and fitted the intake.
This was an incredibly easy job, with the only part even remotely difficult was the transfer of the MAF sensor to the new intake tube.
All in all, the whole thing took about 40 minutes, and about 20 of those were in wrestling the sensor into place.
Now, I put the term “cold air intake” in quotes, because I’m well aware of the arguments on this forum regarding Intake designs. I accept that while this is officially classed as a cold air unit, it’s location does make it liable to suck in hot air from the radiator efflux, so with the cold air, it effectively renders it a warm air intake. So I need to (and eventually will) manufacture a heat shield, to render it a true cold air unit.
As regards the air flow discussion, it makes no difference if you have a 3” pipe, or a 4” pipe, if it’s being choked down before it reaches this pipe. So the first order of business is the filter properties, the surface area through which the air is drawn, and the entry path to the filter. With the standard airbox, sure you get a 4” corrugated pipe from the filter to the manifold, but the air is coming in through a hole of around 4”x 3”. That’s where the choke point is. With the box removed, the lower cold air opening, as well as the side is open.
So while this intake may draw warm air, and have only a 3” pipe, the fact is that it is drawing it unrestricted across the entire filter surface, and flowing through a short, smooth, pipe, makes me believe that air flow will be better.
Now I haven’t done any time checks, so I can’t say for sure if performance is improved, but it does feel, slightly quicker. Not a great deal, but just a little, and the difference seems to come from getting up through the rev range quicker. Now there may be no difference, and it’s psychological due to the noise difference, but I’ve got to say that the induction roar itself makes the swap worthwhile, so it’s staying regardless! The Aurora now roars.
With the increased space the lack of airbox gave, I was able to fit an air-horn. Now it’s not that the standard horn was so inadequate, but I had this one sitting about anyway, and it sounds like a 60’s/70’s Italian sports car, so I like it. It’s identical to one I put on my wife’s MX5, and I like it.
All it took was to use an existing hole for the unit’s mounting bolt, and once it was secure I reached through the lower hole, and disconnected the existing horn. Pulling the wiring through to upper area, I cut the socket off (with about 1.5” of wire), and crimped on male spade connectors to this. It’s now stored in the trunk. Female spades went onto the loom wiring, so I can go back to standard whenever I need to.
Next I made a patch wire with male spades at one end, females at the other, then connected the male end to the loom wires, and the female end to the male spades on the unit. Tuck the wiring down below, and we were ready to test, and everything was good.
Note that the unit came with a relay, but since the vehicle horn wiring already goes via relay, it is not necessary to use this.
So by Wednesday, I was feeling really happy, and fairly smug, so things had to come crashing down, and on Thursday, they did.
On the way into work I had a blowout at around 65mph.
Fortunately it was on a rear wheel, so it was easy to keep it under control and pull over. When I did, that’s when I discovered that the vehicle had no Jack. It didn’t bother me too much, because I knew that the spare was badly damaged anyway ( I was only about a mile and a half from work, so it could have been used to limp there, but that’s about it).
This is why I pay AAA every year, for just such an episode, so a quick call, and a wrecker was on it’s way. A trip to a tire place, and I was back on my way to work, so it basically took me three hours, and $80 to get to work.
On the upside, it looks like one of my diagnostic hunches was wrong. There’s been a low-pitched, obviously wheel related noise on the car since I bought it in January, which I had thought was most likely a wheel bearing, but apparently it was the tire, because with the bad one replaced, the noise is gone. There was no external visible sign of any damage on the tire, so I reckon the ply’s were probably delaminating from within.
So overall a good week. There is more to tell, but I’ll save that for a few days. I’ve ordered a camera to keep in the car, so that when I work on it, I’ll have a camera at hand to record what’s going on.
|
|
|
|
Post by aldrichd on Mar 10, 2010 13:44:35 GMT -6
Thanks for the well written story.
|
|
fatjock
Aurora Groupie
Reality is an illusion caused by lack of alcohol
|
Post by fatjock on Mar 10, 2010 15:47:12 GMT -6
Hopefully the camera I've ordered for the car will arrive soon, and I can start posting more pics.  |
|
fatjock
Aurora Groupie
Reality is an illusion caused by lack of alcohol
|
Post by fatjock on Mar 15, 2010 9:37:43 GMT -6
As I’ve said before, I’ve been having some starting issues.
From what I’d learned on here, I suspected a VATS issue, and had decided to carry out the VATS bypass modification. But when I went to do this, I couldn’t find the wire described in the write-up, and so I gave up temporarily.
Fast forward to a recent Saturday, when I had some time, I decided I wasn’t taking no for an answer. An online parts search, got me a good photograph of the actual keyswitch, so I now know the source of the wire, and decided to trace it through from there.
I figured access would ease things considerably, so I removed my steering wheel , and the plastic cowling from the steering column upper end. Here I found the source of the wire, and began extracting it from it’s run, and tracing it back.
Unlike the vehicle I in the write-up for the VATS bypass, the “Dark grey wire” in my car ran in the middle of a large group of wires in the loom, and only broke free as it branched off into the steering column area, but there was plenty of wire to work with.
Now, from my previous abortive attempt, I had a Bypass made up in a 2-pin male connector, and I had an additional male connector for the switch end of the wire, and a female one for the loom end. I cut the wire, and crimped on the female connector, then connected in the bypass.
Key in, turn, no start. Symptoms were exactly as before. Doubting my connections I removed the female socket, and held the both bared wires to the bypass. No change. So now I knew My bypass was the correct value (measured), and I knew I had a good connection on it, so I began to question if it was a VATS issue. So I grabbed the switch end of the wire, and did a resistance check with each of my three keys in place. All showed readings within the acceptable range, so I know knew that the switch was fine, as were the keys, so there was no need to bypass the security system.
Armed with this, I butt-spliced the wires back together to return the original, and replaced those parts I removed for access. This time, it started on test. So I repeated it five times with each key, and had roughly a 70% start rate. But I listened and watched very carefully, and observed that when it failed to start, there was and audible “click” (like that of a starter motor solenoid), and all the instruments went dark (lack of power).
It seems it was trying to start, but just wasn’t getting enough juice to do it. Therefore next step was to check the connections supplying the juice to the starter. This meant the battery, and the starter motor itself. Starting with the easiest first, I went under the back seat. Here I found the –ve (ground) terminal slightly loose. So I tightened both terminals, torqueing them down to “3 white knuckles”. I repeated my start test, this time with a 100% success rate, and I’ve been driving it for over a week since, with no starting issues whatsoever.
BTW,
Having had the intake in for a couple of weeks, I will say that it sounds better, but if performance has changed it is extremely minimal, though I have noticed a 1mpg improvement in economy (for certainly no less performance) in my commute.
|
|
fatjock
Aurora Groupie
Reality is an illusion caused by lack of alcohol
|
Post by fatjock on Mar 21, 2010 14:13:00 GMT -6
So I've still not got the hang of posting pics on here, but I've added more pics to my Image shack album. img406.imageshack.us/g/shrunkenthree.jpg/They're not in order, and not even named properly, but here are there. When I get time, I'll play with things and try to improve them. Attachments:
|
|
|
|
Post by Deleted on Mar 21, 2010 18:11:52 GMT -6
That mazda just looks to happy. You should name it smiles.
|
|
fatjock
Aurora Groupie
Reality is an illusion caused by lack of alcohol
|
Post by fatjock on Mar 22, 2010 9:53:21 GMT -6
That's my wife's pride & Joy, and yes, she does call it "smiley".
I was going to try to name this shot as "her's, mine, and ours", but couldn't see how to do it on Imageshack.
One of these days, when I get some time!
|
|
|
|
Post by Deleted on Mar 22, 2010 10:34:00 GMT -6
That's my wife's pride & Joy, and yes, she does call it "smiley". I was going to try to name this shot as "her's, mine, and ours", but couldn't see how to do it on Imageshack. One of these days, when I get some time! You have to actually change the name of the file to that. I've seen alot of faces in cars but that has got to be the happiest car I have ever seen. |
|
|
|
Post by Jae Dee on Mar 27, 2010 21:07:39 GMT -6
Has anyone noticed that if you look at the classics using just the fog lights as the eyes it looks like a ghost or maybe a flat fish.
|
|
|
|
Post by aldrichd on Mar 29, 2010 0:02:14 GMT -6
Nice pics.
|
|
fatjock
Aurora Groupie
Reality is an illusion caused by lack of alcohol
|
Post by fatjock on Mar 30, 2010 10:52:12 GMT -6
Having been a keen reader of this forum for a month or two now, I was conscious of the cooling system normal operating temperatures, and the peril of ignoring cooling problems. So I keep a weather eye on my temp gauge. Living in South Florida, my potential issues are not quite the same as our Northern cousins. Antifreeze protection to 20°F is perfectly adequate, but the risk of overheating with 90°F+ days being less than unusual, is pretty high. My commute is about 10 miles, on surface streets with a set of lights around every 1/3 mile, so air flow is principally by the fans. On Thursday I noticed that I seemed to be getting a little hotter than usual (about 210 degrees, maybe 5 more than normal), so I made a note to keep an eye on things. On Friday when I was nudging over 220° when I got home, I popped the hood for a look-see, and this is what I found.   So this got me to thinking as to why one of my radiator hoses looks like a python that’s just swallowed a pet dog, and it doesn’t make logical sense to me. First of all, why is the outfeed from the thermostat housing going to the lower radiator hose? These seemed counter-intuitive to me, but I guess when you look at the “no-grill” design of the car, and take into account where the radiator air intake is, it makes sense to want the max cooling at the bottom end of the rad. So next was “why bulge there?” The only logical reason I could come up with was a radiator blockage, which is not good news. Regardless, the hose required replacement, so I figured while I was in the parts store, I’d pop the extra $16 for a new thermostat as well, just in case. Removing my air filter for access, it was easy to get the old hose off, the only thing that made it awkward was the positioning of the hose clamps (Squeeze type), which were not easy to get pliers on.  Similarly with the Thermostat. It came out easy, with just the two 10mm bolts, and the housing cover was off, then a little tug with a pair of piers, and the thermostat itself followed. This showed definite indications of wear (and the gasket was shot), so I was glad I had new.  It took only a few minutes to fit the new parts., the it was just a case of replacing lost coolant. I used a Prestone Dex-Cool 50/50 pre-mix, and topped up to full line, leaving the pressure cap off. Then I turned off the A/C, wound the heat all the way up, and started the car. It warmed up as normal, and just over 180° I could feel the lower hose warming up, and I turned my attention to the expansion tank, topping up the coolant as necessary. After a few minutes like this the fans kicked in at low speed, and the coolant level began to stabilize. So I popped on the pressure cap, and went for a short test drive. During the drive the heater was blowing hot, which was a good sign. Upon return, I checked the Radiator upper hose, which was hot as well by now, showing that the radiator was not blocked. So I let the car cool, then topped up again. So now I figured I’d just watch the temperature gauge, and see what happens. (on the theory that if the readings stay high, it would indicate a radiator constriction, and if they return to normal, implies normal operation.) I watched my temperature on the commute Monday morning, and things stayed good (200-205), up until the last few minutes, when things began to climb up to 220. At lunch, I checked the coolant level again, and topped it up. Over my next few trips, the gauge never exceeded 200°F. So I’m happy with that. Judging by what it took to get the system topped up again, I lost about 8qts of coolant by removing the lower hose and thermostat, which accounts for about 2/3 of the total. |
|
fatjock
Aurora Groupie
Reality is an illusion caused by lack of alcohol
|
Post by fatjock on Mar 30, 2010 10:55:29 GMT -6
I'm pleased to say I've finally had some time, and learned how to post pictures correctly.
So now (when I get some more time) I can go back and modify my previous posts, and hopefully get some of them easier to digest!
|
|
 Forum")