XJSman89
Administrator 
Posts: 6,309
Staff Member
|
Post by XJSman89 on Jul 10, 2015 10:59:48 GMT -6
Well that didn't take long, did it?  The headlight bowls are rusted on the XJS to the point where they don't hardly put any light on the road anymore. Instead of simply recoating them, I made the decision to go with projectors. Because why not? I went with a 50w D2S setup this time around. Minimal bowl modification (took out the factory bulb holder and had to file a little bit to get new H4 positioning ring cutouts in the right place) and great light output. There's basically no size restriction here since the bowl is so large, which makes me very happy.     I'm going to coat the bowls black before I seal these back up. I wanted to do silver, but you'll see why I can't three pictures down. 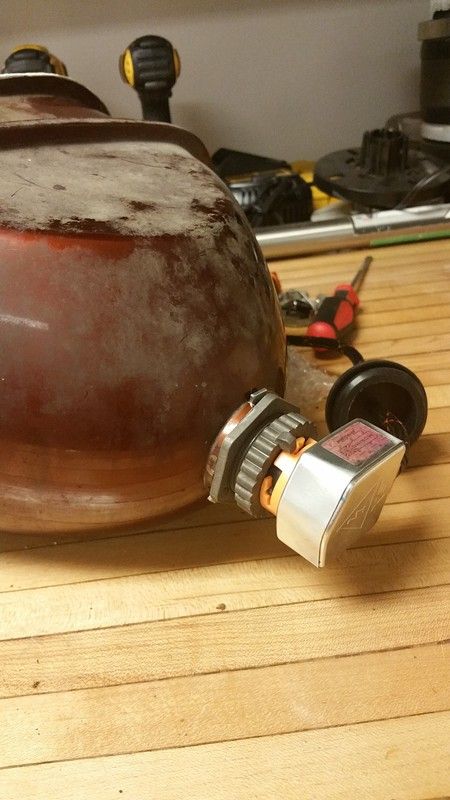 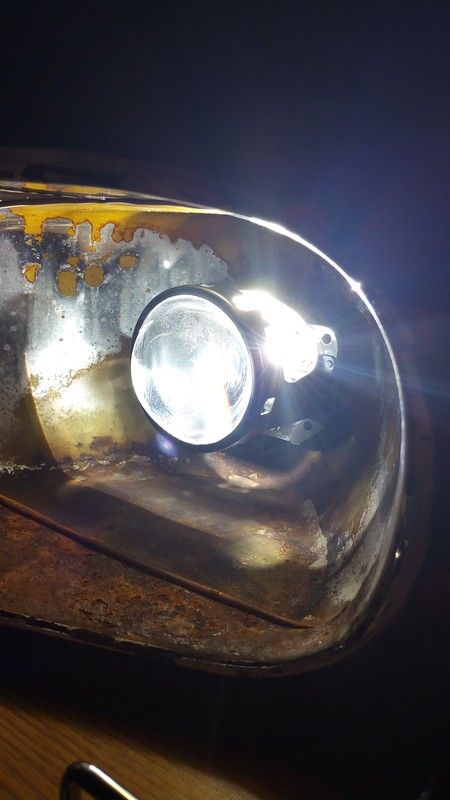  The glare above the cutoff is from light coming out the top of the projector and reflecting off of what remains of the factory chrome in the reflector bowl. I covered up the factory coating and the glare went away. I'm glad it's easy to counteract, but it appears that I have to coat the bowls black. It won't look as stock, but the fluting on the glass headlamp lens would make it so you can't really see the projector anyway. I couldn't decide whether to do black or silver anyway, so this decides it! I've got a thread over on the Jaguar Forum with more detail, but I just wanted to show you all what I'm up to. I get my gas tank back today from getting all the rust cleared out and coated in Redkote, so she should be on the road (hopefully) this weekend. (albeit minus one headlight, but still!) I'm hoping this motivates others (ROB!) to do a retrofit. It's really a great upgrade, one of the best that I've done to my Olds. |
|
RCA1186
Administrator
Rob
Go Pack Go!
Posts: 4,837 
Staff Member
|
Post by RCA1186 on Jul 10, 2015 14:25:28 GMT -6
Collins, wont that part of the projector where the light shines out in back be covered with the shroud and thus not cause the glare?
|
|
XJSman89
Administrator
Posts: 6,309
Staff Member
|
Post by XJSman89 on Jul 10, 2015 14:28:30 GMT -6
I don't think it will entirely, some light can also escape and reflect off the back and bounce forward potentially. It wouldn't be a bad idea to test it with the shroud on though, just in case. I didn't being a shroud with me to work today to test these, so I can't say for certain.
I'll look, though! Thanks for the idea.
Sent from my Galaxy Note 4 via the ProBoards app
|
|
|
|
Post by awehlage on Jul 11, 2015 14:32:53 GMT -6
Awesome job! It's nice you can "drop in" a projector without cutting the reflector bowl up. TRS really has done a nice job providing everything you need in a kit! Morimoto product is IMO the best aftermarket non-factory option available. Can't wait to see finished real world pictures  |
|
|
|
Post by lkraft92 on Jul 12, 2015 0:11:53 GMT -6
looking good.
|
|
|
|
Post by sall on Jul 12, 2015 10:24:43 GMT -6
Those reflector assemblies look huge! Aren't the headlamp lenses fluted though?
|
|
XJSman89
Administrator
Posts: 6,309
Staff Member
|
Post by XJSman89 on Jul 12, 2015 15:23:54 GMT -6
Thanks, guys. Yeah awehlage, TRS has really stepped up their game since I got projectors last. I had to modify their harness when I first did them on the Olds. This one is supposed to be completely plug and play.
They sure are big, Sall! I'm quite happy about that. The lenses are indeed fluted, I haven't tested the output with the lenses on yet. That's another thing I need to test. No one has ever done this to an XJS before, so I took a shot in the dark and decided to be the guinea pig and give it a try. I'll post pictures with the shroud on for glare testing and with the lens on for output testing once I get to that point.
Sent from my Galaxy Note 4 via the ProBoards app
|
|
|
|
Post by awehlage on Jul 12, 2015 18:51:10 GMT -6
Any aftermarket housings available with a clear lens instead of fluted?
|
|
XJSman89
Administrator
Posts: 6,309
Staff Member
|
Post by XJSman89 on Jul 12, 2015 20:01:57 GMT -6
If we thought aftermarket for the Classic Aurora was non existent, I don't know what aftermarket for the XJS would be considered. there is zero aftermarket for this car, only OEM replacements. There may have been at one time (the Dayton 70 spokes I have were purchased about 15 years ago) but not any longer. I think I'll just have to deal with the fluting and hope it doesn't mess with the output too much. It will certainly be better than stock, or at least I hope so! Sent from my Galaxy Note 4 via the ProBoards app |
|
|
|
Post by sall on Jul 13, 2015 9:01:12 GMT -6
You can sand the flutes down and polish. Since you have access to a 3D printer you could likely make mold of the inside of the lens, smooth the printed product and then use it as a form to make a custom clear lens.
|
|
|
|
Post by awehlage on Jul 13, 2015 11:53:19 GMT -6
^ Yeah, what he said! A couple posts on HIDP of how to do that (sand/polish fluted lens and mold your own clear lens) |
|
XJSman89
Administrator
Posts: 6,309
Staff Member
|
Post by XJSman89 on Jul 13, 2015 20:18:58 GMT -6
Good ideas gents. I have more information:  Tested Rob's idea about the shroud. You were right man, it sits back further than I thought. It blocks light leakage around the projector for the most part. Cleans it up above the output for sure. And the shroud looks AWESOME back there. Plus this means I can coat the bowl silver, so it will look more stock. That's the good news. I wouldn't call the next two pictures bad news really, more like what I expected. The fluting messes with the output for sure. It's not horrible in that there aren't any hot spots and the cutoff is still present (meaning that it won't throw lights in anyone's eyes) but I have mixed feelings because it kills the beautiful cutoff I would have otherwise.  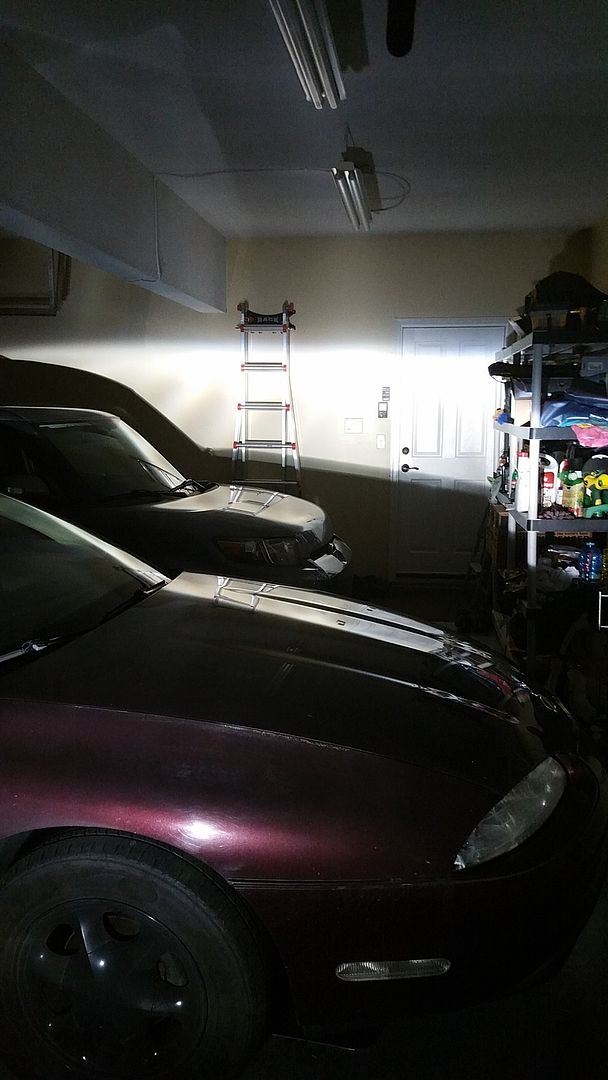 I'll take a look at sanding down the fluting. I'm honestly not that worried about the sanding if I go that route, it just takes patience and elbow grease. I'm more worried about if it makes a "classic" car (ok it's not quite an antique yet, but you get what I mean) look like someone has riced it out. I suppose with a silver bowl it wouldn't look too bad. But if I leave the fluting alone and deal with the less than stellar output it will still look stock, the output will be way better than it was, I'm not blinding anyone, and I can always open it up and sand it off later. I'm tempted to leave it for now and open them up later (winter maybe) and sand then. See if it really bugs me, you know? There are some pictures on the XJS forum of one with projectors that I found a little while ago, I'll see if I can find it and post it. It looks a little weird IMO. **edit** found it:  Compared to the front of mine in her prime: 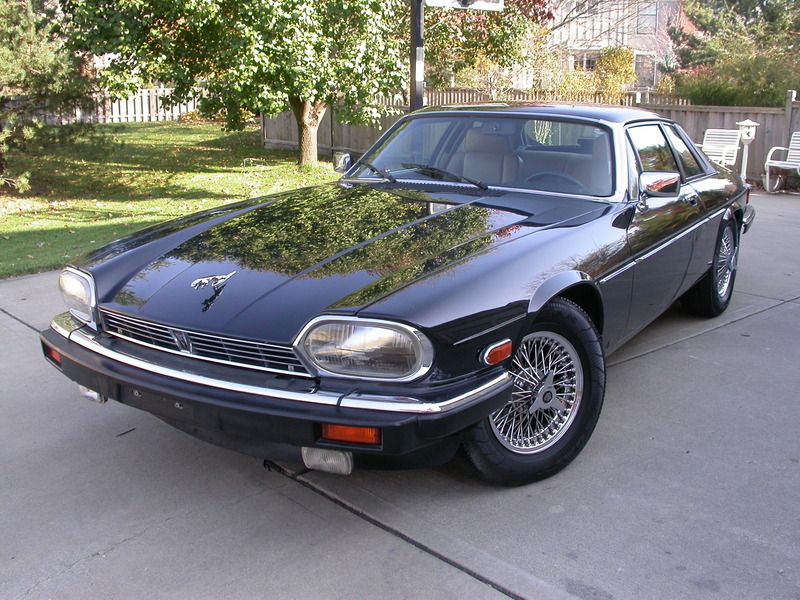 Those projectors are offset whereas mine would be centered and further back, with silver bowls, and a clear lens instead of blue... But still. That picture scares me off a little. Thoughts are appreciated, as always! What do you guys think? Sent from my Galaxy Note 4 via the ProBoards app |
|
RCA1186
Administrator
Rob
Go Pack Go!
Posts: 4,837
Staff Member
|
Post by RCA1186 on Jul 14, 2015 6:23:04 GMT -6
Well you have to look at what is missing on that one too, I think that adds to the perceived "weirdness" you're feeling. No hood ornament, a "ricey" grill, stripes, no fog lights, and it looks like even weird marker lights. I think yours will look just fine. If you have no reservation about taking the lenses off again and sanding I'd say yeah, see how you like it now.
|
|
|
|
Post by sall on Jul 14, 2015 6:26:01 GMT -6
Put another pair in the inner reflector bowl! You can get H1 for like $25 a pair.
|
|
XJSman89
Administrator
Posts: 6,309
Staff Member
|
Post by XJSman89 on Jul 14, 2015 7:40:33 GMT -6
Put another pair in the inner reflector bowl! You can get H1 for like $25 a pair. There are two sets of headlamps with this car, quad lamps (US spec, and an option in Germany) and Ovoid H4 lamps (standard everywhere else). I have the Euro oval lamps on mine obviously, which uses a single H4 bulb for the low/high instead of a separate low/high beam found in the cars with US spec lights. There is only one hole in my housing, so I'm not sure how this guy got two projectors on this one with oval lenses. Maybe he used a quad lamp mount and put an oval lens over it, who knows. But I only have a spot for one projector in each of my lamps, which is just fine with me. I don't enjoy the quad lamp look at all. After sleeping on it, I'm thinking that I'll leave it alone for a few months and see how the output looks on the road. Maybe try to pick up a set of lenses on the Jaguar forum and sand those down in the mean time. I would eventually like to sand them down or make clear lenses because that output is just too pretty to cover up long term, but for now the light output will be fine. I'd actually like to drive this thing this summer, and I don't want to be driving around without headlights and risk getting pulled over or anything. Winter is a great time to do it, because I won't be driving the thing anyway. The lens came off really easily but that was the factory sealant, is butyl difficult to remove at all? I've never used it (used silicone on the Olds lights, both times. Dumb.) so I don't know how it is to work with. |
|
|
|
Post by sall on Jul 14, 2015 10:29:37 GMT -6
Butyl is not hard to re-open after initial sealing. Was the original seal compromised to cause all of the rust/peeling? I think that front end would look good with quads, but if you don't have the assemblies to do it that is a moot point! The single BiX should be just fine and still outperform the OEM setup. I would be curious to see the output with the lens though! I had a friend who had one in high school but it had dual round assemblies.   Wonder if they would be able to swapped? |
|
XJSman89
Administrator
Posts: 6,309
Staff Member
|
Post by XJSman89 on Jul 14, 2015 12:05:56 GMT -6
Good to hear that the butyl is easy to remove if needed. The rust is contained to the bowl mostly, the flange where the glass seals to is still rust free. The sealant didn't seem compromised at all actually, just weak due to age. There's another hole at the back of the lamp that has a grommet but I'm guessing the grommet shrunk and let some moisture in that way. The quad beams can most definitely be swapped, I hate that look though. That's what I was saying about the quad beam in the previous post, those are US spec lamps. Euro spec lamps (that I have) were an option that not as many US cars were fitted with. I'm thinking that's what the guy above did, he used the quad assembly with a euro spec lens. These quad beams don't have a lens over them, they're just an exposed (glass) sealed beam bulb. Kind of like the ones that go in Jeep Wranglers. I would think they would need some sort of lens over the front if you put a projector in one of those holes so you don't have an exposed projector lens/shroud/etc. Was that what you meant by output with that lens? The output with the oval lens over them is the second of the two output pictures above. The quads would be an option, but I'm just not a fan of them. For my own taste anyway, I would sand the larger lenses and run a single projector sooner than I would retrofit a quad lamp setup. (wiring is different too. There's a 4 wire plug coming from the car that is then plugged into a short H4 extension. I'm guessing you just plug in a different connector for the quad beams.) Good idea though and one that I considered, but not the direction I'd like to take it. I've loved this car growing up, and have gotten used to it with the oval lamps. It just wouldn't look right with quad beams. That's part of the reason why I'm so concerned with it looking closer to stock; I've gotten so used to the look that I don't want to mess it up too bad. I appreciate the discussion though. I debated starting a thread over on HID planet (still might) but I value what you guys (Sall, Awehlage, Rob) have to say more at this point.  |
|
|
|
Post by sall on Jul 15, 2015 7:46:57 GMT -6
Ah gotchya now. If the assemblies you have are more rare in the US I would certainly keep those. Especially since you prefer them to the dual. Though the dual ones lend more replacement options with clear lenses. I would say leave the flutes in the lenses. Do the black chrome or chrome powder powder coat on the reflectors. This should preserve that look you are after with a modern upgrade.
|
|
XJSman89
Administrator
Posts: 6,309
Staff Member
|
Post by XJSman89 on Jul 15, 2015 8:27:23 GMT -6
Just what I was thinking. I've got a WTB ad up on the Jaguar Forum, hopefully I can get lucky and someone has an extra set of lenses lying around.
I'll probably go with a bright silver coating on the lights, we have a chrome imitation coating but it has to be polished; I don't know how easy that would be with these bowls. We usually only do pipes in that coating and throw them in our vibratory polisher. We'll see!
I think I'll wire up the projectors and harness tonight outside the lamps to make sure that all works great before I pull the other light out. Can't hurt to be certain, right? If that all checks out then I'll pull the passenger lamp out, get the lens off, and get them coated.
|
|
XJSman89
Administrator
Posts: 6,309
Staff Member
|
Post by XJSman89 on Jul 16, 2015 20:57:16 GMT -6
Did some more work on the lights tonight. Before I went to the point of no return, I wanted to be sure that the lights would work on the Jag wiring, not just in a test environment. The new harness is lightyears ahead of the one I got with the Olds. It was literally plug and play, which says a lot for installing projectors in a 1989 car! 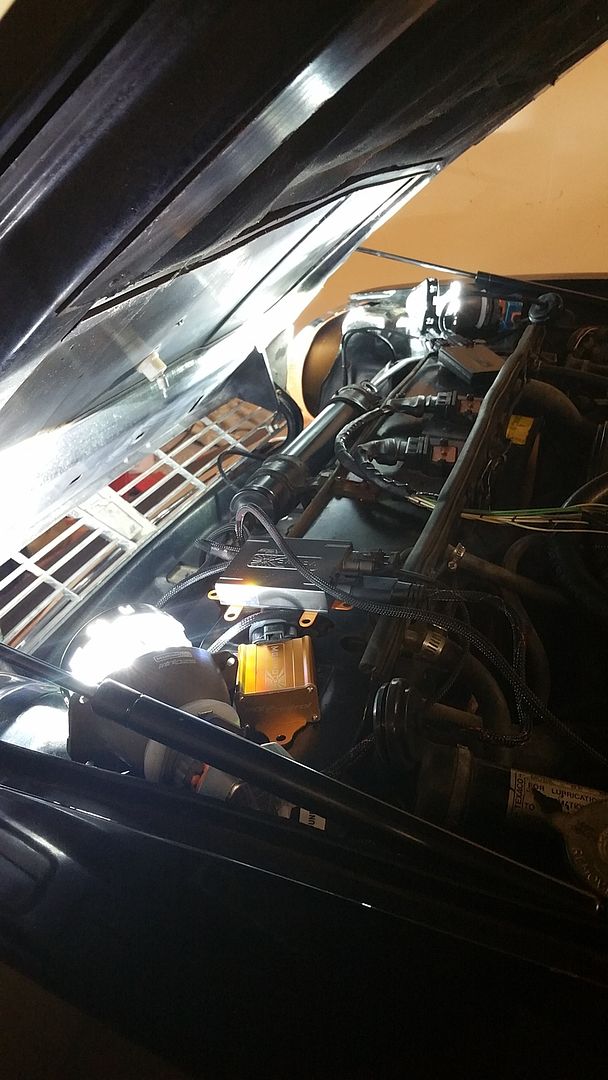 Luckily there is a stud on the firewall that gets +12v power that I tapped into for the harness power. I had to extend the wiring a little, but it worked out. I have to route the harness still, but I'll handle that while they're getting coated. I took the passenger light out and opened it up as well. It wasn't nearly as bad as the driver's side, but I'm going to coat them both so that they're uniform. 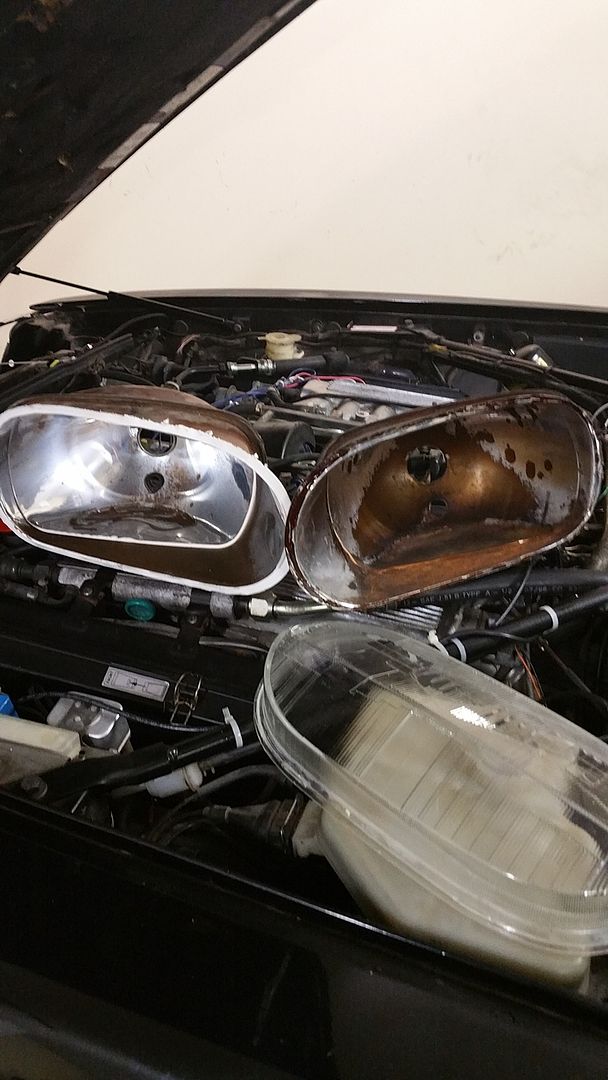 I hope to move pretty quickly with these, we'll see how quickly I can get them coated. I don't want to be without headlights for too long, having an 8pm curfew (bc I don't have lights) isn't fun! Sent from my Galaxy Note 4 via the ProBoards app |
|
XJSman89
Administrator
Posts: 6,309
Staff Member
|
Post by XJSman89 on Jul 21, 2015 12:31:02 GMT -6
More progress: Got the coated bowls back. I love the look of fresh powder! I went with a light silver with some subtle metallic flake in it. Should look close to stock and it was a quick, single coat/cure application. 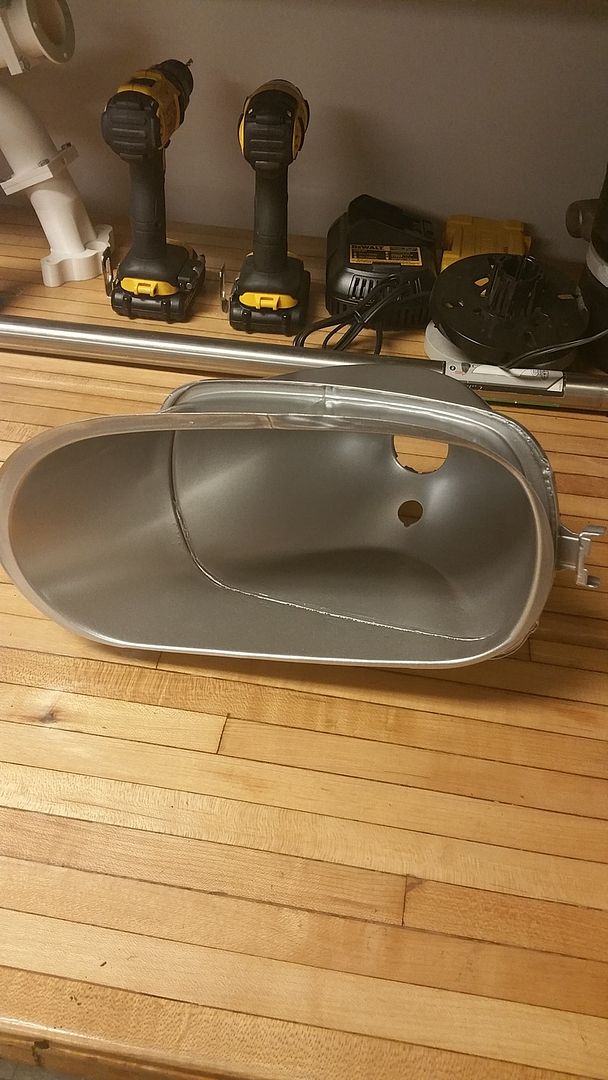 The less exciting part: we tested the driver's side lamp at temperature to see if the seal between the two halves would hold, and it did. So he went ahead and coated/cooked them both. The passenger side lamp came apart at the flange where the front and back half seal back together. 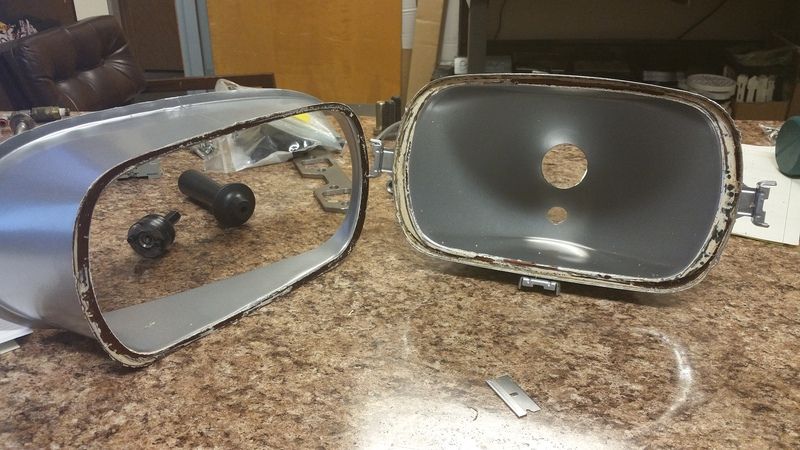 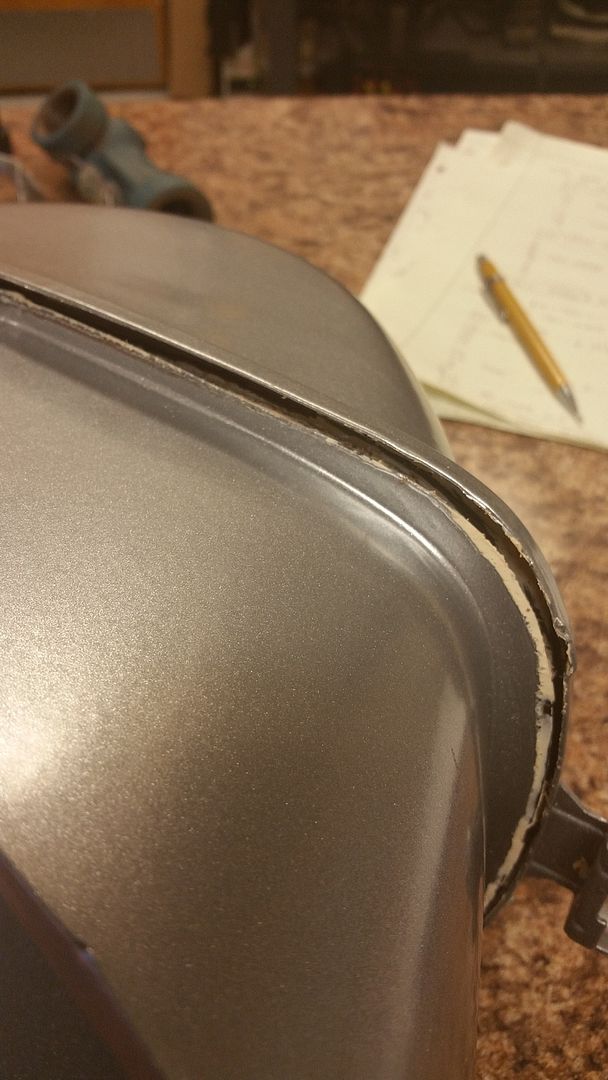 I've not got any idea what sealant they used stock, only that it was white. Would butyl seal that up? it's a real thin layer of the stuff, so I don't want to use anything too crazy. I know I can make silicone work if that's the best solution but I've done that before and I wasn't super impressed. Help, headlight guys! |
|
|
|
Post by sall on Jul 21, 2015 15:59:32 GMT -6
Butyl should be fine there. A good epoxy would work well too. Epoxy or silicone might make a mess when squeezing the halves together though. You can clean butyl up easily though with more butyl. Kind of a interesting headlamp design. Like a 4x6"(?) assembly and then the extra curved piece.
|
|
XJSman89
Administrator
Posts: 6,309
Staff Member
|
Post by XJSman89 on Jul 21, 2015 16:37:13 GMT -6
Yeah I'm sure it was due to ease of manufacturing. Looks like a standard symetrical rectangular bowl with an extension on it to fit the car's curve in the front.
Good to know butyl will work, thanks Sall. I was thinking JB Weld since both pieces are metal, and you don't have to splooge a bunch of it on. We'll see what happens. I can always blast and recoat it once it's bonded back together if necessary.
Sent from my Galaxy Note 4 via the ProBoards app
|
|
|
|
Post by sall on Jul 22, 2015 9:46:17 GMT -6
No problem. My only concern with epoxy is if you miss even a small section moisture will find it's way in, but can still seal put some on the outside too. Just don't put butyl on it and re-coat then cure it in the oven. It will just separate again haha but jb weld 500* can handle it!
|
|
XJSman89
Administrator
Posts: 6,309
Staff Member
|
Post by XJSman89 on Jul 22, 2015 20:42:23 GMT -6
Yeah I thought I might seal the outer rim with butyl as well as JB Welding the housing on the flange itself. One of the bolt holes on my new (refurb) alternator was stripped out so I couldn't install that tonight, so I routed wires instead. 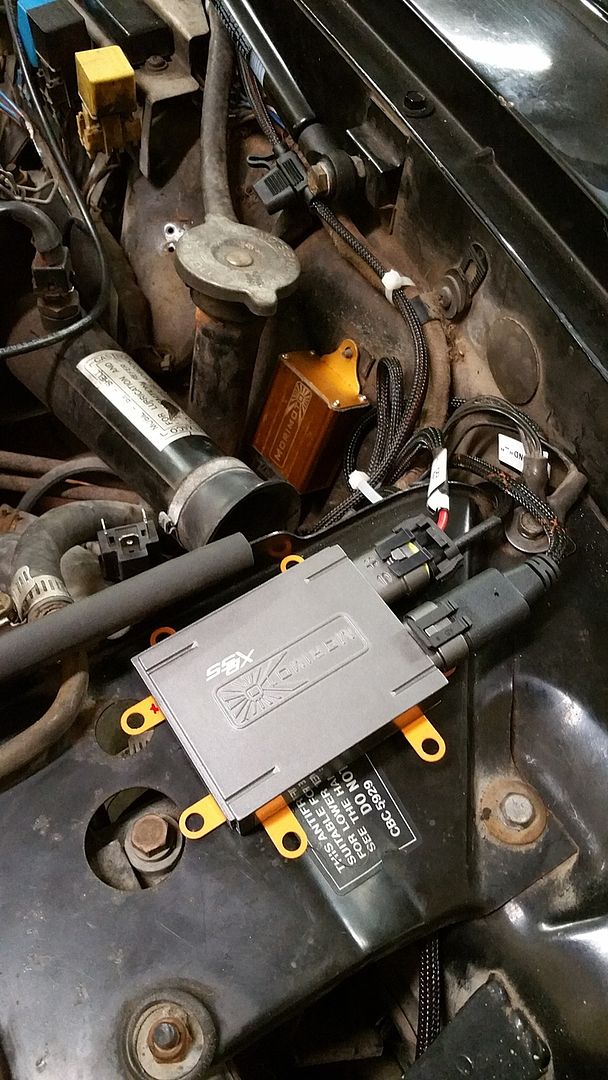 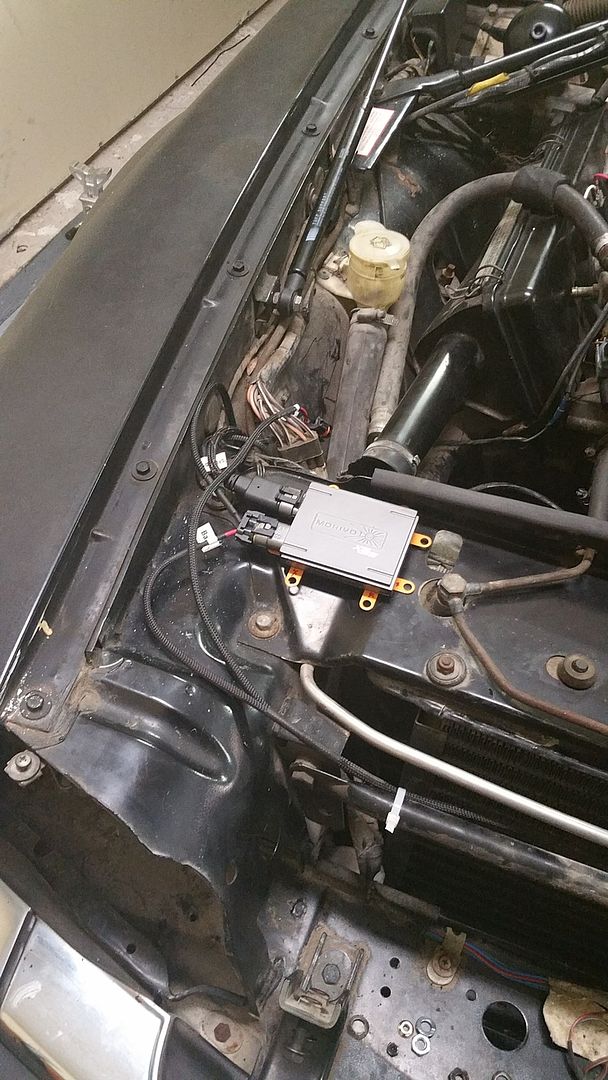 All I have are white zip ties. I will replace with black when I get them. The purpose tonight was to place the motocontrol box and ballasts so that they reach everything they need to and are in a suitable place. Just need to get some fasteners to attach the brackets. I can't wait to get the projectors in and test fire them for real. Aiming should be simple on this car; if it needs to rotate I will just take out the projector, file a little down on the outer ring of the headlamp, and refit. Sent from my Galaxy Note 4 via the ProBoards app |
|
XJSman89
Administrator
Posts: 6,309
Staff Member
|
Post by XJSman89 on Jul 28, 2015 12:16:58 GMT -6
I cleaned off the silicone off of both of the faces of the headlight that came apart and was going to JB weld them back together, but when you put the faces together you can still see some of the places where the paint has peeled off (because there was silicone there that is now gone). I just wasn't happy with it; it doesn't make any sense to go to the effort to have them coated, put projectors in, etc. and have the paint not completely cover the part. It's a small detail that most would miss, but I would know that it's there. You wouldn't be able to see it with the fluted lens but when I take them off to sand them down I would have to take that bowl out and have it recoated then anyway, so we might as well do it now so that I don't have to remove the projector and stuff to fix it later. We are going to completely burn it off, sandblast it again, and re-coat the light. We have a bright silver job coming up next week anyway, so it will be easy to slide it in along with that job. It will be easier to bond it together with a nice, clean surface as well. I'm hoping that I can get the bowl back next week so that I can get these lights in! The new alternator is in and the battery light is blissfully absent from my instrument panel, so that's one more thing to check off the list. If only I could drive it at night! |
|
|
|
Post by sall on Jul 28, 2015 15:12:33 GMT -6
Just curious what electrical problems were fixed that had the vehicle sidelined when you previously owned it?
|
|
XJSman89
Administrator
Posts: 6,309
Staff Member
|
Post by XJSman89 on Jul 29, 2015 8:39:44 GMT -6
Just curious what electrical problems were fixed that had the vehicle sidelined when you previously owned it? The short story is that the insulation on the wires in the ignition harness were failing. It had apparently been taken apart and electrical-taped back together at one point as well, with no heat shielding on it at all. What I'm thinking happened is that a couple wires shorted to each other and got really hot, catching the insulation on fire and causing a small under-hood fire. The crank sensor is a magneto using a high frequency AC signal and needs coax cable to function properly and protect the signal, from what I understand. That wire got melted and when I tried to repair it all those years ago I tried to replace it with regular wire so the car wouldn't start. I went back and re-did all the wiring with 6 more years worth of experience and it was really quite basic, actually. If I had known then what I do now, we probably wouldn't have sold it. I'm having to chase a lot of problems stemming from the car sitting for so long now, which I wouldn't have had to deal with if I could have fixed it back then. Besides the seat heater and cruise control, everything on the car worked when we sold it. Now my A/C isn't kicking on at all, it only blows out by your feet instead of out the dash, the driver's window doesn't roll down, the trip computer doesn't want to work correctly, the ground on the fuel sender is broken so I don't know how much gas I've got, I've got lower oil pressure than I want, bad tires, etc etc. It's worth it to have the car back though, and I have so many things that I can work on now! So far I've replaced the plugs, wires, and coils, WOT switch, refreshed the ignition harness, had both fuel tanks cleaned out and coated, and replaced the alternator. Lights are in process, and new tires will come soon. Driver's window is probably next on the list, then A/C after that. |
|
|
|
Post by sall on Jul 30, 2015 14:42:39 GMT -6
Damn shielded wire haha. Keep up the good work.
|
|
XJSman89
Administrator
Posts: 6,309
Staff Member
|
Post by XJSman89 on Jul 30, 2015 15:05:32 GMT -6
Haha yep, that coax gave me a headache or two for sure! At first it took a little while to find it, then I reversed the signal and ground wires by accident. The crank sensor connector is the same as a Ford injector connector so I bought one of those to replace the old one with. It had black and pink wires, not the factory colors. I hooked the black wire to the shield (ground) without thinking about it, and then wondered why the thing didn't have consistent spark. Swapped the wires and it fired right up. Doh! Got the headlamp burned off today. This is what a part looks like after sitting in an 800 degree oven overnight: 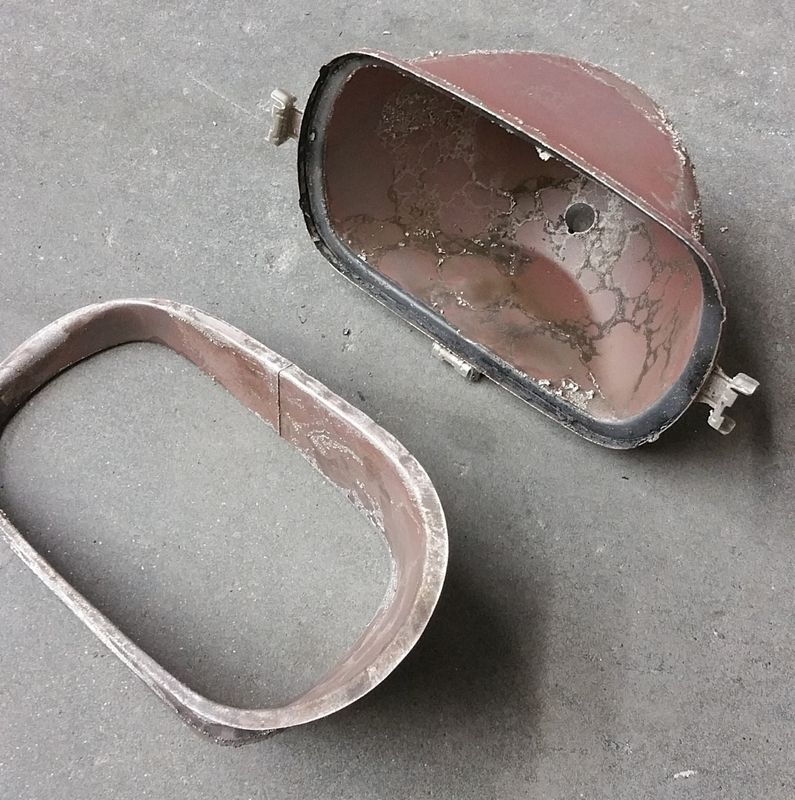 It looks like they'll get it blasted and coated tomorrow, so I might even be able to install some lights next week! |
|
 Forum")


