|
|
Post by papacadillac1 on Jul 11, 2011 21:12:18 GMT -6
So we know there's a fix for front bumpers with liscense plate mounts that have started to sag, but what about those of us that have a clean "nose"?
I know that underneath the covering is a dense form that was originally attached, or glued, to the metal bumper underneath. I also noticed that piece has a little play in it now. The problem is, glue just ain't gonna get it done...not without clips or screws or...something.
Anyone figured it out?
|
|
RCA1186
Administrator  Rob
Go Pack Go!
Rob
Go Pack Go!
Posts: 4,838 
Staff Member
|
Post by RCA1186 on Jul 11, 2011 22:03:28 GMT -6
How about that spray foam insulation haha
|
|
|
|
Post by nelson480 on Jul 12, 2011 10:22:41 GMT -6
What exactly is happening here?
|
|
|
|
Post by papacadillac1 on Jul 12, 2011 11:08:24 GMT -6
The front bumper is sagging, 2 or 3 inches from the tip of the hood. Others have fixed this problem by drilling a screw through the liscense plate holder into the aluminum bumper underneath to bring it back into proper position, but those of us without a liscense plate holder don't have that luxury. Any ideas? aurorah.proboards.com/index.cgi?board=Ride&action=display&thread=13596&page=1 |
|
|
|
Post by nelson480 on Jul 12, 2011 12:14:34 GMT -6
Do what i did Tape the sh*t out of it with a bunch of glue to foam backing and leave it for a few hours 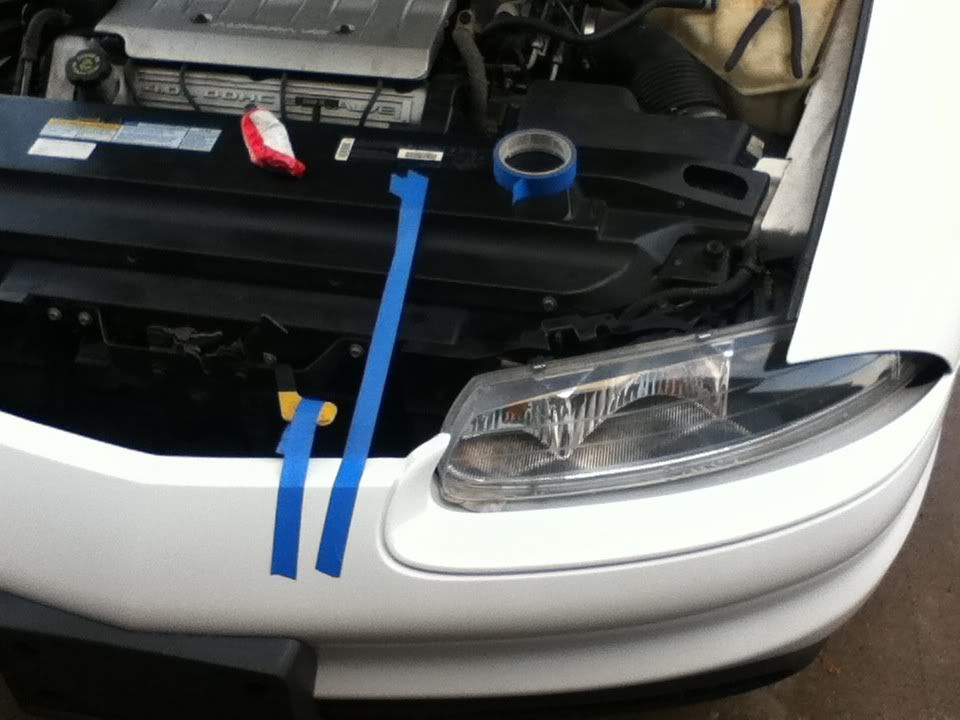 i used Automotive Amazing Goop. Messy stuff but works great when it drys |
|
bobsblue95
Super Moderator  Scars of pleasure, scars of pain. Atmospheric changes make you sensitive again.
Posts: 3,125
Staff Member
|
Post by bobsblue95 on Jul 13, 2011 10:59:15 GMT -6
My thought is to glue some small hook points (like erector set L-brackets or similar) to the inside of the bumper cover, right by the inner headlight corners, then another hook on the back of the bumper. Then use a bungee cord to hold it back.
|
|
RCA1186
Administrator
Rob
Go Pack Go!
Posts: 4,838
Staff Member
|
Post by RCA1186 on Jul 13, 2011 15:33:58 GMT -6
Yeah I wouldn't want to completely glue it down if I might need to remove the bumper one day lol
|
|
XJSman89
Administrator
Posts: 6,309
Staff Member
|
Post by XJSman89 on Jul 13, 2011 21:49:44 GMT -6
^^I agree. You DEFINITELY need to be able to remove the bumper to swap headlights. Whatever you do to hold the bumper on shouldn't be permanent!
|
|
|
|
Post by nelson480 on Jul 14, 2011 20:45:37 GMT -6
^^I agree. You DEFINITELY need to be able to remove the bumper to swap headlights. Whatever you do to hold the bumper on shouldn't be permanent! Guess its because mine isnt sagging, but the amount of glue i used should still keep the bumper in a removable state if nessisary. |
|
bobsblue95
Super Moderator
Scars of pleasure, scars of pain. Atmospheric changes make you sensitive again.
Posts: 3,125
Staff Member
|
Post by bobsblue95 on Jul 15, 2011 8:19:08 GMT -6
Well you glued it to foam, right? How tough could it be, but you'll tear it up a little to remove.
What I've noticed is that it seems worse in the heat of the day, like the plastic expands more than the rest of the car.
|
|
|
|
Post by kbpickle on Jul 16, 2011 13:59:21 GMT -6
I also had a front bumper cover that sagged. Here's what my mechanic told me he did to get the bumper cover back into position on my '99 (Sorry, I wasn't there, I just see the results):
- Pull the bumper cover back into proper position with a couple of straps looped around the bumper cover. One to the left, one to the right of the nose. Use rags or other material to keep from scratching the bumper cover with the straps. Tighten down on the two straps until the bumper cover is right where you want it.
- Cut two 3" lengths from an aluminum shape. IYou might call itl it an aluminum 'angle', but the short leg is maybe only 1/2". So the shape he used is ~1/2" x 1-1/4" x 3" long. One length of this 'angle' goes just left of the nose, one length goes just to the right of the nose of the car.
- Using automotive adhesive, glue the short leg of each angle to the underside of the bumper cover, with the long leg extending down, and catching on the backside of the foam block. Again, protect the surface of the bumper cover when you use vise grips or C-clamps to hold the angle in place as the glue sets.
This is an almost invisible fix, and it has been working on my car for around 18 months now.
I have not yet had to change headlamp bulbs, but it's look like I'll be able to remove the bumper cover by just lifting the cover enough to get the long legs of the 2 angles clear of the foam block.
Ken
|
|
|
|
Post by papacadillac1 on Jul 23, 2011 18:59:27 GMT -6
Alright, so my idea for pulling the bumper cover back into proper position has started.
I got some RV Goop(tough stuff) and four 3 1/2" X 1" plates which have holes in them already. They're all I could find as my original thought was a pair of small piano-type hinges.
I set one on either side of the nose just behind where the hood would cover and the other two exactly below them underneath the bumber cover, and the "goop" is set. Tomorrow, I will drill through the holes and bolt the pairs of metal together, making a strong securing point to wich I will attach either picture-haging wire, or strapping, or whatever I can find. The idea was to avoid gluing just a metal hook alone, as that may come loose under the tension. This way, there's no cracking of the bumper, it is discreet, and yes, can be taken loose if I need to remove the cover in the future.
I'll see about some pictures tomorrow, if I can find a camera that works...
|
|
|
|
Post by papacadillac1 on Jul 24, 2011 14:56:21 GMT -6
Done.
The plates have three bolts/nuts through them, and onstead of wire, I used plumber's strapping, or the metal strapping that's used to tie up pipes from rafters and in crawl spaces. The strapping is galvanized and there is a hole every 3/4inches. One end is secured to the underside of each plate, or the side with the nut, and then secured to each bolt of the hood latch assembly. The tension is good, and the hood covers the top plate by a half an inch. If you're looking for it, it looks like something's there, so I used the GM touchup paint to kind of blend it in.
The next day or two(Storm kicked up, I don't have a dry place to do this...) I will remove the wheel wells and access the mounting screws and releive the bowing, although there really isn't much.
Anyway, it's not permanent, so if I need to remove the bumper cover at any time it's two bolts.
Only cost two bucks at the Home Depot, and three bucks at Wally World for the Goop. My neighboer had the strapping.
Done.
Oh yeah, and the nose lines up with the hood perfectly again!
I REALLY need a new camera...
|
|
|
|
Post by reggie21225 on Jul 24, 2011 16:04:55 GMT -6
i just used some 3m tape and put it inbetween the bumper and the reinforcement block type of thing
|
|
|
|
Post by papacadillac1 on Jul 24, 2011 18:18:51 GMT -6
The foam backing was slightly loose from the metal underneath. I guess the adhesive broke down over time. If I had glued the cover to the foam backing, it would've just pulled free and probably been worse.
|
|
|
|
Post by roara on Jul 24, 2011 19:23:55 GMT -6
This is what mine does on hot days. The passenger side starts popping out, forward. I think I'll try the bolt trick, since I'm blessed with the front-plate-screw-up-the-sleek-lines-of-a-gorgeous-car option.   |
|
|
|
Post by beastboy1976 on Aug 2, 2011 20:44:32 GMT -6
With a nice vanity plate the bracket up front really dosent look so bad dispite what certain nameless younger members of the forum may say :-)
|
|
 Forum")