bufo
Aurora Owner
 Beautiful North Carolina
Posts: 555 
|
Post by bufo on Aug 12, 2006 21:32:19 GMT -6
I bought a new center console trim from eBay. It's made in GERMANY! 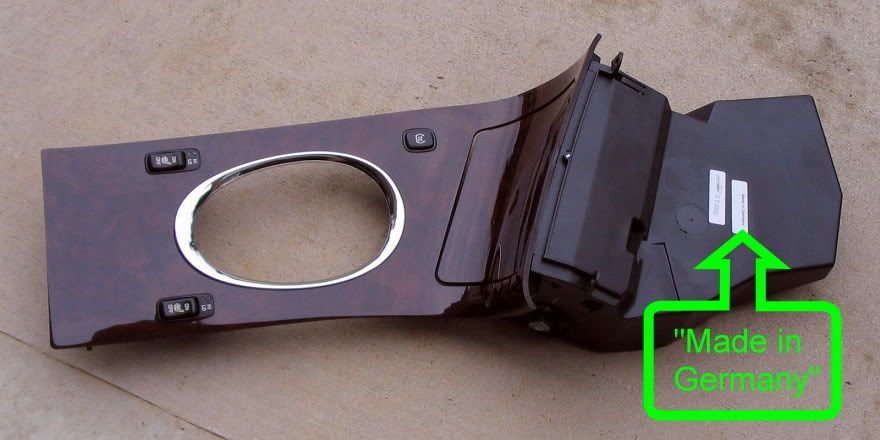 Here are photos of the 'innards' of the center instrument panel and console in case anyone is interested. (It's my wife's Aurora. She said I'm posting Aurora porn ;D ) The edges of the wood trim are supposed to be sharp, but I did not find that to be true. No damage to the vinyl. The left and right margins of the center console under the trim were horribly dirty. The previous owner must have spilled drinks. 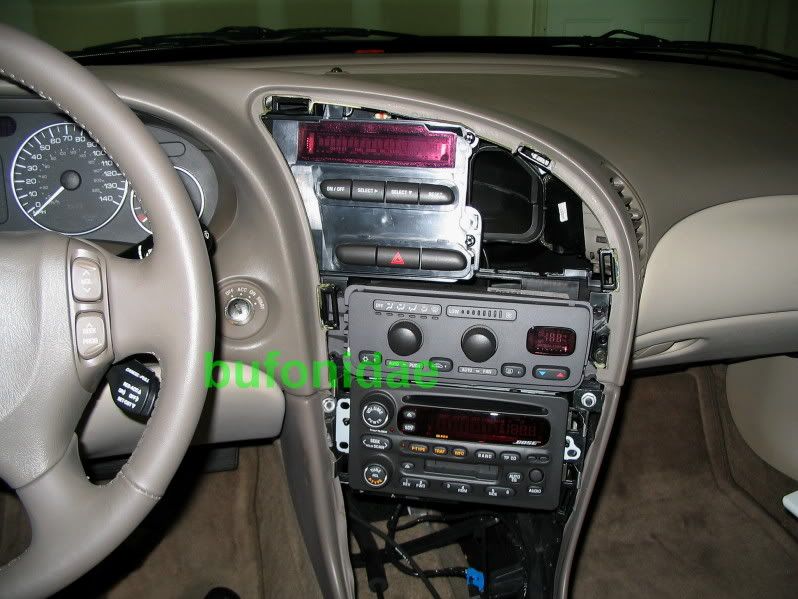 All cleaned up: 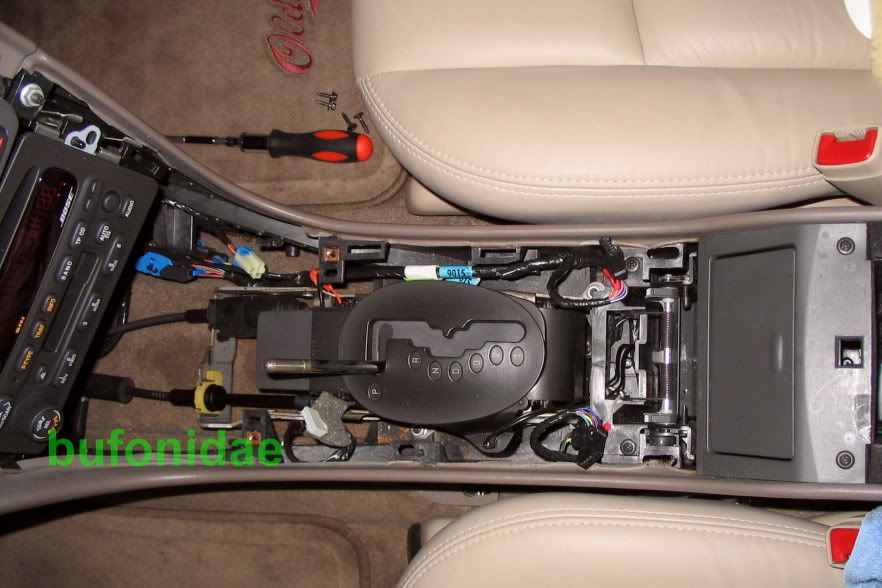 |
|
|
|
Post by Mr. Javi on Aug 13, 2006 10:09:17 GMT -6
Nice.
|
|
|
|
Post by Custom88 on Aug 13, 2006 19:27:55 GMT -6
ahh yup. That looks too familiar.  It's really interesting to see half of the dash off too though.  |
|
|
|
Post by A-boy95 on Aug 13, 2006 21:23:39 GMT -6
I wonder... is there any way to swap the shift mecanisim and the console cover outta a 2nd gen and put it in a classic, cause i have allways loved the 2nd gens shifter set up?
|
|
|
|
Post by froggyscike on Aug 14, 2006 10:09:07 GMT -6
Nice one bufo i got one on ebay myself but its for my 1st gen aurora and im planning on putting a whole new console in it  |
|
|
|
Post by unirok on Aug 16, 2006 12:44:11 GMT -6
I wonder... is there any way to swap the shift mecanisim and the console cover outta a 2nd gen and put it in a classic, cause i have allways loved the 2nd gens shifter set up? I really love the Wide shifter setup on the First gens. |
|
|
|
Post by guy48065 on Aug 18, 2006 10:27:56 GMT -6
How does this piece come out of a 2nd gen? I'm looking to add a XM radio by mounting it right in the seam between the lower and upper console trim pieces.
|
|
bufo
Aurora Owner
Beautiful North Carolina
Posts: 555
|
Post by bufo on Dec 22, 2006 15:44:12 GMT -6
How does this piece come out of a 2nd gen? I'm looking to add a XM radio by mounting it right in the seam between the lower and upper console trim pieces. To remove the upper console trim, I used a plastic knive and worked it into the upper edges to pry it loose. There are about 4 clips holding the trim in place. Removing the lower piece (around the gear shift) is quite tricky. First you have to remove two screws at the top corners of the piece. Put the shifter in neutral and remove the shift knob. Here is the challenging part: Use a flat blade, preferably L-shaped, to lift up the trim piece starting at the cup holder end. (I used an allen wrench!) Again--there are about four clips holding the trim in place. I had to use a lot of force to remove the trim--BE CAREFUL NOT TO CRACK THE WOOD OR SCRATCH THE VINYL! |
|
|
|
Post by guy48065 on Dec 23, 2006 18:16:40 GMT -6
Ok I finally did it. Some notes: The upper trim pulls straight back to unsnap. The plastic knife is a good tip, "bufo". The lower trim lifts straight up (after the 2 hex-head screws are removed). It's easier to get under the rear edge if you remove the cup holder bezel first. 2 screws in the top.
No need to remove the shift knob unless you plan to go further and remove the shift indicator. The knob pulls straight up--there's no screws, clips, etc.
Following are some pictures to make things easier for the next guy.
|
|
|
|
Post by guy48065 on Dec 23, 2006 18:26:37 GMT -6
Under the lower trim is the shift indicator. Mine was pretty gummed up with visible crud. It attaches with 4 clips--2 are visible in the pic.  Flipping it over you see the clear plastic light guide. More sticky crud here. It unsnaps from the black plastic.  Once separated you can use a toothbrush and a rag with hot water to clean it up.  Here's the nasty slider with a variety of residue stuck to it. It lifts right off once the shift knob is pulled off.  Behind the slider is a small piece that slides left/right and can be removed for cleaning.  |
|
|
|
Post by guy48065 on Dec 23, 2006 18:32:22 GMT -6
While apart I found some spots where the outer wood layer was pulled away from the plastic beneath. They're held together with a plastic pin thru a hole and melted (mushroomed) to hold it in place. I was able to snap them together and mash the pin flat with a screwdriver tip heated in a flame.
I also used some fine plastic polish to remove scratches, haze and smoke from the information display.
Now it's back together and looking better than when I bought it (used).
|
|
|
|
Post by dk58 on Jan 7, 2007 11:37:47 GMT -6
Nice. Thanks guys for the pictures. I have been wanting to do this to get to those burnt out/poorly weired shift lights. This will help a lot...
Admins... Sticky worthy?
|
|
|
|
Post by Custom88 on Jan 16, 2007 18:49:12 GMT -6
I'm not going to sticky it, just because we'd have a lot of stickies after a while, but I did add it to the maintenance FAQ's for the 2nd gen. 2nd gen FAQ's |
|
|
|
Post by slimpee on Jan 17, 2007 16:01:43 GMT -6
Just outta curiousity how much would a nice console trim kit cost for a classic?
and
How difficult is it to remove the console trim?
|
|
|
|
Post by greenmachine on Jan 17, 2007 19:29:54 GMT -6
New or used?
bunch of screws, retaining clip on front of shift lever (see froggies), gentle lift after removal of console storage box.
|
|
|
|
Post by slimpee on Jan 18, 2007 15:01:41 GMT -6
new or used but in good condition (wood not deeply scratched, nice sheen, not major defects.
|
|
|
|
Post by froggyscike on Jan 18, 2007 18:33:44 GMT -6
Really the console for a 1st generation aurora isnt all bad taking out, or putting in, it just takes patients, the cup holder, woograin and ciggerette lighter are all one piece. I went to a junk yard and got a wood grain trim for $2 the guy was gonna sell me the whole console for $50 but turns out it was in poor shape, but the woodgrain part wasent so he said $2.00 i was shocked, but this new console i got, it didnt come with the woodgrain trim, so i put the one in i got out of a junk yard, that has NO cracks or scratches and it looks great, my old woograin was cracked back close to where the cup holder was, it wasent noticable, but it was noticable if u really looked at it. Ill take a pic of the new wood trim, and the old one and show u guys |
|
|
|
Post by Buddiemac on Mar 7, 2007 18:53:49 GMT -6
Where are the hex screws located to remove the shifter console piece?
IS it a must to remove the upper to remove the lower shifter console?
Are the heated seat switch light replacable?
I recall there is a service bulletin on console removal - I do not have a copy.
|
|
|
|
Post by macadamiaman on Mar 7, 2007 22:26:07 GMT -6
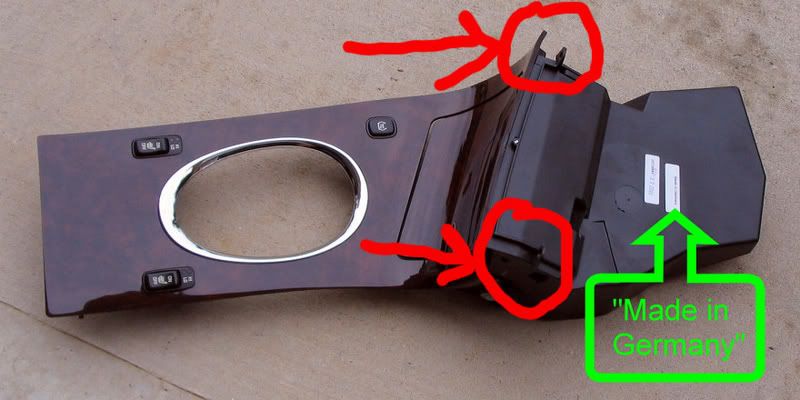 Looking at this picture they are in the red circles, facing RIGHT as the arrows point (toward the front of the car). They are black, so they are hard to see at first. As a side note when I put my console all back together, I forgot to put these hex screws back in. Everything is held together pretty well though still... By the way, even the original was made in Germany too  Yes, because the hex screws "hide" behind the lower part of the upper trim piece, you need to remove that. It is VERY easy to remove - just get a knife or pen or anything, and undo the clips. Just be careful - don't force it. To my knowledge the light is not replacable; you must replace the entire switch. |
|
|
|
Post by Buddiemac on Mar 10, 2007 18:18:53 GMT -6
Woowh - Great picture - thanks for clarifying.
I recall GM has a bulletin for removal of the console but it could not be as good as the one posted in this thread. Great thread.
|
|
|
|
Post by human on Mar 14, 2007 11:15:37 GMT -6
Just an idle thought. If the console insert is made in Germany, it may well be made by Opel, or more likely an Opel parts supplier. I wonder if there's an Opel model that shares the 2nd gen. Aurora console? I bought a new center console trim from eBay. It's made in GERMANY! |
|
|
|
Post by flintoid on Mar 17, 2007 6:16:14 GMT -6
Hey guys I have two questions -
1. How difficult is it to replace the seat heater switches in that console? Mine are gummed up and have to be replaced.
2. Anybody got a pic of the back of the upper console? Trying to figure out how it's mounted before I pry it.
|
|
|
|
Post by nicholas on Apr 15, 2007 20:31:06 GMT -6
Hey guys, I'm new here and I just bought a used 2001 Aurora last week. I'm loving it except the lights on the gear indicators don't work as well as the light on the driver side seat heaters. I can see from the pics above that the console plastic is pretty easy to take off, but I do not see where/how to replace/repair the burned out lights. Can someone provide some more details please?
|
|
scottydl
Super Moderator  There's nothin' like an American V-8...
Posts: 7,373
Staff Member
|
Post by scottydl on Apr 23, 2007 12:14:58 GMT -6
Hey fellas, I'd suggest starting a new thread with your specific questions rather than piling more inquiries into this one that probably isn't getting much traffic. nicholas, check out the stickied "Removal of Center Console" thread at the top of this "Interior" forum. |
|
|
|
Post by yankees25 on May 12, 2007 23:29:15 GMT -6
How do you get the shifter knob off? Is it just a screw-off, or are there retaining clips somewhere (not that I can find them if there are). Didn't want to use too much force to try to unscrew...
|
|
|
|
Post by macadamiaman on May 13, 2007 11:01:12 GMT -6
It's not screw off, technically you have to just pull really hard, from what I've read. However, I have taken apart and put back together the center console a number of times, and as long as you just shift it into neutral (put parking brake on!!  , everything should fit around it. No need to take it off. |
|
|
|
Post by oldsss on May 14, 2008 11:18:12 GMT -6
How do you remove the shifter knob on the second generation? Is it s screw on or just pull up staright?
|
|
|
|
Post by oldsss on May 14, 2008 11:23:17 GMT -6
In the second generation, how do you take off the shofter knob? Is it screwed in or can you just pull it up?
|
|
|
|
Post by oldwino on May 5, 2009 12:33:38 GMT -6
Had to take the center console apart to replace the bulbs in the heated seat switches. Ran into a problem when taking off the upper console piece that covers the radio and hvac units. When prying this piece off, you want to make sure that you get the tool you're using deep enough behind the trim. The wood grain portion is mounted on the black plastic part. The wood is held on by little plastic pieces that are melted to the black plastic. I didn't get in deep enough and ended up breaking the wood trim off the black plastic. You can see the separation of the wood trim(bottom) from the black plastic. You can see one of the points where the 2 are melted together above my thumb.  Luckily I didn't do any damage to the parts and was able to glue it back together and looks good as new. Hope this will help someone else from doing the same thing. |
|
|
|
Post by strohmoose on Oct 29, 2009 12:06:55 GMT -6
How much of a task would it be to install a Kenwood DNX 5140 nav unit in my 02 Aurora? I have a factory non Bose unit now and the Kenwood unit looks awesome!
|
|
 Forum")


 It's really interesting to see half of the dash off too though.


 , everything should fit around it. No need to take it off.