Forum")


Post by RCA1186 on May 11, 2010 15:11:45 GMT -6
Anyone with further instruction or pictures feel free to add and help out -Rob
This thread/writeup may not be copied in any part by anyone without prior authorization by the original poster/ACNA staff. Feel free to link to this page but do not copy/paste the information anywhere else. Thanks! -Staff
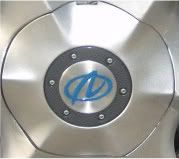
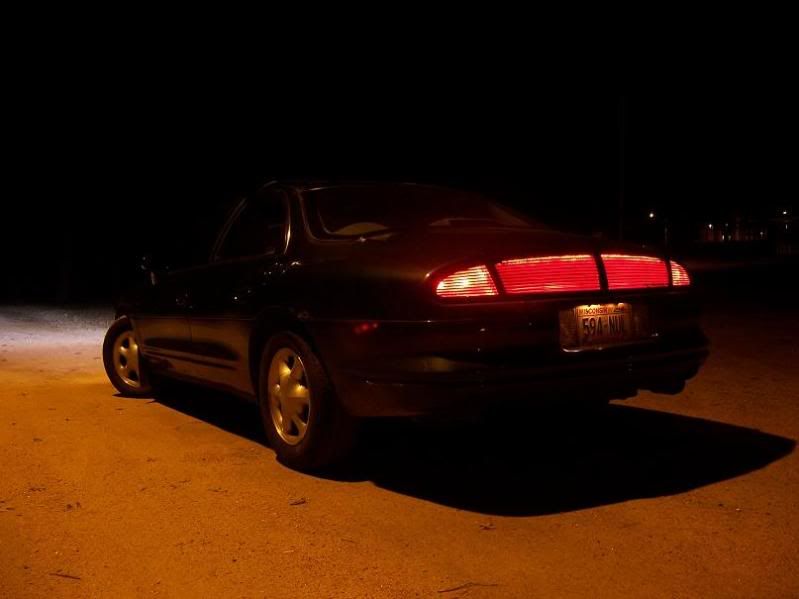
The LED lit rear panel
Your car will be without a rear panel for about 24-30 hours in this time water may be able to get in your trunk and you will not be able to open the trunk with the key. It will still open with the trunk pop button on the dash and with the key fob. (there are ways around the water problem.)
Tools Needed:
1. 10mm DEEP Socket
2. Socket Wrench Extension
3. Socket Wrench
4. Wire Cutters
5. Electrical Tape
6. Dremel Tool or Similar
8. Safety Glasses
9. Flathead Screwdriver (Optional for Prying)
10. Waterproof Silicone RTV Sealant (Black/Clear)
11. 38" (96cm) Red LED Strip. (1 or 2 depending on preference)
12. A Roll of Electrical Wiring
The LED strip is available pretty cheap on eBay. There is a seller from Hong Kong that will usually have it to you in about 9 days. I got 2 for $14.
You can also get them from a website called oznium.com. The strips come with a warranty as well. They replace them no questions asked if they stop working. These are a little more expensive; its about $45 shipped for a 38" Strip. A few members have gotten theirs here.
If you don't trust yourself enough and think you might screw up somehow and make your panel unusable (which I think is pretty hard to do) they are also available on eBay, usually around $50. They are usually available at your local u-pull for less if you can find one.
***Step One: Removing the Panel***
Open your trunk and pull down the carpeting on the trunk lid, it is held on by plastic clips. I found the easiest way to remove these is to grasp them underneath the carpet and use the carpet to pull them out. They'll fight you a little bit so be patient and don't be afraid to pull on them a little bit. You can also use a pair of needlenose pliers and grab the edge although this might scuff them a bit.

On '97-'99 Models there is an electrical connector to the panel that needs to be disconnected


After that you will need to remove the little circular covers over the bolts for the panel. There are two, one on each end of the trunk lid. Get some sort of straightedge underneath a corner and pry it out. Needlenose pliers work too, but it is VERY easy to scratch your paint. Be careful!

Next, use the socket, extender, and 10mm deep socket to remove the four nuts holding the panel in place. There are the two on each end under the caps you removed, and two more nearer to the center that each have open access holes. If the nuts fall into the opening in the trunk just move it a bit until they move to a place where you can fish them out.

Once you get the nuts off, you can now grasp the panel and pull it straight off. This can get a little tough. There are also two little white clips on each side of the panel near the bottom that hold it on. I found that prying near there with the screwdriver popped them loose, but be wary of cracking your panel and/or breaking the clips. They're pretty fragile. Just be gentle. If you break them its not the end of the world, the bolts will hold the panel on just fine.
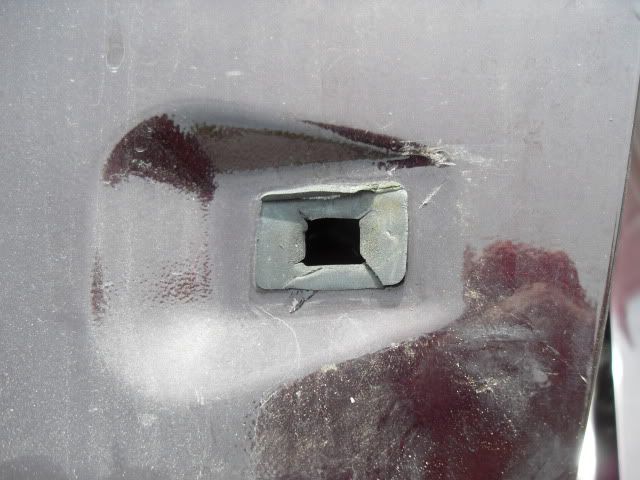
THE LITTLE WHITE CLIPS

There are two square holes that the clips fit into:
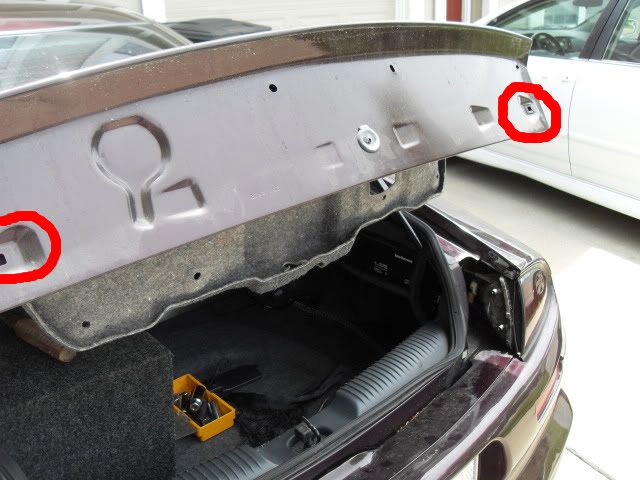
You can see the holes on the far left and right bottom corners of the trunk panel:
Your panel is now off. You CAN close the trunk, but will not be able to open it with the key, only the button on the dash or the FOB. If desired, place a piece of duct tape over the holes to prevent water from rain if no garage is available.
***Step Two: Preparing the Panel***
Now comes the hard part.
Take your Dremel (or similar) and cut a slot in the panel for the LED. You need to be careful with this, smaller to start is better. It needs to be just wide enough that the LED will fit in snugly without falling into the panel itself. If you cut it too large its not the end of the world because the silicone will hold it in place once its dry; it just makes the whole gluing process a lot more difficult.
Here is where preference comes in. I used two LED strips and placed one on top and one on bottom of the panel. The original write-up had one LED on top. I think that two LED's look better from a distance as they fill the cavity much better but it’s all up to preference. Here's the pro's and con's of the different options as I have experience with all of them haha
-One LED on top: This works pretty well, it looks much better than having one on bottom, it does not look as great from far away it tends to not fill the space well enough. It can be problematic with leaking if you don't seal it right. It also can cause problems with the studs; it tends to weaken the panel around the stud and will cause problems if you tighten the nuts too tight; it will pull the stud right out of the panel.
-One LED on bottom: This works better in some aspects but it does not look as good as having the LED on top in my opinion. The pros with it are that it is almost leak proof as the LED is on bottom and water can't leak upwards haha. Also, there is no problem with the studs this way, and it will also look more stock as the rubber weather stripping on bottom will cover the led completely.
-Two LED's one top one bottom: This is what I did on my second chance with the panel. It fills the cavity the best, has the pros of both but unfortunately the cons of both too. I think it will look the best too. It is also a LOT of work and heightens your chance of doing something unfortunate to your panel haha. Be patient.
I used WHITE LED's on mine, but in my opinion THE BEST POSSIBLE COMBINATION is two RED LED's one on top one on bottom
Depending on what you do, you will either cut the groove on top

Or:
Remove the weather stripping on bottom and cut a groove there.
To remove the stripping you have to unscrew all the screws on the back of the panel and then remove the plastic rivets on bottom being careful not to break them!


Now you can cut your grooves with your Dremel.
REMEMBER YOUR SAFETY GLASSES, I also recommend long sleeves. There will be lots of molten plastic chips flying around and taking one in the eye is not fun. (speaking from experience)
Plastic Chips and Panel Bits

***Step Three: Setting in the LED***
Now you can lay in the LED. The best way, I think, is to have the wires on the driver side of the panel. Test it to make sure that it is working and looks how you want it, you can do this by placing the positive wire on your battery's positive terminal and the negative on the negative terminal BE CAREFUL!
Also, you can cut the LED strip to fit the bottom if needed.

Once you get the LED set in, get your silicone and start sealing. You want to make sure no water will be getting into your panel.
Allow at least 24 hours for the silicone to dry.

You are ready now to start wiring.
***Step Four: Replacing the Panel and Wiring it All Up***
You'll want to run a good length of wire and attach it to the wiring on the LED. The LED has a clear and red wire for + and a clear wire for -. Allow enough wiring to go from the panel down the trunk lid and to the passenger side tail light.
You can run the wiring for the LED through the grommet for the original wiring to panel.
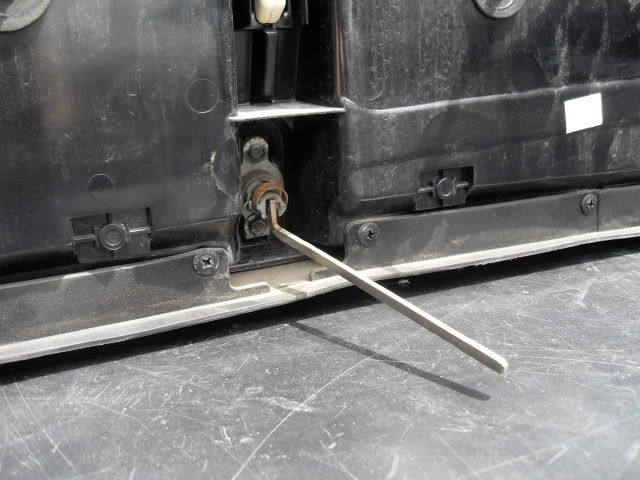
Replace the panel (reverse of removal). Be sure to get the locking mechanism lined up correctly. You will notice a long metal "arm" that comes out of the back of the panel from your lock cylinder on the panel itself. This arm fits into a hole on the locking mechanism itself. It fits throught he grommet in the center and into the hole.
Re-connect the panel wiring (If applicable).
Now, run the LED wiring along with the wiring for the lock on the trunk lid. This will take your wiring exactly where it needs to go and keep your panel looking bone stock.


Remove the cargo net hook on the top on the passenger side and the carpet to gain access to the tail light wiring.

In the Bose Auroras its easier to see where to go. The right rear tail light access door is right next to the CD changer.
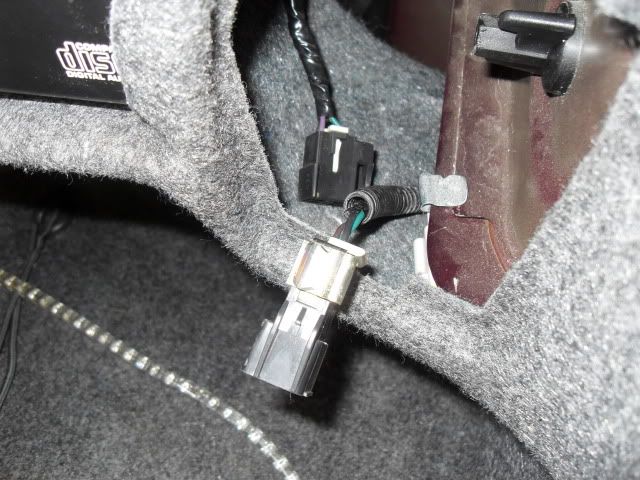
Once you get the wiring to the passenger side tail light you are going to splice into the tail light wiring.

The positive cable of the LED goes to the BROWN AND WHITE wire on the tail light. The negative cable goes to the BLACK wire on the tail light. I soldered them in, you don't have to but it’s probably better. Be sure to tape up your connections.
In the picture you will see a big red wire, that is my positive LED wire connecting to the brown one.

Once that’s done, button everything back up, close your trunk and enjoy your panel.
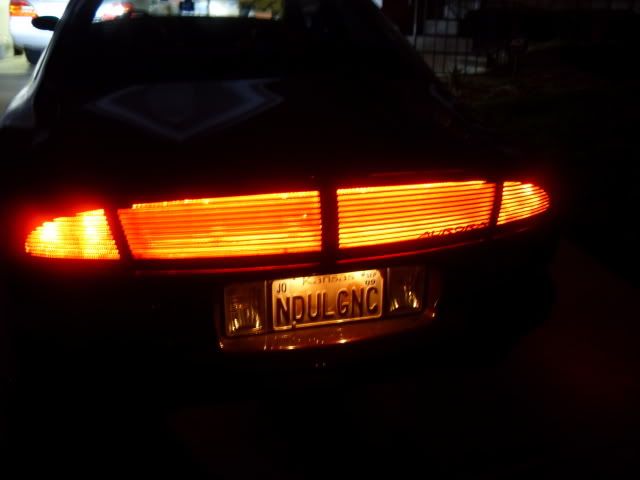
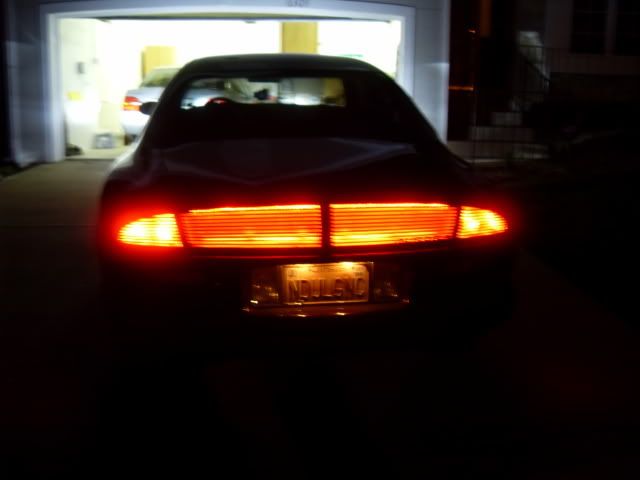
The camera shows the hotspots but in person it looks about 100% cleaner. I used white LED's but I think the red I used last time color matched better.


Xjsman89 used a red LED mounted at the top of the panel. Clutch 1, the pioneer of this mod, did the same thing. Like Rob said it looks like there's a hotspot in the pictures but it looks much better in person.
**xjsman89 edit on 5.12.10**
Great writeup, Rob! It's even better than the original. I added some info and pictures.
For reference, here's the original LED thread. The thread is locked as the current thread is night and day from the old one, even without the first post removed. Feel free to post questions/comments on thie current thread. Happy Modifying, everyone!
This thread/writeup may not be copied in any part by anyone without prior authorization by the original poster/ACNA staff. Feel free to link to this page but do not copy/paste the information anywhere else. Thanks! -Staff
The LED lit rear panel
Your car will be without a rear panel for about 24-30 hours in this time water may be able to get in your trunk and you will not be able to open the trunk with the key. It will still open with the trunk pop button on the dash and with the key fob. (there are ways around the water problem.)
Tools Needed:
1. 10mm DEEP Socket
2. Socket Wrench Extension
3. Socket Wrench
4. Wire Cutters
5. Electrical Tape
6. Dremel Tool or Similar
8. Safety Glasses
9. Flathead Screwdriver (Optional for Prying)
10. Waterproof Silicone RTV Sealant (Black/Clear)
11. 38" (96cm) Red LED Strip. (1 or 2 depending on preference)
12. A Roll of Electrical Wiring
The LED strip is available pretty cheap on eBay. There is a seller from Hong Kong that will usually have it to you in about 9 days. I got 2 for $14.
You can also get them from a website called oznium.com. The strips come with a warranty as well. They replace them no questions asked if they stop working. These are a little more expensive; its about $45 shipped for a 38" Strip. A few members have gotten theirs here.
If you don't trust yourself enough and think you might screw up somehow and make your panel unusable (which I think is pretty hard to do) they are also available on eBay, usually around $50. They are usually available at your local u-pull for less if you can find one.
***Step One: Removing the Panel***
Open your trunk and pull down the carpeting on the trunk lid, it is held on by plastic clips. I found the easiest way to remove these is to grasp them underneath the carpet and use the carpet to pull them out. They'll fight you a little bit so be patient and don't be afraid to pull on them a little bit. You can also use a pair of needlenose pliers and grab the edge although this might scuff them a bit.
On '97-'99 Models there is an electrical connector to the panel that needs to be disconnected
After that you will need to remove the little circular covers over the bolts for the panel. There are two, one on each end of the trunk lid. Get some sort of straightedge underneath a corner and pry it out. Needlenose pliers work too, but it is VERY easy to scratch your paint. Be careful!
Next, use the socket, extender, and 10mm deep socket to remove the four nuts holding the panel in place. There are the two on each end under the caps you removed, and two more nearer to the center that each have open access holes. If the nuts fall into the opening in the trunk just move it a bit until they move to a place where you can fish them out.
Once you get the nuts off, you can now grasp the panel and pull it straight off. This can get a little tough. There are also two little white clips on each side of the panel near the bottom that hold it on. I found that prying near there with the screwdriver popped them loose, but be wary of cracking your panel and/or breaking the clips. They're pretty fragile. Just be gentle. If you break them its not the end of the world, the bolts will hold the panel on just fine.
THE LITTLE WHITE CLIPS
There are two square holes that the clips fit into:
You can see the holes on the far left and right bottom corners of the trunk panel:
Your panel is now off. You CAN close the trunk, but will not be able to open it with the key, only the button on the dash or the FOB. If desired, place a piece of duct tape over the holes to prevent water from rain if no garage is available.
***Step Two: Preparing the Panel***
Now comes the hard part.
Take your Dremel (or similar) and cut a slot in the panel for the LED. You need to be careful with this, smaller to start is better. It needs to be just wide enough that the LED will fit in snugly without falling into the panel itself. If you cut it too large its not the end of the world because the silicone will hold it in place once its dry; it just makes the whole gluing process a lot more difficult.
Here is where preference comes in. I used two LED strips and placed one on top and one on bottom of the panel. The original write-up had one LED on top. I think that two LED's look better from a distance as they fill the cavity much better but it’s all up to preference. Here's the pro's and con's of the different options as I have experience with all of them haha
-One LED on top: This works pretty well, it looks much better than having one on bottom, it does not look as great from far away it tends to not fill the space well enough. It can be problematic with leaking if you don't seal it right. It also can cause problems with the studs; it tends to weaken the panel around the stud and will cause problems if you tighten the nuts too tight; it will pull the stud right out of the panel.
-One LED on bottom: This works better in some aspects but it does not look as good as having the LED on top in my opinion. The pros with it are that it is almost leak proof as the LED is on bottom and water can't leak upwards haha. Also, there is no problem with the studs this way, and it will also look more stock as the rubber weather stripping on bottom will cover the led completely.
-Two LED's one top one bottom: This is what I did on my second chance with the panel. It fills the cavity the best, has the pros of both but unfortunately the cons of both too. I think it will look the best too. It is also a LOT of work and heightens your chance of doing something unfortunate to your panel haha. Be patient.
I used WHITE LED's on mine, but in my opinion THE BEST POSSIBLE COMBINATION is two RED LED's one on top one on bottom
Depending on what you do, you will either cut the groove on top
Or:
Remove the weather stripping on bottom and cut a groove there.
To remove the stripping you have to unscrew all the screws on the back of the panel and then remove the plastic rivets on bottom being careful not to break them!
Now you can cut your grooves with your Dremel.
REMEMBER YOUR SAFETY GLASSES, I also recommend long sleeves. There will be lots of molten plastic chips flying around and taking one in the eye is not fun. (speaking from experience)
Plastic Chips and Panel Bits
***Step Three: Setting in the LED***
Now you can lay in the LED. The best way, I think, is to have the wires on the driver side of the panel. Test it to make sure that it is working and looks how you want it, you can do this by placing the positive wire on your battery's positive terminal and the negative on the negative terminal BE CAREFUL!
Also, you can cut the LED strip to fit the bottom if needed.
Once you get the LED set in, get your silicone and start sealing. You want to make sure no water will be getting into your panel.
Allow at least 24 hours for the silicone to dry.
You are ready now to start wiring.
***Step Four: Replacing the Panel and Wiring it All Up***
You'll want to run a good length of wire and attach it to the wiring on the LED. The LED has a clear and red wire for + and a clear wire for -. Allow enough wiring to go from the panel down the trunk lid and to the passenger side tail light.
You can run the wiring for the LED through the grommet for the original wiring to panel.
Replace the panel (reverse of removal). Be sure to get the locking mechanism lined up correctly. You will notice a long metal "arm" that comes out of the back of the panel from your lock cylinder on the panel itself. This arm fits into a hole on the locking mechanism itself. It fits throught he grommet in the center and into the hole.
Re-connect the panel wiring (If applicable).
Now, run the LED wiring along with the wiring for the lock on the trunk lid. This will take your wiring exactly where it needs to go and keep your panel looking bone stock.
Remove the cargo net hook on the top on the passenger side and the carpet to gain access to the tail light wiring.
In the Bose Auroras its easier to see where to go. The right rear tail light access door is right next to the CD changer.
Once you get the wiring to the passenger side tail light you are going to splice into the tail light wiring.
The positive cable of the LED goes to the BROWN AND WHITE wire on the tail light. The negative cable goes to the BLACK wire on the tail light. I soldered them in, you don't have to but it’s probably better. Be sure to tape up your connections.
In the picture you will see a big red wire, that is my positive LED wire connecting to the brown one.
Once that’s done, button everything back up, close your trunk and enjoy your panel.
The camera shows the hotspots but in person it looks about 100% cleaner. I used white LED's but I think the red I used last time color matched better.
Xjsman89 used a red LED mounted at the top of the panel. Clutch 1, the pioneer of this mod, did the same thing. Like Rob said it looks like there's a hotspot in the pictures but it looks much better in person.
**xjsman89 edit on 5.12.10**
Great writeup, Rob! It's even better than the original. I added some info and pictures.
For reference, here's the original LED thread. The thread is locked as the current thread is night and day from the old one, even without the first post removed. Feel free to post questions/comments on thie current thread. Happy Modifying, everyone!


 lol
lol