|
|
Post by sall on Mar 3, 2012 15:32:11 GMT -6
Unfortunately, no. Just been toying around with interior lighting. Needed to step away to clear my mind of mounting options to still have aiming adjustments. It was getting annoying. I am going to have to fabricate some sort of bracket vs using the OEM.
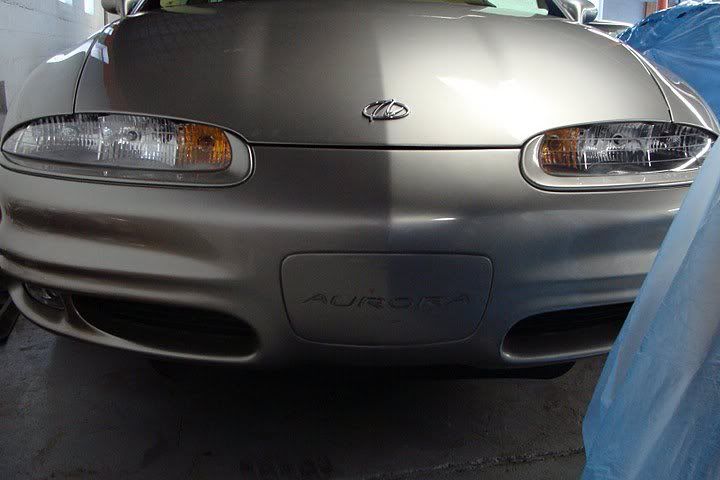
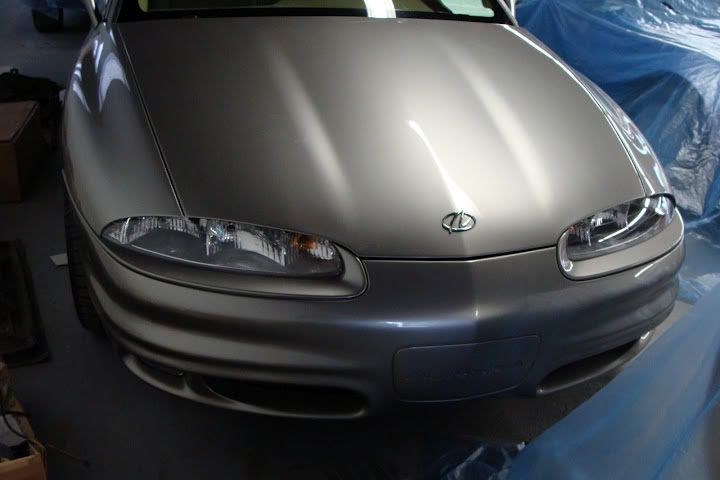
I also had an idea after visiting the yard the other day of hacking a 2G bumper up and a Classic Bumper and mending them together. Sort of like the Glass Roof Aurora. Including the fog lamp section. Then this would be even simpler and the front fascia would be awesome. Guess that's the one time a year I use the 'awesome' word haha.
|
|
|
|
Post by wireless on Mar 3, 2012 19:56:32 GMT -6
Mmm.
When you say make a mounting bracket, are you also going to make your own lense? Or are you going to leave it exposed?
|
|
|
|
Post by sall on Mar 3, 2012 20:13:22 GMT -6
I mean a bracket to actually mount the projector to still be able to have full control over aiming(up/down) and alignment rotation. I have a couple options for custom lens to go over the projector. One being vacuum formed acrylic the other being housing the projector inside a larger shroud with an acrylic lens to protect the glass from rock chips, etc. I'm really contemplating the 'hacking' the two generation bumpers together though. For the Glass roof Aurora look which equals bad***! And it makes mounting the projector much easier in it's own housing. So this project may be pushed more towards late spring/summer. I would really like to do this. That would be my crowning achievement... all that for some fog lamps huh haha.  |
|
|
|
Post by lkraft92 on Mar 3, 2012 21:14:38 GMT -6
If you make a front to look like the glass roof concept, I want you to make me one too, haha.
|
|
XJSman89
Administrator 
Posts: 6,309
Staff Member
|
Post by XJSman89 on Mar 3, 2012 21:34:02 GMT -6
I've thought about doing that for the longest time. It wouldn't be hard to take the bottom half of a 2G bumper and the top half of the classic bumper and use some dry glass to bond them together. It would be cool to see it done!
|
|
|
|
Post by sall on Mar 3, 2012 21:53:00 GMT -6
I've thought about doing that for the longest time. It wouldn't be hard to take the bottom half of a 2G bumper and the top half of the classic bumper and use some dry glass to bond them together. It would be cool to see it done! I would likely use uniweld ribbon(plastic welding) and/or fiberflex. This is how I fixed multiple cracks in 300M front fascia. It wouldn't be as simple as cut bottom half plastic weld on. Side markers would remain Classic Aurora and some other differences. I've contacted a few yards to see what the cheapest price I can get on a 2G front fascia is. No one has one locally and eBay isn't cheap either. I can get an extra Classic fascia for $50. Too bad there is no way it would bolt right up that would be superb. |
|
|
|
Post by wireless on Mar 4, 2012 19:20:02 GMT -6
I'm interested to see how you would do this.
I'm not good at custom fabrication, etc, or else I would shoot some ideas your way..
|
|
|
|
Post by sall on Mar 7, 2012 20:05:25 GMT -6
Can't find a 2G front fascia for a decent price locally and shipping alone on one is upwards of $100 unless. I'll be keeping my eye out though.
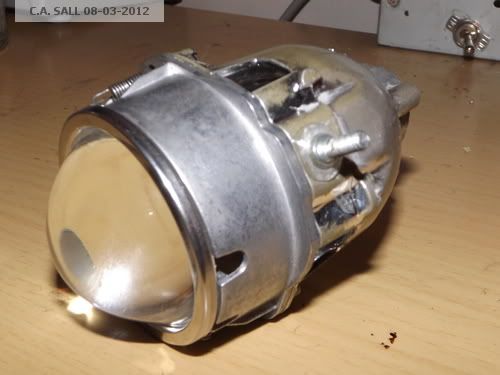
I may have figured out/learned a way to mount the projectors today and still have adjustable horizontal and vertical alignment. Waiting for J.B. Weld to cure and then find out if it will work tomorrow[probably].
|
|
|
|
Post by wireless on Mar 8, 2012 11:42:19 GMT -6
Any luck?
|
|
|
|
Post by sall on Mar 8, 2012 12:16:32 GMT -6
I was too impatient with JB Weld. I'm waiting for some JB Qwik to dry. Four minute cure time haha. Then I'll find something to mount it to other than fascia to see if the mounting method will work well or not. |
|
|
|
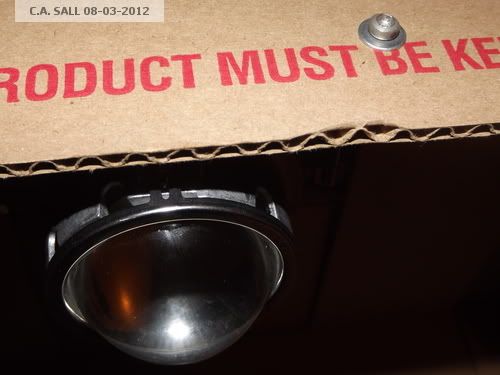
Post by sall on Mar 8, 2012 14:24:37 GMT -6
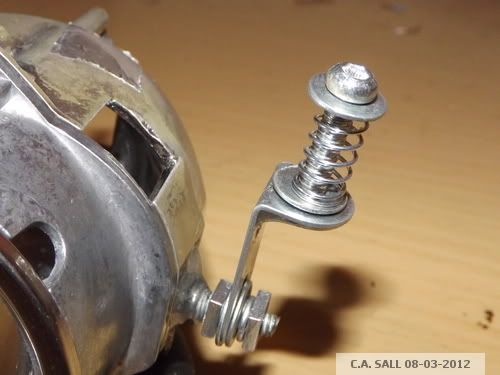
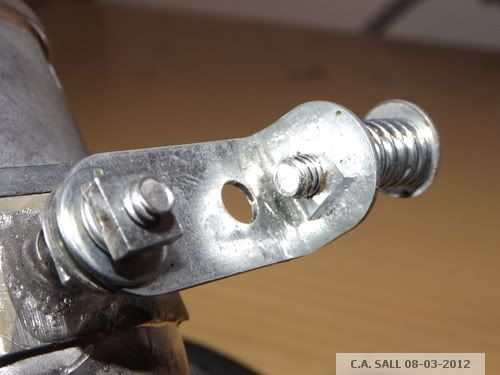
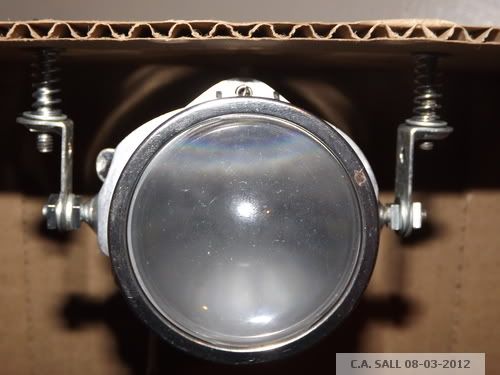
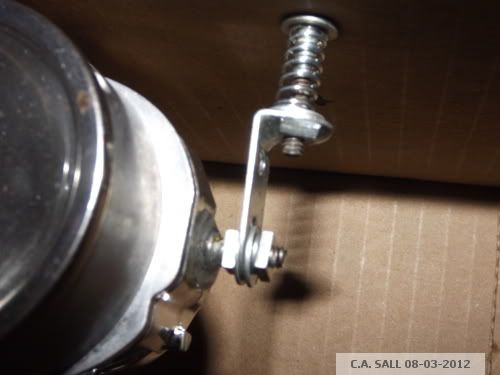
After the epoxy cured enough to hold a load I mounted it up inside a cardboard box to test. Ideally I'd mount it to something a little more stout but all I could find at the moment. I'll post up some pictures this evening and video showing adjustment capability. Should be the same as mounting from the top of fog lamp cavity in the fascia. I would mount from the top to not show mounting from the bottom of the fascia. Doing the second projector now.
|
|
|
|
Post by sall on Mar 8, 2012 18:03:34 GMT -6
|
|
|
|
Post by wireless on Mar 10, 2012 20:24:10 GMT -6
Hmm, so what will that actually mount to? Will you have to modify the existing housing a lot? Also, have you considered using the Bosch Mini V1 projectors for the fogs? Those are some of the smallest if I recall correctly.. 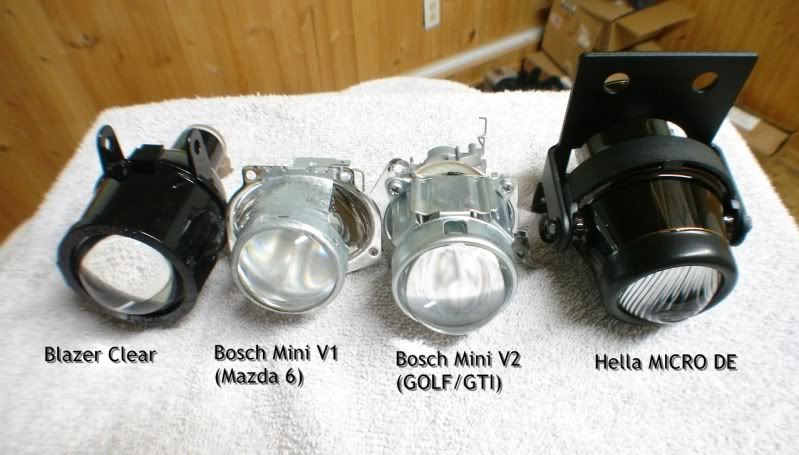 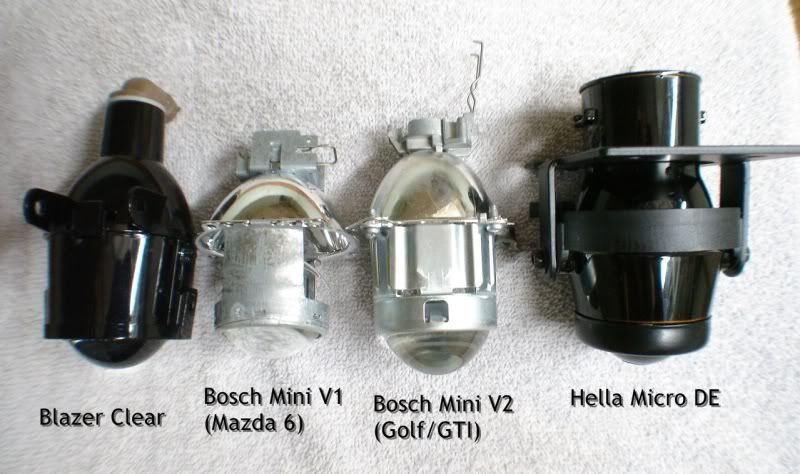 (photos taken from this thread ) |
|
|
|
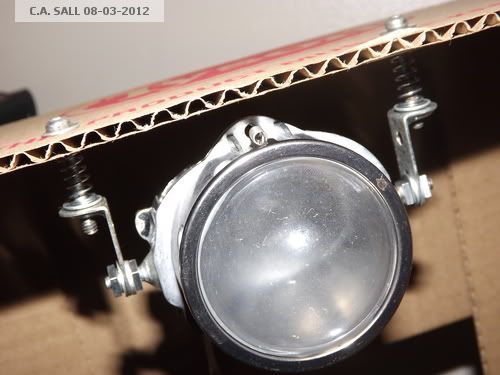
Post by sall on Mar 10, 2012 20:37:22 GMT -6
Yeah if you look back, I had the Blazers initially but with mounting bracket they are too big for fog cavity as are Micro DE. The projectors I am using are also a bit smaller than the bosch mini versions and the same mounting issues would arise except they have some mounting holes as mentioned above. Plus neither of the Bosch projectors suit my needs for LED conversion.
Not really modify anything. Just drilling two holes. If you look at how the projector is mock mounted on the cardboard it would be identical just inside the fog lamp cavity. I choose to mount above rather below because I do not want to drill a hole through the bottom of the fascia which may or may not be seen, but I'd know it was there and potentially visible.
If you remove one of the fog lamps from the fascia and have a look at how it's mounted, the odd shape you will see there is not a lot of options mounting wise.
|
|
|
|
Post by sall on Mar 11, 2012 16:00:35 GMT -6
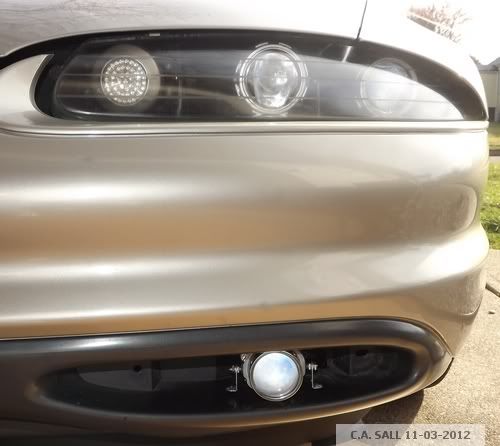
There is actually more room to mount adjustments from below and still have access. Seems there is only about 1/4" of space above fog lamp cavity and bumper. So, I plan to mount similar to picture above but with screws coming from the bottom. Then there will be two small holes plugged with push fasteners on the very bottom of the fascia. They will hardly be noticeable unless you crawl under and look for them. Pop these out and that is where you make adjustment. Pop them back in to cover up the adjustment holes. Once I get both sides mounted and aimed correctly I will make the custom urethane shroud. Slowly but surely. |
|
|
|
Post by wireless on Mar 11, 2012 21:24:21 GMT -6
That makes a lot more sense, actually seeing it on the car...
|
|
|
|
Post by wireless on Apr 1, 2012 18:43:47 GMT -6
Ordered some Blazer fog projectors on Friday.
They've got some 5000k Morimoto bulbs to go with 'em that I shall be using.
Not sure how I'm going to mount. I may go with the same method that you did, though (epoxying some studs on & making those brackets)
|
|
|
|
Post by sall on Apr 1, 2012 19:45:49 GMT -6
We will come up with something conclusive for mounting, that's for sure.
|
|
|
|
Post by wireless on Apr 1, 2012 21:00:14 GMT -6
The bracket I have in mind wouldnt allow for any vertical alignment (not sure how to even do that - I'm not exactly very savvy at custom fabrication lol) Mine would look something like this..  |
|
|
|
Post by sall on Apr 2, 2012 8:32:38 GMT -6
Yeah that should work. Very much like the mount I built for the LED fogs, but no rotational adjustment. I likely won't be able to work on it this week as I will be pretty busy with other things. Only caveat is there is not much space[at all] above the fog cavity between top of cavity and actual bumper. That is why I chose to mount from the bottom with the other projectors, so I had room to make rotational adjustments. I think Matt @ TRS can get you the actual Blazer brckets for $10. As I mentioned the Blazers I bought came with them.  |
|
|
|
Post by wireless on Apr 2, 2012 8:59:12 GMT -6
I'm not sure how you would mount from the bottom, since the projector has to sit in there one way and only one way because of how the cutoff is oriented, or am I somehow mistaken / thinking this out incorrectly?
That bracket looks a bit simple to cost $10, I think I'll stick with making my own. I need to get better at fabricating things, anyways!
|
|
|
|
Post by sall on Apr 2, 2012 9:07:55 GMT -6
Yeah bottom mount I was referring to the other converted LED projectors. With the Blazers you don't have much a choice.
You can get the Blazers much cheaper on eBay with brackets and wiring harness, you had just already ordered though. A bracket should be rather simple to fabricate though!
|
|
|
|
Post by wireless on Apr 2, 2012 15:41:14 GMT -6
Really? I got mine for $45/pair. Also, they were having a 15% off sale, so I got the projectors / bulbs for less than $80. I'm not sure if I'll even need a wire harness. I mean yeah, it's ideal, but I'm not even sure if I'll like the output for my fogs - However, I do know a guy who wants a retrofit. maybe his fogs? Currently, though, I'm planning to see if I can actually use double sided tape to get the ballast mounted on TOP of the fog housing (plenty of room there, but not sure how clearance is with the bumper on..) How would you recommend I make the bracket? I'm really new to this custom stuff, soo..  Definitely appreciate all of your help in this, by the way.. |
|
|
|
Post by sall on Apr 2, 2012 18:59:20 GMT -6
Haha I just shop around. I got them from a seller named papsnme on eBay. I know I mentioned it in the beginning of the thread but these projectors are used in 99-04 Alero. Chances are the bowls are toasted though.
I think you will like the output. Although, IMO HIDs are overkill for fog lamp. I read a few more threads about the Blazers and many were saying the Mini H1 massive amount of foreground light was washing out the fogs. So, you may need to consider a foreground limiter on the MH1.
I don't think you are going to be able to mount them on top of the fog lamp cavity. IIRC there is little to no room between the top of the fog lamp cavity and the actual bumper.
As for a custom bracket, let me mess around with some things with the Blazers and I'll let ya know. It would likely be very similar to what we have already discussed.
and no problem. I need someone to shoot ideas off of to!
|
|
|
|
Post by wireless on Apr 2, 2012 21:00:06 GMT -6
Sounds good - i got my new 3five ballasts in the mail today. Cant wait to start using them, in fact im about to go on a drive.
Also, i figured i wouldnt really have room. Im expecting to have to cut my housing to make room... which i dont mind doing for the aforementioned reasons.
The foreground limiter - i have noticed the large amount of foreground lighting, so i was indeed planning on making one. However, thats for a later day, likely if i do quads is when ill do that..
|
|
|
|
Post by sall on Apr 5, 2012 14:39:11 GMT -6
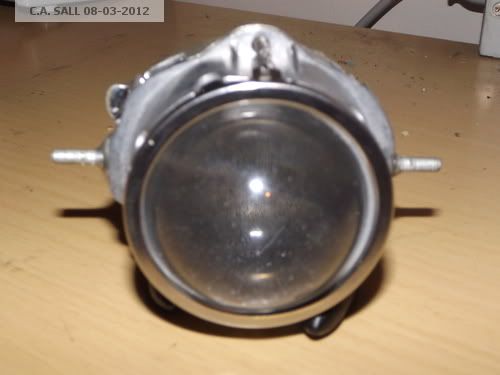
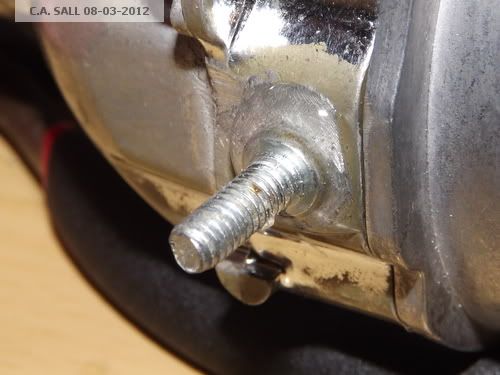
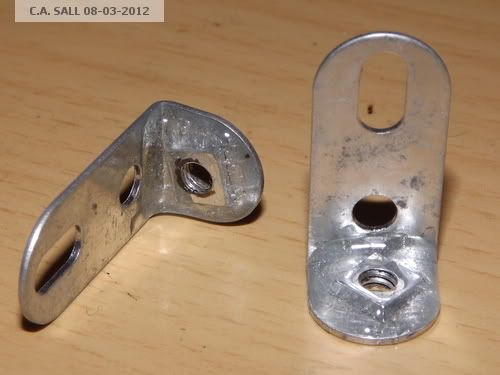
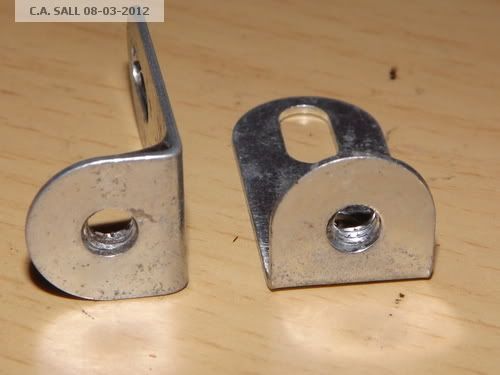
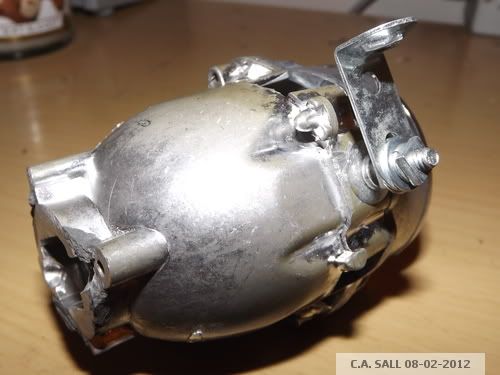
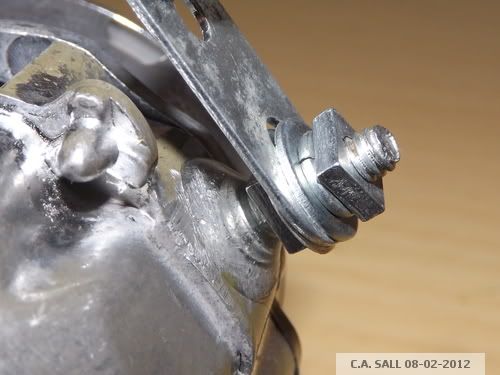
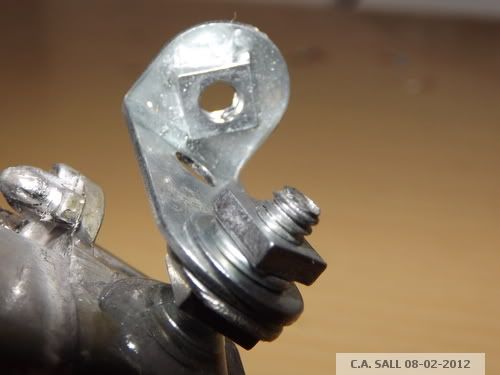
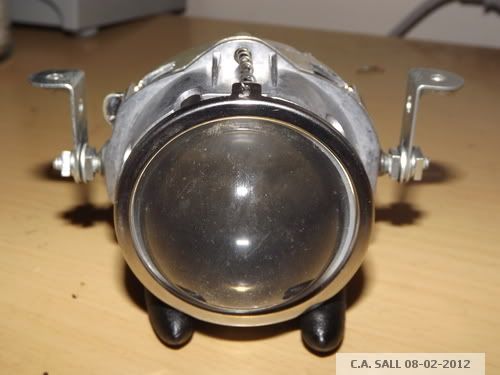
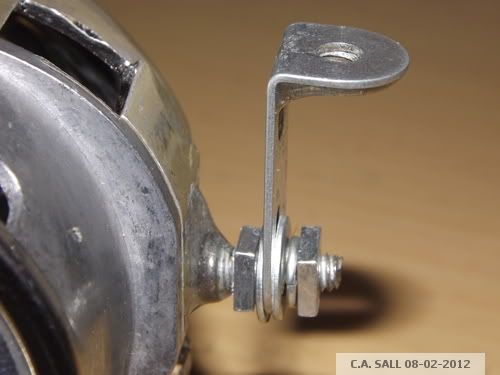
Okay, easiest way to do this with Blazer Projectors is to remove the fog lamp assembly from front fascia. Remove the mounting bracket from fog lamp assembly. Remount fog lamp mount in front fascia. The hole is where the factory bulb went through, this is where the bulb holder on the projector will go through for easy access to change bulb(whether halogen or HID). 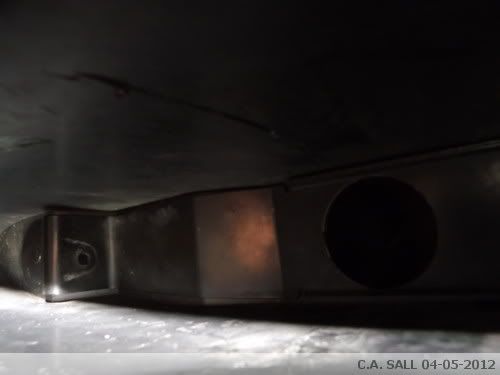 Then cut off Blazer projector mounting tabs: 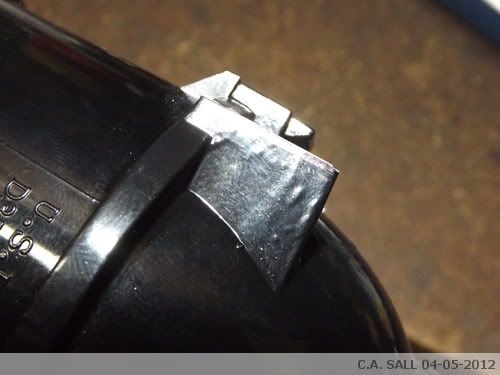 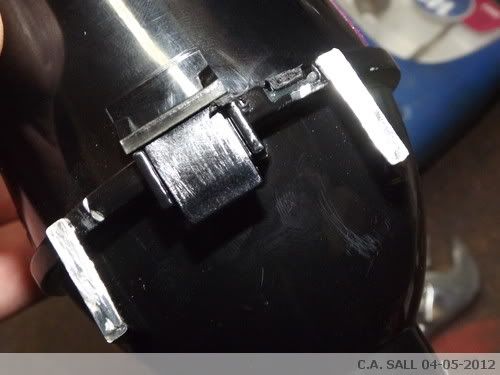 Now that the tabs are gone the projector still fits snugly into fascia cavity and through the bulb hole. Go somewhere level and aim the projectors aim and rotate projectors properly. Now you can take some JB Stik and epoxy the projector to the OEM mounting tab. The JB Stik is more like putty and is easy to use and takes about 10 minutes to cure. In the picture I don't have the projector pushed back flush with OEM mounting bracket just so you can see what I mean and where to put the epoxy. 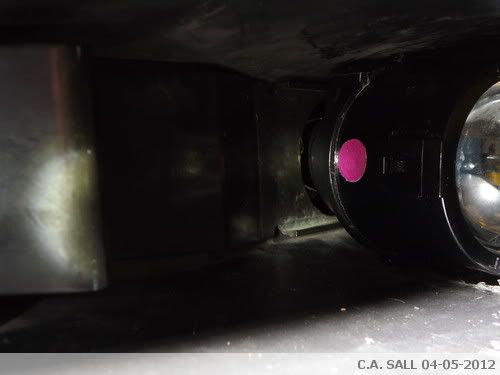 Of course with this method you get one shot at aiming and rotation once JB Stik is cured. However, you can drill it out and remove it if you mess up. Welcome to the world of retrofitting. I'm going to go pick up another tube of JB Stik this evening and aim them between then and the end of weekend. Then time for the custom shroud! |
|
|
|
Post by sall on Apr 5, 2012 18:41:11 GMT -6
A couple output shots from close range. Don't mind the messy garage and bench    '4300k' 37.5W 893 halogen bulb. Much better than stock and fills the light space the foreground limiter 'limited' on the MH! low beams just as they should. May consider going to 3000k or 2500k halogen. I think the HIDs would be overkill but may end up going that route with a 'Chinese' 3000k kit. Doubtful though. |
|
RCA1186
Administrator
Rob
Go Pack Go!
Posts: 4,838 
Staff Member
|
Post by RCA1186 on Apr 5, 2012 19:17:02 GMT -6
those are blazer ones like found on the alero right? I would have gone this route at some point were my car not totaled haha. Still have the alero fogs sitting in my closet.
|
|
RCA1186
Administrator
Rob
Go Pack Go!
Posts: 4,838
Staff Member
|
Post by RCA1186 on Apr 5, 2012 19:19:40 GMT -6
^ Actually thinking they are similar, but looking again, the alero ones have the spot to mount the bulb on an 90° angle so its kind of like on top or actually underneath the procector I believe.
|
|
|
|
Post by sall on Apr 5, 2012 19:48:18 GMT -6
|
|
 Forum")