RCA1186
Administrator  Rob
Go Pack Go!
Rob
Go Pack Go!
Posts: 4,838 
Staff Member
|
Post by RCA1186 on Apr 5, 2012 20:21:38 GMT -6
yep thats them, they pop out of that housing in 5 seconds literally haha, but that 90° was the problem I ran into, and why they never got installed (besides the accident)
|
|
|
|
Post by sall on Apr 5, 2012 20:27:42 GMT -6
You may be able to get them in there sideways and rotate them to get the bulb holder through. Try it. It's easy to pull the fogs w/o pulling the fascia.
|
|
|
|
Post by sall on Apr 5, 2012 20:49:21 GMT -6
Here is example video.
Foreground when you need it, none when you don't!
|
|
|
|
Post by wireless on Apr 5, 2012 21:56:12 GMT -6
can't wait to get mine put in! I'm excited.
That output is amazing..
|
|
|
|
Post by sall on Apr 7, 2012 9:17:10 GMT -6
I agree, pretty remarkable! Anyways, I poured some foam yesterday and let it cure over night. I have it shaved down a little bit and started shaping it. I determined I will fiberglass over the foam as there are still too many air pockets. I haven't deemed this one a failure yet but either way it's practice and progress. 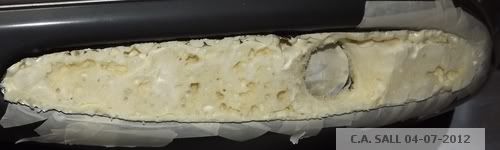 |
|
|
|
Post by wireless on Apr 7, 2012 13:07:40 GMT -6
Would it be possible to go over it with something like rhino liner? (The stuff they put in the bed of a truck)
Not sure how that stuff works, but it's an idea.
Also, how will that mount in there? Will it mount to the OEM brackets, allowing for adjustments etc?
|
|
|
|
Post by sall on Apr 7, 2012 13:58:06 GMT -6
Yes you could use Rhino Liner or any rubberized coating. I doubt that will fill the holes though which is why I think I will fiberglass over it first and get a really good sandable shape and surface to spray over. I am actually going to use PlastiDip for the top coat and do the entire dark portion of the fascia. The plastidip is completely removable. I posted a thread about it in the Products subforum.
This is my first pour with new foam though and I did it two stages because I wasn;t sure if it would cure pouring a bunch at once. So I'm going to try one pour next.
|
|
|
|
Post by sall on Apr 9, 2012 19:40:56 GMT -6
Moving in a different direction. Mocked up the shroud with mini gatling and some cardboard(simulated abs plastic). I like the results.  and crappy photoshopped black: 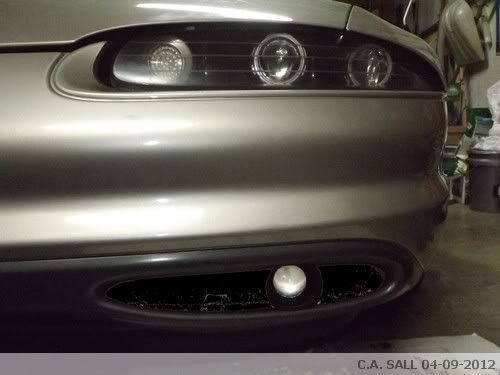 Also, the upside of this. Lexan lens. Can cut a circle shaped piece of acrylic to fit inside the mini gatling and therefore protects the Blazer projector lens. Granted this is a mock-up. Looks good. |
|
|
|
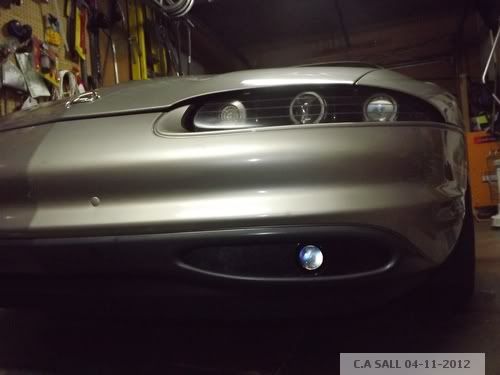
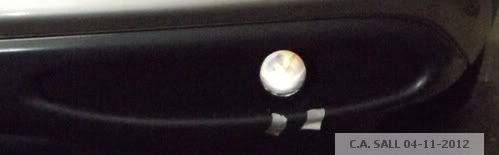
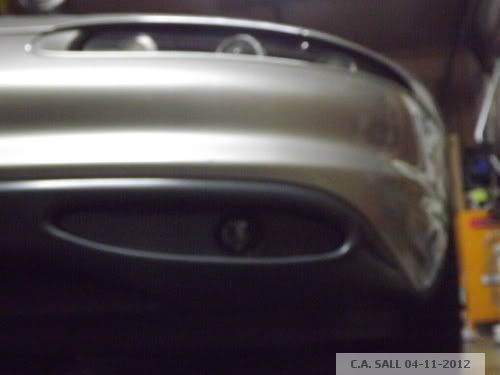
Post by sall on Apr 11, 2012 14:10:01 GMT -6
|
|
|
|
Post by lkraft92 on Apr 11, 2012 14:48:11 GMT -6
that looks good. i can't wait to see the finished product.
|
|
|
|
Post by wireless on Apr 11, 2012 15:26:46 GMT -6
I've been gradually doing these myself. If any of you are interested, this is what it will look like once epoxied to the fog bracket.. (Use JB Stik. DO NOT USE THIS STUFF INDOORS, good lord it smells horrible. I had to sleep with all of the windows open to get the atrocious smell out of my apartment..)   Sitting on top of my new AC Compressor (you can see the receipt!  ) |
|
|
|
Post by sall on Apr 11, 2012 19:33:17 GMT -6
Thanks lkraft! I should be finished by the end of the weekend but no guarantees!
And yep, wireless thanks being the only one to bounce ideas off of. I appreciate it brother. Haha latex gloves and kneading out doors is must. Sorry for not mentioning that. The urethane flexible bumper repair smells the same way that I used on a 300M fascia.
|
|
|
|
Post by wireless on Apr 11, 2012 21:17:56 GMT -6
I still have one concern; you mentioned wanting the shroud to be water tight.
Why? Aren't the blazers naturally running hot? (Especially with HIDs like I'm running..) Wouldn't it make sense to leave a bit of open space around them? Only problem with that, though, is potential debris getting in over time.
edit: also, no problem! I've never been much of one to do custom much (I'm used to being spoonfed mods to follow a guide, etc) rather than figure it out myself. I'm really enjoying the DIY aspect of this.
Still trying to think of a way, though, to get everything to work with the OEM bracket. Even if it's something a bit crude, such as a screw in the bottom of the cavity threaded up to push the bracket up & down for a bit of adjustment thats not 100% relied on the epoxy aiming (really concerned, as I messed up my aiming the first time and still haven't had a chance to fix it!)
|
|
|
|
Post by sall on Apr 11, 2012 21:24:25 GMT -6
They are still getting more air than if surrounded by foam haha. I just don't want build up of debri in there or water. it would also possibly let the blazer projector lens and lexan lens become very dirty quickly. Which means more cleaning. They should be fine temperature wise.
Also, I plan for there to be a smooth transition from fascia to 'fog shroud' with plastidip with no seams in between. This way it looks cleaner.
|
|
|
|
Post by wireless on Apr 12, 2012 1:12:56 GMT -6
To be honest, though, I drove with the fogs on (used hot glue to seat them for aiming) and I was really impressed by their throw/light output (with my 5k HIDs)
If I hadn't retrofitted my headlights already, I would probably just do a Bi-Xenon fog retrofit and call it a day lol
|
|
|
|
Post by sall on Apr 12, 2012 9:19:10 GMT -6
Yes, they work very well. I ordered some 3000k and 4300k HID bulbs to compare with the halogen '4300k' and '3000k' bulbs. Haha one could definitely do a matchbox bi-xenon retro in there, but take some thought on mounting and weatherproofing. Same ideas could be used though. I don't see much of a point ina bi-xenon fog, but many HIDP members have done it haha.
|
|
|
|
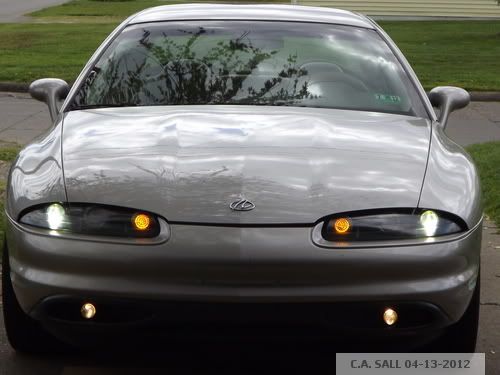
Post by sall on Apr 12, 2012 12:42:48 GMT -6
LED Park Lamps, 4300k HID Lows and '4300k' Halogen Fogs. |
|
|
|
Post by lkraft92 on Apr 12, 2012 13:38:37 GMT -6
With those lights and the blacked out reflectors, the car looks like a UFO from the front. It definitely looks great.
|
|
|
|
Post by wireless on Apr 12, 2012 16:58:57 GMT -6
Eh, I honestly don't want Bi-Xenon fogs as I like my current setup. However, if I lost my bi-xenon's now, I'd cry, so maybe the bi-xenon fogs would suffice! Also, I did quite a bit of driving with both the 2500k Nokya's and the 5000k HIDs. The light output of the 5000k HIDs is phenomenal; simply put, combined with my low beams, I feel as if I could see everything.. Whereas the halogen's were better than stock, but just couldn't compare. lkraft, enough talking , when are you going to do your retrofit! We'd love to help you out if you need anything! |
|
|
|
Post by sall on Apr 12, 2012 18:13:21 GMT -6
Thanks! I love the look. It looks aggressive, sporty and up to date! And oh yeah I can see! lol
I'm still not finished just yet. Just pulled out of the garage to have a look. I actually drove two miles forgetting that the two shroud pieces and the mini gatling were still in the cavity, unsecured. Luckily, they fit very snugly and were still there once I remembered! Should have everything secured and plastidipped over the weekend if weather holds up for me.
|
|
RCA1186
Administrator
Rob
Go Pack Go!
Posts: 4,838
Staff Member
|
Post by RCA1186 on Apr 12, 2012 18:31:42 GMT -6
Looks good
|
|
|
|
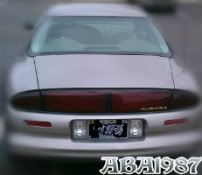
Post by aba1987 on Apr 12, 2012 18:38:11 GMT -6
Looks like an OlsmoAudi.
|
|
|
|
Post by sall on Apr 12, 2012 19:26:53 GMT -6
Thanks. Get your new retro going! Haha yeah wireless said something similar some time ago. I like it though ;D and can see pretty good at night now, can be seen and have a pretty efficient lighting system. Funny you say that though because... 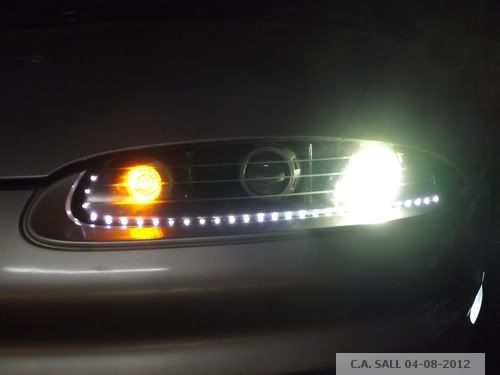 It actually looked pretty good, but haven't made it permanent and don't know if I will. |
|
|
|
Post by lkraft92 on Apr 12, 2012 22:50:23 GMT -6
lkraft, enough talking , when are you going to do your retrofit! We'd love to help you out if you need anything! it is a plan for over the summer. i plan on doing it when i paint my car, as long as i dont have any money issues that come up, but i cant guarantee anything right now. |
|
|
|
Post by aba1987 on Apr 12, 2012 22:52:59 GMT -6
lkraft, enough talking , when are you going to do your retrofit! We'd love to help you out if you need anything! it is a plan for over the summer. i plan on doing it when i paint my car, as long as i dont have any money issues that come up, but i cant guarantee anything right now. U goin to a shop, or u doin it by yourself? Sorry i plan on sprayin mine too |
|
XJSman89
Administrator
Posts: 6,309
Staff Member
|
Post by XJSman89 on Apr 13, 2012 0:15:18 GMT -6
I've told him that many times haha. He knows he has help when he goes to do it. ;D
I'm not a fan of the audi lights. I tried them on mine too when I had the lenses open... I didn't like it. It's too much going on in the front. It would only work for me if you replaced the turn signal with the audi strip entirely.
|
|
|
|
Post by sall on Apr 13, 2012 8:08:26 GMT -6
Yeah your headlights are stock plus a projector though. It would look completely different. In any case it would likely be a custom strip(array) of LEDs. The strip would be consecutive [good]LEDs with no spaces. So, a solid strip persay. Pre-built LED strips are not up for any task but maybe interior lighting(as we know from the LED rear panel) not for a 'safety' device. I have seen others here experiment with strips as well. My idea is DRL and/or Park Lamp on the 'strip' and turns off with turn signal or headlights. Needless to say it is not on my immediate list of things to do/complete.
Anyways, back on topic. Forecasted to be 82* here on Sunday. It looks like that will be the day the PlastiDip will be sprayed. I'm going with original black plastidip first and then decide if I would like to use the glossifier.
Wireless, have you mounted your ballasts under the actual bumper or just having them laying in there? I have a pair of 'super slim' ballasts so I am sure I can find a spot to mount them somewhere for testing. They are about the length/width of a credit card. Just waiting on the 3000k and 4300k bulbs to arrive.
|
|
|
|
Post by lkraft92 on Apr 13, 2012 9:29:56 GMT -6
it is a plan for over the summer. i plan on doing it when i paint my car, as long as i dont have any money issues that come up, but i cant guarantee anything right now. U goin to a shop, or u doin it by yourself? Sorry i plan on sprayin mine too i plan on doing it myself with some help from my dad. he originally went to school for auto body, so he's got a good idea of what to do, and he just got done helping my brother with his car. and i hope to do the projectors during the painting process and maybe the taillight mod. |
|
|
|
Post by wireless on Apr 13, 2012 11:42:00 GMT -6
Wireless, have you mounted your ballasts under the actual bumper or just having them laying in there? I have a pair of 'super slim' ballasts so I am sure I can find a spot to mount them somewhere for testing. They are about the length/width of a credit card. Just waiting on the 3000k and 4300k bulbs to arrive. I actually mounted my ballasts right behind the fog cavity (on the bumper itself). Used 4 strips of double sided tape per ballast after cleaning the surface. No problems so far! Definitely don't have them just laying in there - I don't have the plastic piece re-attached, so it's kind of just open space. I'm hoping an Aurora shows up in a junkyard nearby so I can snag one, however I don't see that happening as I haven't seen an Aurora in a junkyard here in a long time.. |
|
|
|
Post by nelson480 on Apr 13, 2012 12:03:15 GMT -6
I love that LED strip there!!!
|
|
 Forum")


 )
)