RCA1186
Administrator  Rob
Go Pack Go!
Rob
Go Pack Go!
Posts: 4,838 
Staff Member
|
Post by RCA1186 on Jan 21, 2012 10:09:40 GMT -6
|
|
|
|
Post by sall on Jan 21, 2012 11:34:02 GMT -6
Thanks RCA! It just looks in my opinion....like an after thought, a bolt on mod or unfinished with one projector. Too much dead space. In the low beam reflector area where the projector is the way the shadows cast makes it look as if it is painted black as well. Just looks odd. Begging for more updated look. Most Many new cars are using a quad setup and have black background(can't call it a reflector because it isn't.) and chrome or body colored accent shrouds. For example 2012 Corvette. These guys here are some of my favorite retro-fitters and you'll notice hardly any retrofits are chrome/chrome especially ones in smaller form factor(lacking height and depth). I take in consideration this may be my biased opinion but it's just that an opinion. I tend to go above and beyond and get absorbed in a project and aren't satisfied until the end justifies the means... |
|
XJSman89
Administrator
Posts: 6,309
Staff Member
|
Post by XJSman89 on Jan 21, 2012 12:13:06 GMT -6
Thanks for the criticism haha. I don't think it looks unfinished at all. It may look that way to you because you're used to your setup. Besides, most people wouldn't be willing to do make the custom shroud and all that. I considered it but I didn't like the thought of a custom shroud for just the low beam section. The spread on the road is great and they look good on the car. It looks to me like it belongs there. You can't argue that it looks less stock than your setup.
But let's not argue! That's not what the thread is for. Sorry for getting into that type of discussion.
|
|
|
|
Post by sall on Jan 21, 2012 12:30:43 GMT -6
The custom shroud is over the LED Park/Indicator. Low and High beam are just mini gatling. The Micro gatling fits perfect for the park/indicator area. Just too much gatling shroud that way. Most people wont do a retrofit but most that do (HIDPlanet.com) go all out. I just think project like this need customization. I look and at new cars and think mine looks more factory because of how they look... but it's custom. Like I said it's biased because... it's mine lol. I plan to take start up a thread relating to this. My choice for color scheme and setup goes with theme.. tinted windows/tinted rear deck... custom stuff everywhere. On another note are you running regular Morimoto H1 bulbs or XB35? XB35 blow the pants Morimoto H1! |
|
XJSman89
Administrator
Posts: 6,309
Staff Member
|
Post by XJSman89 on Jan 21, 2012 13:38:29 GMT -6
I'm running the H1s. How much are the XB35 price wise? Are they still 6000K or are they lower than that?
|
|
|
|
Post by sall on Jan 21, 2012 15:21:52 GMT -6
$70 - 4300K-6000K I personally like 4300k now after using. Which is OEM HID color temp. Here is a custom shroud. Attempting a 2G look. Haven't put much work into since then. In fact it still sits exactly as is. Needs trimmed, drilled, sanded and painted.   |
|
RCA1186
Administrator
Rob
Go Pack Go!
Posts: 4,838
Staff Member
|
Post by RCA1186 on Jan 21, 2012 15:54:03 GMT -6
Actually I see most cars today with low beam projectors and normal halogen highs.
That being said, I think yours looks AWESOME haha
|
|
|
|
Post by bravadaurora on Jan 21, 2012 16:23:04 GMT -6
sall Yes - I bought the HID Kit which includes the relay harness, I am trying to figure out the best place to put it as I did not really see it in this thread.
|
|
XJSman89
Administrator
Posts: 6,309
Staff Member
|
Post by XJSman89 on Jan 22, 2012 16:32:59 GMT -6
There isn't a good place, really. I zip-tied my ballasts to the frame and they haven't moved but ideally they would be bolted somewhere. I'm going to use some self tapping screws to bolt them to the frame I think. The relay harness itself I just zip-tied to the existing harness. It hasn't moved an inch.
|
|
|
|
Post by sall on Jan 23, 2012 11:04:27 GMT -6
There isn't a good place, really. I zip-tied my ballasts to the frame and they haven't moved but ideally they would be bolted somewhere. I'm going to use some self tapping screws to bolt them to the frame I think. The relay harness itself I just zip-tied to the existing harness. It hasn't moved an inch. There is actually a really nice place to mount the ballasts on both the Classic and 2nd Gen. I don't have any pictures for the Classic(that I can locate right now) but in front of air box and in front passenger side fuse box. A good double sided sticky pad is alright to use as long as you thoroughly clean the ballasts and the mounting surface. There are also brackets that you can purchase to mount the ballasts. It is virtually the same spot on the 2nd Gen. You know there is a write up in the audio/electric/lighting section right, bravadaurora?  Now about the relay harness. On the Classic I mounted the relay to a spot on the rad beauty panel. Grabbed a few of these: Put them in the empty holes in the backside of the beauty panel and ran the harness through them across to the drivers side. Clean and simple. |
|
XJSman89
Administrator
Posts: 6,309
Staff Member
|
Post by XJSman89 on Jan 23, 2012 11:14:56 GMT -6
That's where I have mine placed, haven't given me any problems so far.
|
|
|
|
Post by sall on Jan 23, 2012 14:38:27 GMT -6
Speaking of relay harness... I just wanted to suggest using a heavy duty relay harness. It utilizes two relays. This way if something unexpected happens you do not lose low beam in both headlights.
Other suggestions:
1. always test projectors first before assembling into the headlamp. make sure they match to your satisfaction, the cutoff color and sharpness is correct, and they have the same beam pattern. nothing is more frustrating than finding out after everything is installed that each projector has a different beam shape.
2. use extreme caution when testing hid bulbs. the ballasts use extremely hi voltages that can KILL you. not only that, but an exploding bulb (due to water vapor, a bug, dust, etc) can send mercury covered glass fragments into your skin and eyes. always wear goggles and protective clothing and never stare directly at an hid bulb. shield + and - connections to prevent cross contact or contact with ballast casing.
3. always try to use oem equipment for bulbs and ballasts.(unfortunately H1 bulbs are ALL aftermarket there is no OEM) they have much better build quality and lifespan compared to aftermarkets. oem ballasts are usually brighter (true 35w), last 5-10 yrs, can light up a bulb to usable output in a few seconds, and allows hot restrike of the bulb. oem bulbs are almost always brighter and last much longer while running cooler than aftermarkets. there is alot of research put into these important parts and its safer to use well designed components.
4. pay attention to your wiring. its the most important part of the retrofit and determines whether you will be driving home without headlights or not. make sure all connections are secure and insulated, there is a proper size fuse on the power lead, and the relay is of good quality (bosch/tyco). watch where you run wiring and do not let any cables get near moving car parts.
5. ballast mounting is also important for long lasting hid retrofit. as well designed as oem ballasts are, most do not have complete waterproof protection (hella gen3 is an exception). so be sure you mount ballasts away from places water may splash onto or mount them in a vented box.
6. fogging inside the headlamps due to water leakage. this is a very common problem after opening the headlamps and resealing. 99.999% of the time, you have a gap in the sealant between the two halves that is letting water inside. then when the temperature changes, some of it turns into fog and condenses inside the lens. this is not normal and must be repaired (safety hazard). it can happen with both oem and aftermarket lamps, as both can be prone to leaks. the solution is to always add extra sealant to the channel groove before closing the retrofit. [the ONLY sealant that is acceptable is a butyl based product like 3M windoweld ribbon. it is tacky and permanently soft and will be able to lock out water from entering so long as you apply enough of it. any excess can always be squeezed out and removed after clamping the housing together (heat may be necessary). it is not required to remove old sealant. simply add more and you will be fine. in some rare cases, you may get small amounts of fog forming due to rapid changes in weather, for example freezing rain or snow falling on a warm headlamp that is being used in humid climates. this is normal and should clear up so long as there is a vent hole in the rear of the housing. there must be at least one vent to allow air exchange from pressure and temp differences. more vent holes work faster and also allow better cooling, but they may let more dust inside.
7. driving in the rain with hids should be no problem, but there are a few issues that could make things very dangerous. your headlamp lens is the most important part of the retrofit. it determines how much light from the projector actually makes it to the ground, and how much is lost due to refraction thru the plastic. always keep outer lens covers clean and clear. do not let them become cloudy or damaged from sun exposure, and always use a protectant. plastic sealers and even wax (which must be applied more often) will keep the outer lens covers looking new and also play a critical role in rain visibility. when it rains, the covers get wet. an untreated cover allows dirt and water to sit on top in sheets, causing the projected light to become very blurry with reduced output. it also causes excessive glare to other drivers. a treated lens will cause the water to form into tiny beads (like rain-x on the windshield does). these beads will have much less effect on the beam output, resulting in better visibility and less glare to others. the beads that do remain on the lens are quickly blown off when the car is moving. next time it rains, pull up to a wall and see what your cutoff looks like. if it is blurry and faded, it is a good indication you should be protecting the lenses. the cutoff should look almost as bright and sharp as in dry weather.
|
|
RCA1186
Administrator
Rob
Go Pack Go!
Posts: 4,838
Staff Member
|
Post by RCA1186 on Jan 23, 2012 18:51:01 GMT -6
I wonder what my car would look like with the setup you have sall, but instead with body color reflectors.
|
|
|
|
Post by nelson480 on Jan 23, 2012 18:58:09 GMT -6
Lol i just smashed my ballast behind the airbox haha
|
|
|
|
Post by sall on Jan 24, 2012 10:46:11 GMT -6
I wonder what my car would look like with the setup you have sall, but instead with body color reflectors. Hmm.. On your new Dark colored Aurora I think chrome would be best. I think darker reflectors accent a lighter colored vehicle better. The difficult part of keeping chrome would be not messing up the vapor deposited aluminum when boring the hole for the high beam projector. And if you keep it chrome and want to do LED Park/Indicator shroud it would be extremely difficult to get your custom shroud the same color 'chrome' as the projector shrouds. TRS used to have micro gatling shrouds which fit perfectly. After a limited run of micro projectors they are all but gone now. Not saying it's not doable though! |
|
|
|
Post by Blacky Bulger on Jan 24, 2012 21:33:58 GMT -6
Those headlights in black would look amazing with the Angel Eyes glowing around it. On your car I think that night time picture with the street light gave it sort of a Evil, Dark Bat-mobile or Nightrider look.   . I think I would try to attempt this possibly. It looks like alot but it's custom forsure! |
|
RCA1186
Administrator
Rob
Go Pack Go!
Posts: 4,838
Staff Member
|
Post by RCA1186 on Jan 25, 2012 11:01:13 GMT -6
I wonder what my car would look like with the setup you have sall, but instead with body color reflectors. Hmm.. On your new Dark colored Aurora I think chrome would be best. I think darker reflectors accent a lighter colored vehicle better. The difficult part of keeping chrome would be not messing up the vapor deposited aluminum when boring the hole for the high beam projector. And if you keep it chrome and want to do LED Park/Indicator shroud it would be extremely difficult to get your custom shroud the same color 'chrome' as the projector shrouds. TRS used to have micro gatling shrouds which fit perfectly. After a limited run of micro projectors they are all but gone now. Not saying it's not doable though! You're probably right with that haha, especially with the chrome rims. Who knows though, I'm still not even sure if I even want to do projectors again. Time will tell haha. |
|
|
|
Post by sall on Feb 3, 2012 10:35:57 GMT -6
There's one final step. As mentioned earlier, most cars leave the low beams on when the high beams are turned on. The classic doesn't. There's a very simple way to fix this! You'll need to get a 1N5404 diode from radio shack (they're like $1.58) and wire this in. The diode is very important, it prevents your stock wiring from getting fried by the harness. All you need to do is connect the positive STOCK high beam wire to the positive RELAY INPUT wire that connects to the car's 9006 low beam output, but be sure to connect it on the relay side. You also need to be sure that the strip on the diode is on the low beam side. You only need to do this on the side where you plugged the low beam output from the car into the relay harness on, which would be the passenger side. This picture (sent to me by one of the TRS tech support guys) should help clarify everything! 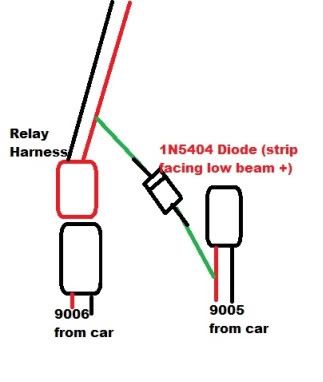 I remember this question from HIDPlanet. I looked into jumping the low beam from the high beam and that is how I had 'quad highs' with filaments(relay really, but same principle). I just wanted to verify that the HID bulbs/ballasts flash during the day with the high beams/Flash-to-pass? Can you confirm these results of diode jumper, Collins? I ask because am working on a new all-in-one PnP harness and almost have the wiring nailed down with some help from Pedro to isolate all the aspects of DRL/Flash-To-Pass/High Beam and Quad High Beams. I don't want the HID bulb/ballasts to be flashing for increased longevity. That's idea of the DRL relocation and this combined halogen high/flash-to-pass harness, but I think the diode jumper is detrimental to this idea. I believe this can be resolved with a small micro/mini relay to prevent the high beam jumper from activating the relay unless the low beams are already on. Therefore preventing the bulbs/ballasts from flashing when using high beam/flash-to-pass during the day. |
|
XJSman89
Administrator
Posts: 6,309
Staff Member
|
Post by XJSman89 on Feb 3, 2012 10:47:09 GMT -6
I think I understand you, I'll try to answer as best I can. When you use the flash to pass feature it will turn on the high beams and trigger the bi-xenon solenoids, yes. The diode keeps the lows on when the highs are triggered or turned on as it should. It doesn't flash the HIDs if the highs are already on, I think. Just the solenoids. I'll confirm this for you tonight. Was that your question?
|
|
|
|
Post by sall on Feb 3, 2012 10:59:59 GMT -6
I think I understand you, I'll try to answer as best I can. When you use the flash to pass feature it will turn on the high beams and trigger the bi-xenon solenoids, yes. The diode keeps the lows on when the highs are triggered or turned on as it should. It doesn't flash the HIDs if the highs are already on, I think. Just the solenoids. I'll confirm this for you tonight. Was that your question? Flip the stalk back for flash-to-pass during the day with low beams off. See if the jumper flashes the HID bulbs/ballasts. Or flip the stalk back and latch for high beams and see if the hid bulbs/ballast come on. I understand the use of the diode to keep the lows on when the highs are on, but it also is also turning the HID bulb/ballast on when the lows are not on. Which would mean flashing HID bulbs/ballasts with flash to pass during the day. This is theory in y head until I go out jump the dual harness I've created to test on before the new pre-made dual harness arrives. |
|
|
|
Post by sall on Feb 3, 2012 12:40:13 GMT -6
Alright, so I took a few minutes and slightly modified my harness with a diode to test. My theory is now confirmed. With the diode jumper between high and lows it flashes the HID bulbs/ballasts for Flash-To-Pass w/o low beams on(AKA day time or dusk haha). Which is not good for the HID bulbs/ballasts as we know. Video demonstrations below. First video no diode. Second video diode jumper between high and low and using Flash-To-Pass. The only way around this I can think of right now is to simply not use the diode between the jumpers and only keep halogen high beam. I'm working on a small relay or other setup to prevent this from happening during the day using Flash-To-Pass. EDIT: Maybe just use the Delay On Timer in-line with diode jumper with a delay set for about 1 sec. Should keep the bulbs/ballasts from flashing when using Flash-To-Pass and only a slight 1 second delay for HIDs to come and shield drop for quad highs when activating high beams. The halogen high will be just warmed up at this time as well and MH1 cut-off shield already dropped. I think that may just work! |
|
RCA1186
Administrator
Rob
Go Pack Go!
Posts: 4,838
Staff Member
|
Post by RCA1186 on Feb 3, 2012 15:26:13 GMT -6
Late but yes, this was a concern of mine as well when I realized that the HIDs do in fact flash during the day time with flash to pass
|
|
|
|
Post by sall on Feb 3, 2012 16:04:39 GMT -6
Late but yes, this was a concern of mine as well when I realized that the HIDs do in fact flash during the day time with flash to pass Not late at all. Good to know I wasn't imaging things. Unfortunately, the time delay didn't seem to work, which is really odd. Tested good on bench. Installed in vehicle had no effect. Removed and tested on bench works. Checked wiring installed on vehicle again no effect. Proverbial Grr. So, I'm going to look into some sort of extra relay to do this. I like 'extra' light at night with quad highs if need them. |
|
|
|
Post by sall on Feb 4, 2012 16:34:55 GMT -6
Got it all working today after trying a few things on the bench yesterday. It only took a micro relay to accomplish. Turns out the T-Tap I was using for ground on my test harness wasn't making a connection through the insulation and producing bad results. I have a wire harness diagram drawn up for HID/DRL/Flash-To-Pass/Quad High Beam. I will post it in a new thread with video, though the only addition to the video below would be the DRL relocation to the high beam. I will Get some other pictures of installation once the bi-xenon harness arrives so I can slightly modify it with the micro relay to get the desired results. You can listen to ESPN(yes, TV in my garage haha), relays clocking and the door chimes until youtube catches up and dubs the video over with the music I selected. |
|
|
|
Post by bravadaurora on Feb 4, 2012 21:43:52 GMT -6
XJSman89 Did you install the relay kit? I am having tons of trouble, I have a lot of connectors with no place to connect, it is like I have 1 extra on each side. No sure what to do. If you get some time please PM me & I'll give you my cell. =/ thanks ....fun times
|
|
|
|
Post by sall on Feb 4, 2012 21:46:45 GMT -6
XJSman89 Did you install the relay kit? I am having tons of trouble, I have a lot of connectors with no place to connect, it is like I have 1 extra on each side. No sure what to do. If you get some time please PM me & I'll give you my cell. =/ thanks ....fun times 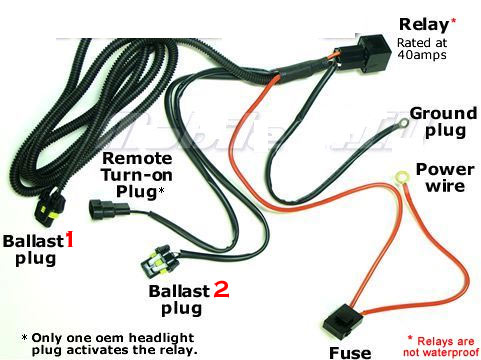 If that does not work post what your harness looks like or a link to your purchase. |
|
|
|
Post by bravadaurora on Feb 4, 2012 23:11:15 GMT -6
ok, i got them both working but i guess you are supposed to have 2 connections that are not plugged in when you use the relay harness so I just covered them with elec tape. I think i am all set
|
|
|
|
Post by bravadaurora on Feb 5, 2012 11:41:59 GMT -6
finished! but now my interior lights won't come on when I open the door, only when I flip the switch to "on". They look awesome =) I got the Morimoto's from The Retrofit Source 6000k. Also not a good idea to do this project late at night, I finished a little after midnight.. I also have 2 silver metal clips that I can't figure out where they came from =/   |
|
|
|
Post by sall on Feb 5, 2012 13:07:14 GMT -6
Looks good! I opened a new thread for the relay harness. Here is the link |
|
|
|
Post by robaurora01 on Feb 6, 2012 17:53:09 GMT -6
those two metal clips go in your headlight on the inner side im guessing.
as for your interior lights thats odd and never happened to mine
|
|
 Forum")


 . I think I would try to attempt this possibly. It looks like alot but it's custom forsure!