|
|
Post by sall on Feb 18, 2012 17:13:42 GMT -6
The regular halogen high comes on with the projector when you use the high beams right? I was thinking I wonder if its possible to wire the amber parking lights into the DRL's kind of like how the trans am has them Yep, sure can! Can relocate DRL to any forward facing bulb you'd like. |
|
RCA1186
Administrator  Rob
Go Pack Go!
Rob
Go Pack Go!
Posts: 4,838 
Staff Member
|
Post by RCA1186 on Feb 18, 2012 17:57:50 GMT -6
The regular halogen high comes on with the projector when you use the high beams right? I was thinking I wonder if its possible to wire the amber parking lights into the DRL's kind of like how the trans am has them Yep, sure can! Can relocate DRL to any forward facing bulb you'd like. Sall, how do you do it haha, I wouldn't be opposed to it even without the projectors. The only thing is, you think the turn signal would still work ok? |
|
|
|
Post by sall on Feb 18, 2012 18:20:55 GMT -6
Sall, how do you do it haha, I wouldn't be opposed to it even without the projectors. The only thing is, you think the turn signal would still work ok? You would tap the DRL output into the Park Lamp Circuit. Pretty much in the same manner as jumping high to low beam. This would make the DRL on the 'dim' filament. Turn signals would operate as normal on 'bright' filament. It would look the same as turn signals at night... except in the day haha. You can always make it so when DRL is on and turn signal is requested DRL it shuts off completely until stalk is released or turn complete. If you read a few posts up I made a wiring diagram of my current setup and how it operates. It started with the flash-to-pass issue and resulted with the all-in-one harness haha. |
|
|
|
Post by wireless on Mar 4, 2012 19:28:45 GMT -6
Just FYI guys - I'm ordering what I need for the retrofit tomorrow morning! Things I need: Morimoto Mini H1 projectors from The Retrofit Source (Likely going to get the "Value" projectors, which aren't as cosmetically perfect, however the output etc is fine.) Mini Gatling Gun shrouds Morimoto 3five 5000K bulbs (All of this from TRS) Other things I need to buy: A dremel tool (I'm open to recommendations!... so far I'm looking at this one: www.harborfreight.com/professional-4-speed-rotary-tool-kit-40457.html)the graphite lube some sandpaper the diode, however I'm likely going to use the same Harness that sall created. some wire taps and some of the glue I need to reseal the headlights. I'm honestly very excited to get started with this. The "Value" projectors are a very good price (They told me half the price of the regulars) at $60 including shrouds (However, I may buy new shrouds) The bulbs will be $40 and I'm going to get 2 day shipping so I can get started! I've already got the ballast. So the total price (including dremel, and assuming $20 in other misc items) will be less than $200. It's my first retrofit, which is why I'm going with the Value Morimotos. I'd still like to know if there's any way to fit a D2S in there.. I don't know if I'll like the experience, etc, but if I do, and they come out good, I'll gladly start making & selling them on here for you guys. Anyways, I'm hoping to have this done by Friday. Very excited. |
|
|
|
Post by sall on Mar 4, 2012 20:41:04 GMT -6
Do NOT use silicone or glue to reseal. Buy 3M Window Weld at auto store. There is a reason no OEM seals with silicone. If you sign up on HIDP shipping is free too BTW. The Mini D2S has very bad ratings and not many are happy with output. They also have a 3 inch lens which isn't going to fit in the housing.
I've thought about buying some extra sets of value projectors just to have them but no reason really. You can probably get Matt to sell you some new Mini h1 lenses for $10 and then they will be perfect.
Don't hesitate to ask questions if you need! You've got my contact info!
|
|
|
|
Post by wireless on Mar 4, 2012 21:11:37 GMT -6
|
|
|
|
Post by sall on Mar 4, 2012 21:16:34 GMT -6
|
|
|
|
Post by nelson480 on Mar 5, 2012 0:25:39 GMT -6
The regular halogen high comes on with the projector when you use the high beams right? I was thinking I wonder if its possible to wire the amber parking lights into the DRL's kind of like how the trans am has them Yep, sure can! Can relocate DRL to any forward facing bulb you'd like. More like an intriuge would have them..lol |
|
RCA1186
Administrator
Rob
Go Pack Go!
Posts: 4,838
Staff Member
|
Post by RCA1186 on Mar 5, 2012 2:07:26 GMT -6
Hmm dan, that's.....intriguing  |
|
|
|
Post by wireless on Mar 5, 2012 9:53:14 GMT -6
Just ordered everything for my retrofit! Also, for anyone that's curious, TRS now has this neat device called a "High Beam Splitter"  www.theretrofitsource.com/product_info.php?products_id=9717#techspecs www.theretrofitsource.com/product_info.php?products_id=9717#techspecsThis device has a 9005 input from your High Beams, and connects to both the solenoid on the projector for the Bi-Xenon & the high beam, eliminating the need for that diode (At least that's what I'm told. Let's hope that's how it works out!) Anyways - I ordered a pair of the "value" Morimoto Mini H1 projectors with 2 day shipping, some Morimoto 3five 5000k bulbs, and the splitter. With 2-day shipping, I'm going to be saving a lot of money I think. It's a lot more affordable than I thought it would be. |
|
|
|
Post by sall on Mar 5, 2012 10:08:45 GMT -6
Yeah those are pretty cool! I couldn't use them though as my high beam is now an H1 bulb and not 9005. Those will save you same wiring hassle though! Exactly! Shop around. Email Matt. Don't just pull trigger and waste your money! Oooh Quads?!  If you are doing quads you won't be able to use those adapter though unless you hack one of the 9005 connector off and crimp terminals on them... Unless you just got the other pair for the heck of it? haha you keep confusing me on this factor. If doing quads just remember there is VERY minimal space between high beam projector lens and headlamps lens and even less space between bulb holder and vehicle frame. As well as between headlamp mounting bracket and projector bowl. Also, with quads the high beam projector is modded to halogen for the DRL/Flash-To-Pass feature discussed earlier here and the harness thread I created. Although I am contemplating modding it with an SST90 LED. |
|
|
|
Post by wireless on Mar 5, 2012 10:26:01 GMT -6
Did I word it misleadingly? I'm sorry, I only ordered one pair, no quads right now (maybe later if this retrofit goes comfortably)
Yeah, the lack of space is quite noticeable. I need to replace my high beams, but I don't know how I'd even fit it. You should do a write up on your retrofit experience, too, I'd be very interested.
|
|
XJSman89
Administrator
Posts: 6,309
Staff Member
|
Post by XJSman89 on Mar 5, 2012 12:21:38 GMT -6
Nice, Wireless! Add one more retro to the list. If I ever re-do the retro I would use butyl. Take some pictures and we can add them to the sticky. My silicone still needs to be trimmed (I told myself I would do it and then could never find time) and I need to patch it in one tiny spot. I missed it upon sealing and I'm afraid it may get foggy with time. No problems yet!
I'm excited to see how the value projectors work, too. It may be a good alternative. The harness with the diode that I installed works great but the TRS harness will do the same but look much cleaner, I expect. it'll make installation easier on people, too. Good call on getting that.
I haven't been on the forums in a while, have they fixed the need to do the "preinstall" on the solenoid plungers? I haven't had any problems with my solenoids sticking but it would be great to not have to take the product apart before installing it.
I wouldn't go to harbor freight for a dremel if I couldn't help it. I used a dremel multimax to do mine (it was all I had at the time) but I have since bought a dremel 200 and I think it would be better for cutting and sanding the shrouds and such. They should all work the same, I would just be worried about the quality of a HF dremel. That being said, though, I did buy a huge bin of HF dremel tools and they seem to be working just fine. A heck of a lot cheaper, too!
Keep us updated on the retro!
|
|
|
|
Post by sall on Mar 5, 2012 14:02:44 GMT -6
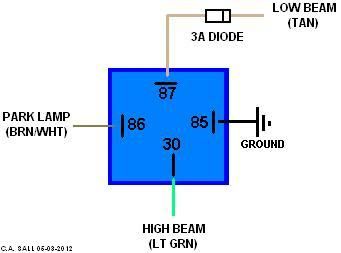
My silicone still needs to be trimmed (I told myself I would do it and then could never find time) and I need to patch it in one tiny spot. I missed it upon sealing and I'm afraid it may get foggy with time. No problems yet! The harness with the diode that I installed works great but the TRS harness will do the same but look much cleaner, I expect. it'll make installation easier on people, too. Good call on getting that. I haven't been on the forums in a while, have they fixed the need to do the "preinstall" on the solenoid plungers? I haven't had any problems with my solenoids sticking but it would be great to not have to take the product apart before installing it.! Yeah that is also an advantage to butyl. It does not squeeze out of the channel either into or outside the headlamp. If I had to use silicone it would definitely be type II as type I off gases when curing. AFAIK they are still using the same solenoid. Personally, I would still do the pre-install steps. It takes 5-10 minutes if that for a peace of mind, you know? The 9005 high beam splitter is just that a splitter. On the current version of the Mini H1 the connector on the cut-off shield solenoid is a 9005/6 male connector instead of the small connector on previous versions. The advantages of using these is they are weatherproof and you don't have to tap into any OEM wiring to fire the solenoids unlike previous versions(if you use the splitter). I actually made mine similar with the wiring harness I installed. With the high beam splitter you still need a diode to keep the lows on when the highs are on. Without the diode the low beam bulbs/ballast will shut off but the cut-off shield solenoid will still fall. As mentioned before the way this write-up says to wire in the diode is okay and it works but is not ideal as it flashes low beam HID bulbs/ballasts during the day if you use flash-to-pass. This is not good for either ballasts or bulbs. I use flash-to-pass frequently. The solution is to wire a relay so the low beam will stay on with high beam but only when the park lamps are on. This just a portion of the All-In-One Harness.Daytime Flash-To-Pass Prevention Relay Diagram: |
|
|
|
Post by wireless on Mar 5, 2012 14:32:32 GMT -6
How many people have done the retro? Im going to feel like im part of a small club, thats part of a small club! Haha. Also, like sall said, the splitter wont eliminate the need for a diode, i forgot to tell the guy that our low beams turn off. Total, for everything (including my current ebay likely crappy ballasts) including(products) the dremel, i will have spent around $170. My total from TRS was $132. I paid $60 for the Value projectors, $40 for the bulbs, and $10 for the splitter, and two day shipping was $22. My silicone still needs to be trimmed (I told myself I would do it and then could never find time) and I need to patch it in one tiny spot. I missed it upon sealing and I'm afraid it may get foggy with time. No problems yet! The harness with the diode that I installed works great but the TRS harness will do the same but look much cleaner, I expect. it'll make installation easier on people, too. Good call on getting that. I haven't been on the forums in a while, have they fixed the need to do the "preinstall" on the solenoid plungers? I haven't had any problems with my solenoids sticking but it would be great to not have to take the product apart before installing it.! Yeah that is also an advantage to butyl. It does not squeeze out of the channel either into or outside the headlamp. If I had to use silicone it would definitely be type II as type I off gases when curing. AFAIK they are still using the same solenoid. Personally, I would still do the pre-install steps. It takes 5-10 minutes if that for a peace of mind, you know? The 9005 high beam splitter is just that a splitter. On the current version of the Mini H1 the connector on the cut-off shield solenoid is a 9005/6 male connector instead of the small connector on previous versions. The advantages of using these is they are weatherproof and you don't have to tap into any OEM wiring to fire the solenoids unlike previous versions(if you use the splitter). I actually made mine similar with the wiring harness I installed. With the high beam splitter you still need a diode to keep the lows on when the highs are on. Without the diode the low beam bulbs/ballast will shut off but the cut-off shield solenoid will still fall. As mentioned before the way this write-up says to wire in the diode is okay and it works but is not ideal as it flashes low beam HID bulbs/ballasts during the day if you use flash-to-pass. This is not good for either ballasts or bulbs. I use flash-to-pass frequently. The solution is to wire a relay so the low beam will stay on with high beam but only when the park lamps are on. This just a portion of the All-In-One Harness.Daytime Flash-To-Pass Prevention Relay Diagram: sall, if I knew as much about electronics as you do I definitely would make my own harness. Not going to lie, I'm not too confident in my ability to do it. As far as making my own relay, I'm not nearly confident enough to do that without any guidance in person lol |
|
|
|
Post by wireless on Mar 5, 2012 15:35:15 GMT -6
Also (sorry for the double post) I'm going to find a decent dremel tonight. The only ones I've ever used are the ones my parents had, and my Dad's is a DeWalt and he said it was quite pricey. I'm looking into this kobalt kit from lowes or maybe dremel 200. My last option, is get the dremel 200, then buy one of the accessory kits from Harbor Freight for the tool, or this kit from Lowes. Sorry for posting all of this, a dremel is something I'm going to be using frequently, so I thought I'd post. I'm only 20 years old, I'm still building up my own tool collection, anyways.. |
|
|
|
Post by sall on Mar 5, 2012 16:28:53 GMT -6
How many people have done the retro? Im going to feel like im part of a small club, thats part of a small club! Haha. Myself, Collins(xjsman), lawdog and RCA(previous Aurora). It's a small club but good company  |
|
RCA1186
Administrator
Rob
Go Pack Go!
Posts: 4,838
Staff Member
|
Post by RCA1186 on Mar 5, 2012 20:14:08 GMT -6
I don't know if I count anymore  lol |
|
|
|
Post by wireless on Mar 5, 2012 20:59:24 GMT -6
I don't know if I count anymore lol why wouldn't you! of course you count, you did the retrofit haha also, just bought my dremel and the kit i posted earlier! Except, I went with the dremel 8200 |
|
XJSman89
Administrator
Posts: 6,309
Staff Member
|
Post by XJSman89 on Mar 5, 2012 21:14:17 GMT -6
You totally count, Rob!
Nice call on the 8200! I was going to go cordless but the 200 was on sale and I couldn't justify the purchase as I'm still in school. You'll love it!
|
|
|
|
Post by wireless on Mar 5, 2012 21:25:56 GMT -6
You totally count, Rob! Nice call on the 8200! I was going to go cordless but the 200 was on sale and I couldn't justify the purchase as I'm still in school. You'll love it! I'm still in school, too. I just have a decent job (got it last Sept, and he offered me full time once I'm done.) so I can afford to do stuff like this! Also, they had the Dremel 200 series for roughly $50, but I figured for the completely variable speed control I have on the 8200, why not? plus, it's cordless.. Hey Collins, I'm hoping this project will take me roughly two days to do.. what part would you say is the most time consuming? That way I have an idea of roughly what to plan around? When I get the projectors, I'm getting a rental car the same day and tearing down my car. Gonna take off the bumper and pull the bumper & headlights inside. I figured the most time consuming part would be testing the alignment of the projector :b |
|
|
|
Post by sall on Mar 5, 2012 22:55:52 GMT -6
I have Dremel 300 series with the drill-press workstation(awesome for drilling PCBs) and a HF special one. Both have been reliable. The cordless is probably reliable as well, but it would always go dead when I needed it the most I figure haha.
Rotational alignment will take you the most time most likely.
|
|
XJSman89
Administrator
Posts: 6,309
Staff Member
|
Post by XJSman89 on Mar 6, 2012 14:47:46 GMT -6
Yeah I hear you on the dremel. I have a pretty good set of tools. My dad is a contractor and gets sweet discounts on everything so I have built up my collection over the past few years. All of my power tools are Dewalt too thanks to the discounts haha, but I haven't found a dremel-type tool of theirs that I like yet. If you have a place for it, though, Home Depot makes a black Husky roller-bearing toolbox that is awesome. Two pieces, top and bottom, for only $140. Totally worth it and a great starting place for building a tool set. I love mine.
Getting the cutoff situated perfectly is probably the longest part. I was a bit of a perfectionist with the shrouds but they shouldn't take as long haha. They will go in quickly enough and can be wired with little difficulty, but you will adjust and re-adjust the rotation of those projectors for a while before its perfect.
A couple thoughts:
- Be sure to adjust the rotation before you put the outside headlight housing back on and seal it. It's a lot easier to do it with the housing off. Also I know it's a lot of steps but it's worth it to completely install and tighten the headlights while testing alignment.
- Be sure they are clean! You won't be able to clean them any more once the headlight is sealed, of course.
- The place you measure the alignment from has GOT to be flat and level, and be 30 feet away from a clean wall. Again, you only get one shot to adjust them before you seal them up for good.
I hope that helped! Good luck with the retro! If you want my cell number for questions just let me know, I'd be happy to help.
|
|
|
|
Post by wireless on Mar 6, 2012 14:56:15 GMT -6
Yeah, my only dilemma is that I don't have anywhere near me to aim the headlights. (Live in an apartment) I'm goin to have to get a very specific parking spot so that I can point it at the walls. It won't be 30ft, but I will be able to drive around w/o the bumper to hopefully get an idea..
I'm going to try to drive to a walmart (nearby) to do the alignment, however I'm not going to enjoy driving 2 miles w/o lenses on, lol. Oh well. I suppose it's got to be done! I can always clean the inside out if anything (bugs) get in it.
I will definitely shoot you a PM for your cell if I think I need anything! I don't think I will, though.
Gonna take it nice and easy, one headlight housing at a time.
|
|
|
|
Post by sall on Mar 6, 2012 15:08:16 GMT -6
If the alignment isn't perfect after final install you can use washers in selective locations(on the headlamp mounting bracket) to fix the issue. Many use this method if off slightly.
|
|
|
|
Post by wireless on Mar 6, 2012 15:55:06 GMT -6
Are you talking about the same washers that you can use (eg, 4 on top right, 2 bottom left, and one on the other two) to adjust your cutoff to get more color, etc?
I was reading about that on HIDPlanet, that adjusting those can get you more color in the cutoff.
|
|
|
|
Post by sall on Mar 7, 2012 10:58:06 GMT -6
Yes you can mod washers for a bluer and a straighter cut-off. JVX and makes custom shields. Some for fogs but the coolest one is called the prism and literally gives you a full spectrum of light in the cutoff. I'm just talking about using washers as shims(on headlamp mounting brackets) to sure up rotation if it's off a bit.
|
|
|
|
Post by wireless on Mar 7, 2012 12:23:21 GMT -6
Okay! Well, it's currently raining, and I don't feel like getting drenched just to pull my bumper off. I'm hoping the rain will settle down and I can go outside and pull it off (or at least get it started). It's supposed to rain for the next 4-5 days. I just bought some of the 3M Windo-Weld Ribbon Sealer that was recommended. I'm also rigging up a computer power supply to run the ballasts externally from the car. |
|
|
|
Post by wireless on Mar 8, 2012 0:50:14 GMT -6
Got one headlight done & resealed!
The other, however, is a perma seal.. and I'm in the slow, awful process of using the dremel to get it open. I need a new housing, anyways..
However, the one I do have, looks good! lol
|
|
XJSman89
Administrator
Posts: 6,309
Staff Member
|
Post by XJSman89 on Mar 8, 2012 1:03:10 GMT -6
Awesome, man! I'm glad you got it done. I'm also glad that I didn't have to deal with a permasealed headlight when I did it haha.
|
|
 Forum")


 If you are doing quads you won't be able to use those adapter though unless you hack one of the 9005 connector off and crimp terminals on them...